02/10 DIY / Seasonal/Holiday

3 Creative Ways to Give Flowers

3 Creative Ways to Give Flowers

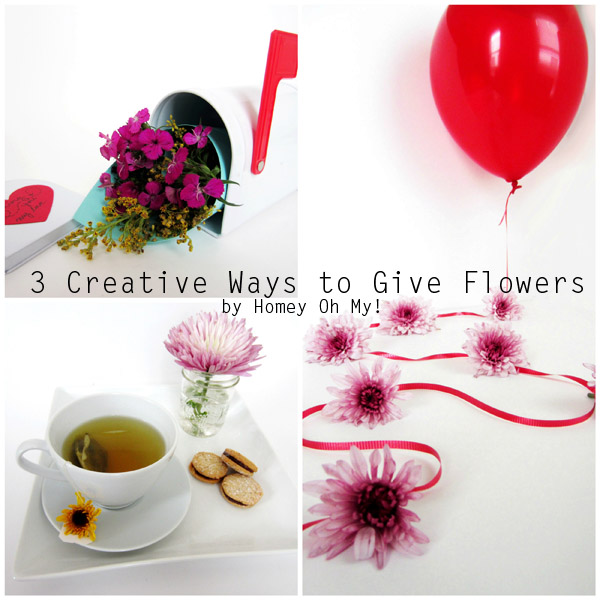
With Valentine’s Day around the corner, I thought I would share some different and unique ways to give flowers.  It isn’t always about having the biggest, trendiest, most professionally designed arrangement, and I hope to prove to you that a little creativity can go a very long way.

Case in point, I used this bouquet of grocery store flowers.

Flower bouquet

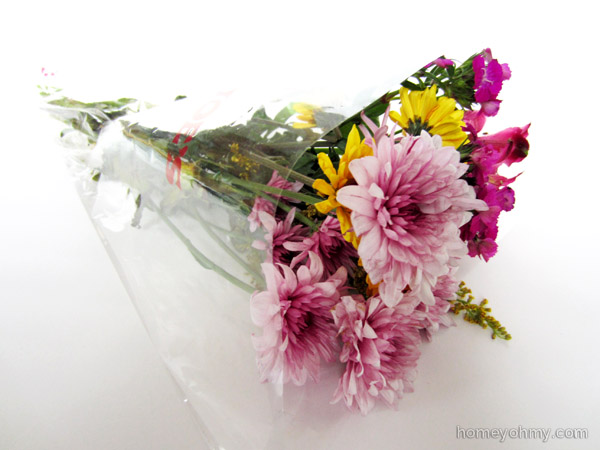
“Grocery store flowers” has a connotation of being generic and boring, but it all depends on what you do with them and how they’re displayed.

Flowers in a mini mailbox

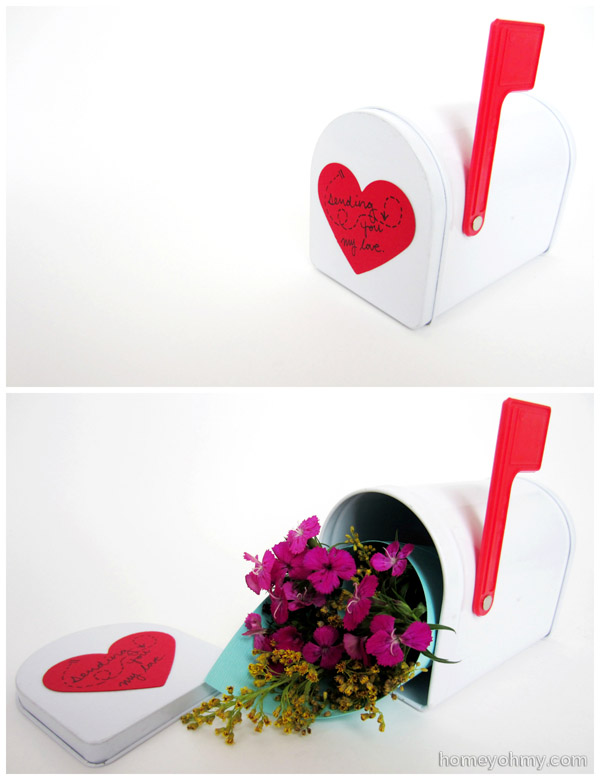
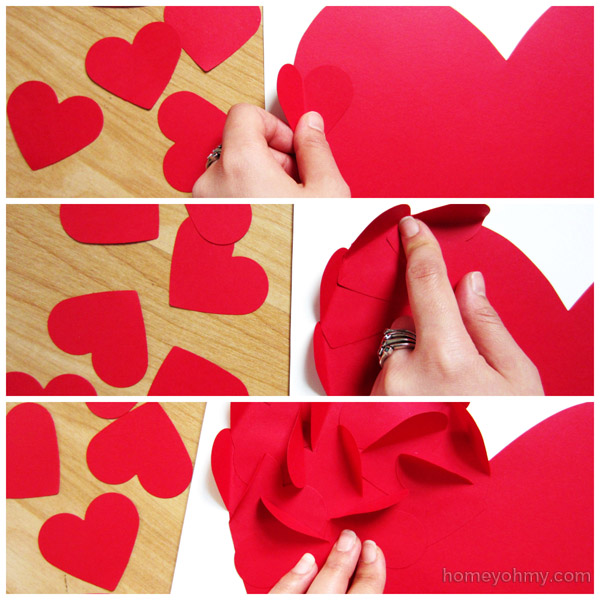
1) Display them in an interesting container– How adorable is this mini mailbox???  I came across it in the Target dollar spot section (goldmine).  I cut out a heart from red card stock and wrote “Sending you my love” to keep consistent with the mail theme, then taped it on the front cover.  I cut down and wrapped a couple of the flowers from the bouquet in blue paper and stuck them inside.
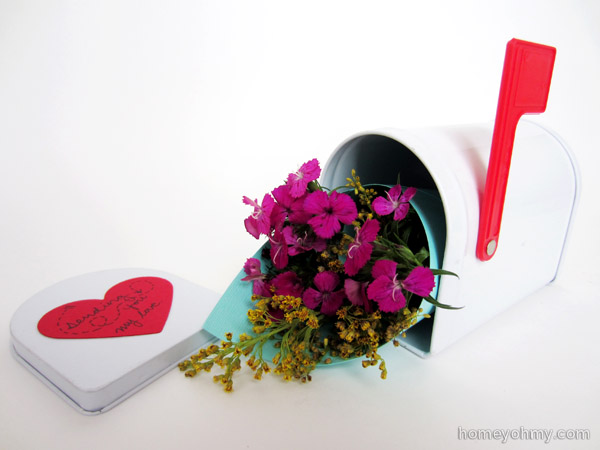
Mini mail box with flowers

So.  Cute.

Flower Tied to Teabag

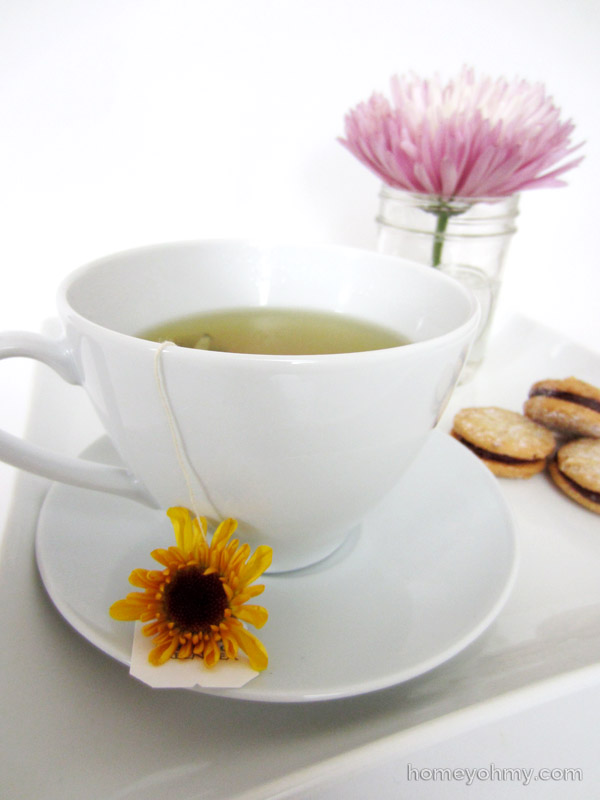
2) Arrange them around food–  This idea was inspired by my boyfriend.  Sometimes, during the frequent late nights I spend working on my blog, he’ll bring me a cup of tea.  It always makes me smile.  It’s the little things that get me, and tying this little flower to the teabag string would be such a special touch.

Tea and Cookies with flowers

In case you were wondering, I did in fact eat the cookies and drink the tea after photographing.  I really enjoyed having the little flower dangle off the side of the cup.  Oddly more than I thought I would.  Seriously, the little things.

Balloon Flower Garland

3) Create a garland– How often do you get balloons?  For me, it’s rarely, if ever, and I think tying flower heads to the string of a balloon packs a wow-factor punch.  This probably wouldn’t travel well, but would definitely look great wrapped around something in the home to surprise your SO.  Or, just what’s in the photo above would be great to come home to as well :).  Attach a card, display it around a gift, lots of possibilities.

All the flowers I used were from that one grocery store bouquet.  We’ve seen now that they can be so much more special outside of the plastic wrapping, right?  I did have some leftovers that were broken off and shared how I arranged them on Instagram.

I wonder, do you ever give flowers to the men in your life?  I don’t think I’ve ever given flowers to anyone other than my gal pals.  All the ideas I shared would be something I’d do for them, or would love to have given to me ;).

02/06 DIY

Gold Painted Geo Planters

Gold painted geo planters

I’m still riding the succulent train, guys.  As long as they keep dying, I’ll keep replacing them <3.

The idea for this project began when I was about $5 short from reaching the minimum purchase total for free shipping at Urban Outfitters online.  Quite the dilemma, I know.  I was sure I’d find something in the home sales that would help me out and came across this geo bowl and cup. 

Geo bowl and cup

All I could see was how perfect they’d be for planting succulents.  Sometimes you just know these things and can’t fight it!  Of course I had to add some customary gold flair.

Applying and cleaning Rub n Buff

I applied Gold Leaf Rub ‘n Buff (affiliate link) with my finger, and while it was difficult to create clean edges, I love how I was able to remove mistakes with a q-tip dipped in acetone.  Very easy and convenient (two of my favorite words).  I applied two layers, waiting about an hour for drying in between.

Painted geo planters

I’d say the color is more brass than gold, which is still a metallic, so I dig it.

Geo planters with rocks

The metallic filler on top was an afterthought, which I conveniently had on hand.  I imagined the bowl would have several succulents planted in it but after plopping in this one, I thought it  would look best on its own.  What do you think?

DIY gold geo planters

Here’s to hoping they survive!  I actually have a mini succulent garden that has been thriving most excellently, which I’m very proud of considering the many other losses, and I think I might have figured something out…  Every plant I’ve put in front of our East facing window has grown so good.  Could that be the secret???  Or is it just a coincidence…  Either way, my boyfriend banned me from watering our plants and he has taken over that responsibility.  That might also be the secret.

02/03 DIY

Custom Magazine Holder

Customized IKEA Kasset magazine holder

I’ve been working on updating my work-space, hence the recent organization and storage related projects.  Besides that, I’m a fan of organization, judging by how the Container Store makes me squeal and shown by how I’ve already put up multiple tutorials related to boxes (I love boxes).

What I love even more is keeping it all affordable.  No one out there doesn’t like spending less, right?  So instead of shelling out for a designer magazine file, I went with a blank slate  and decorated it myself.  *Cue IKEA entrance doors opening with beam of light shining through*

I got the IKEA Kassett magazine file pack in white.  I only wish the hardware came in gold, but that’s okay.  We can do something about that.

IKEA Kasset magazine holder taped and foiled

I applied painters tape around the hardware, including along the inside edges at the opening, then covered all the white surfaces with aluminum foil.  This is a bit of a pain, can’t lie about it, but if it’s gold you want, it’s tape you must do.

After spray painting the hardware with Rustoleum gold spray paint (affiliate link), I tackled the studs on the back.

Painting studs gold

I initially wasn’t going to paint them because taping around them would be more trouble than I thought it was worth, but then I realized they were the size of a regular hole puncher.  So I punched a hole in a piece of paper and used it to spray paint each stud one by one.  It didn’t create the cleanest paint job, but I’m still pretty proud of that move!

Removing the tape was a slow and careful process since I didn’t want to risk ripping the magazine file surface, but I made sure to peel the tape back as horizontal to the surface as possible and all turned out well.

Next, I drew on the design with a Sharpie.

Drawing lines

A major benefit of these squiggly lines is that they don’t require any type of precision, so they’re hard to mess up.  They’re also pretty fun to draw, and the process is oddly soothing.

Finally, I spray painted the remaining silver hardware, which thankfully came separately from the magazine file.

Gold hardware

I sprayed all sides and after they dried completely, I secured them on the magazine file corners.

Back angle of magazine holder

All done!  It’ll be storing my BHG magazines, which by the way, I have no idea how I got the subscription and I’m sure I’m not paying for them.  Not complaining.

Custom IKEA box and magazine holder

Oh yeah, I also got a Kassett box pack.  Told you I love boxes!  The label plate conveniently came separately, but everything else I had to tape and spray paint the same way I did with the magazine holder.  Hopefully I’ll show them displayed once I’m done updating my desk area ;).

I’m pretty sure I’ll renew my BHG sub whenever this one’s over, but other than that I’ve never really subscribed to any magazines.  This makes me wonder… Do you have any magazine subscriptions?  Or has the internet made them obsolete?  Maybe you could recommend a magazine I might enjoy checking out!


01/30 DIY / Seasonal/Holiday

DIY Valentine’s Day Cards

DIY Valentines Day Cards

I make my Valentine a card every year for Valentine’s Day.  It’s been the same guy for about 5 years now (awww).  While I can easily admit this design is very feminine and more-so something that I myself would want to receive, the idea is that a handmade touch makes anything more special ;).  This could also simply be like a print to hang up!  Considering I don’t have three Valentines this year, that’s most likely what I’ll do with the other two.

This is so super easy and not even entirely DIY.  It’s more DIY embellishing on some already cute cards.

Cards

These cards caught my eye around last Christmas because there were big clearance tags on the entire collection.  It was something major like 70% off.  I thought this particular pack of designs was cute and they weren’t specific to any occasion, so why not?  And into hiding they went until now.

Cutting and gluing hearts

I used a small heart lever punch to cut out hearts in different colored card stock.  The lever punches were recently on sale at Michaels for 50% off and I took advantage.  Can you tell that I love me some sales?

I dipped a Q-tip in Mod Podge and lightly dabbed the back of each heart before sticking them on the card.  I learned after the first heart I glued on that a foam brush applies way too much and it will seep out the edges.

Fun, simple, cute, done.

DIY Heart Cards

I GOTTA know which one is your favorite.  Please indulge me with your thoughts.  I will say, I thought the mirrored gold hearts would be my favorite, but the red hearts look so good against the black dots.  And then I’m loving the mint hearts, especially paired with the red ones!  Those two would look great displayed together.

What’s your vote?

01/27 DIY

Decorating a Planner Cover

Planner cover decorating

I’m very particular about what I want in a planner and though it’s all very simple, this is the first time I have ever come across one that covered everything on my list.  There was only one issue, or for a DIY’er, it’s the funnest part- the cover was blank.

Sugarpaper LA Planner

I’ve checked out the Sugar Paper LA line at Target a few times before, but I didn’t come across this particular  planner until a recent trip.  The blank cover is unfortunately very boring, but an easy fix.  I took inspiration from the rest of the Sugar Paper designs and set out to decorate the cover myself.

Of course I went with gold.

I started by typing “2014” in a Word document using the font Engravers MT.  After printing it out and cutting it down, I taped it to a piece of gold adhesive vinyl (affiliate link) with painters tape.

2014 numbers

I cut out the numbers with an X-acto knife, then peeled off the vinyl to stick onto the planner. Right about now I’m screaming at myself to get a Silhouette already.

For the polka dots, I used a regular hole puncher to punch out holes in the gold vinyl.

Gold vinyl polka dots

I very roughly planned out where I was going to put the polka dots and used a ruler to help stick on the dots equidistantly.

Polka dot planner

Simple and gold, just how I like it.  I also like how it’s fairly consistent with the inside, which I guess I should probably show you since I’ve talked so much about it.

Planner month

See the polka dots?  Always a sucker for those.  First off, this planner is the size of a regular notebook, which I prefer the larger space to write on.  Second, there are tabs for each month- major plus!  And for the months, the weeks start on Sunday, NOT Monday.  I’ve seen too many planners that start on Monday and I will never, ever get used to it.  Tell me I’m not alone on this!

Week in planner

This is the most critical part of a planner for me.  The weekly pages come right after each month.  Yes!  I feel like this is harder to find than it should be.  I need to have everything for the month all in the same tab.  And this Notes page that comes after each week is killer.   The large space is perfect for how I often need to jot down random things, ideas, or lists.  Perfect.

All these features, in addition to a simple, no frills design, makes this planner my favorite ever.

What do you think?  What are your must have features in a planner?

01/23 DIY / Seasonal/Holiday

DIY Heart Wall Art

DIY Heart Art

I don’t think I’ve said this before, but I’ll say it now.  I like hearts.  Phew!  Glad we got that out of the way.

Oh yeah, so Valentine’s day is coming up soon.  I don’t typically decorate for this holiday, so I wanted to create something that could still stick around after the holiday is over.  You might be thinking I probably could have gone with something more subtle than a big red heart, but I really think it can be a chic decorative piece because of how it’s both bold and simple.

I kept to the traditional red heart and made things a bit interesting by composing the heart out of smaller hearts.  I’m about to show you how!

I traced the 12×12 insert from the shadow box frame onto some poster board.  I then took that insert and cut it into a heart, using the standard method of folding it in half and drawing half a heart to cut a along the lines of.  I traced this heart onto red card stock to cut, then glued the red heart with Mod Podge onto the previously cut poster board.  I ended up with this:

Red heart

Next, I used a heart lever punch to cut out a bunch of smaller red hearts.  I went with a lever punch simply because of ease and would highly recommend using one to save yourself from the inevitable hand cramps that would result from cutting out each heart individually.  I folded up about 1/3 of each heart before gluing them on with Mod Podge.

Gluing on hearts

I folded up either the right or the left side of the  hearts since I only wanted the curved edges to be sticking out.  There’s only one heart where I folded up the top third of it.  I wonder if you can find it…

Heart Art

I’m loving the interesting texture created by the folded up heart edges.  And I’m also REALLY loving with how well this layers with the black and white art in the back.  Shout out to the great outdoors for providing the stick in the vase.

What do you think?  Is this strictly Valentine’s day decor or could you see it continuing to sit pretty somewhere in the home?