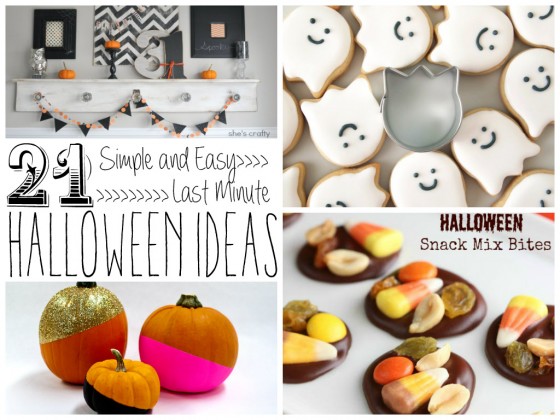
Today’s post is an exciting one! There are so many Halloween ideas from other bloggers that I absolutely love and I just had to share them with you all. I’ve gathered up 21 simple and easy last minute Halloween projects that will inspire you for that party you’re about to throw, the treat you’d like to make, or the decor to make your home more festive for the holiday.
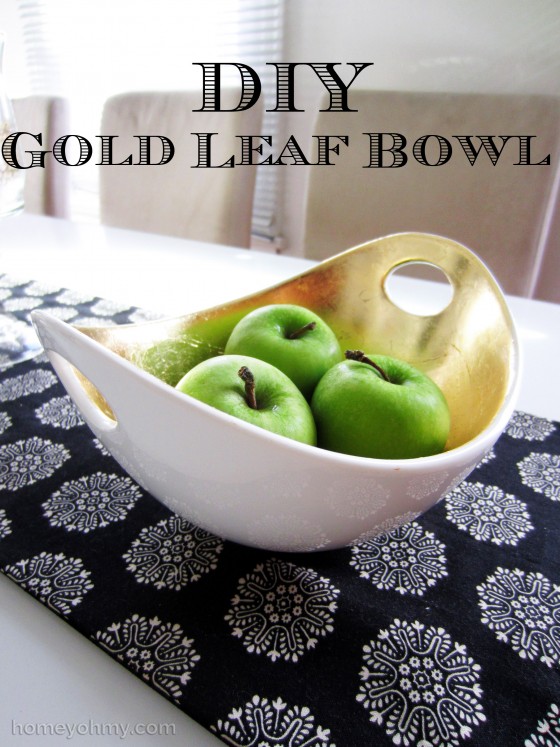
My obsession with gold is something I openly share, and I’m shocked that it has taken me so long to finally try out gilding. And let me tell you guys… I’m HOOKED. I want to gild everything now. While it’s more time consuming and labor intensive than something like spray painting, the results are absolutely worth it.
I found this white ceramic serving bowl at Marshall’s (I share these finds and treasure hunts on Instagram. I’d love for you to follow me if you aren’t already!).
The interesting shape and handles caught my eye. At the time I didn’t know I’d be gilding it, but it hit me later that this would look awesome with gold leaf on the inside.
What you’ll need is gold leaf, adhesive, and sealer.
I got my gold leaf kit here (affiliate link). This comes with all three items, including a good amount of gold leaf sheets. There are instructions to help guide you through the gilding process, which I followed exactly.
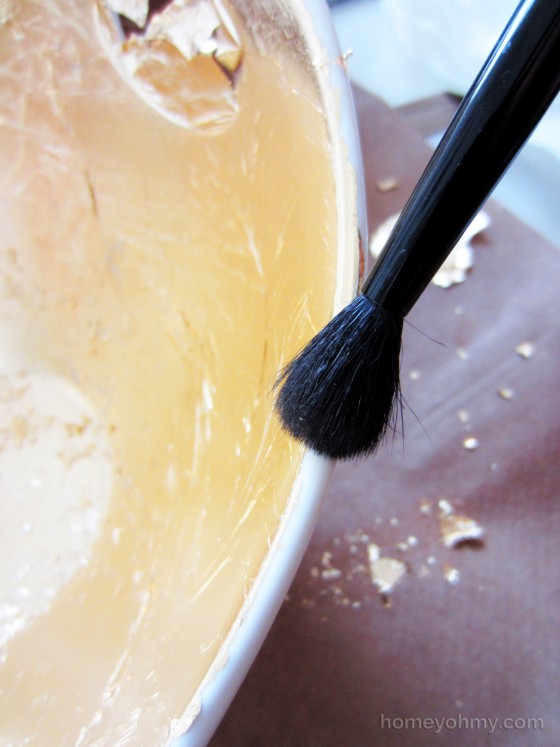
First, apply a thin layer of adhesive with a paint brush to your surface, making sure the adhesive doesn’t pool up anywhere. I waited 30 minutes for the adhesive to set before applying the gold leaf. Because the gold leaf sheets are very thin and my surface was oddly shaped, I had a lot of trouble with the gold leaf ripping and bunching up, so take your time and be gentle!
Once you’ve applied and smoothed out the gold leaf, use a soft bristle brush to brush away the excess. I used an old eye shadow brush I had and brushed along the edges of the bowl and anywhere the gold leaf sheets overlapped.
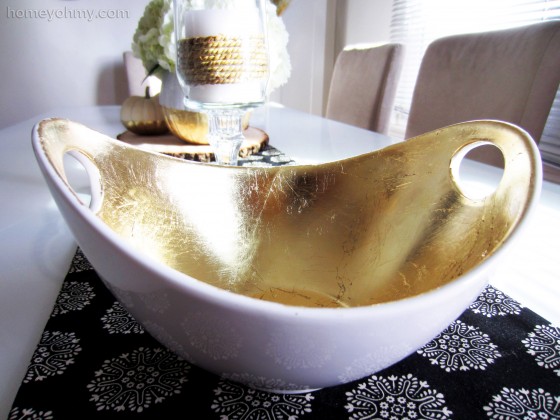
The sealer is optional, but I applied it since I anticipate this bowl will be handled a lot and I wanted the extra protection. If you’re gilding a surface that won’t be touched, then you can skip the sealer if you’d like.
That’s all there is to it!
The gold leaf edges are a bit jagged, and the leaf wasn’t applied as smoothly as I had expected, but I actually really like that about it. It’s more of an antiqued look while still having the beautiful shine of gold chrome. I’m in love!
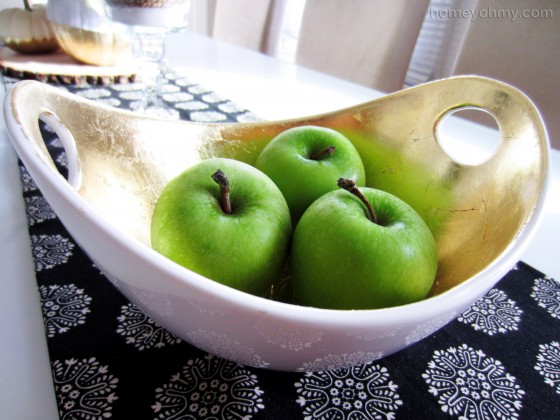
I stored some granny smith apples in the bowl and think this could make a beautiful display for Thanksgiving or just fall in general. It should be noted that the gold leaf surface is not food safe and shouldn’t be used for serving food, but would be more ideal for holding more decorative items like gourds, pine cones, or other types of fillers.
What do you think of my gilded bowl? What would you place inside of it? Leave a comment to let me know!
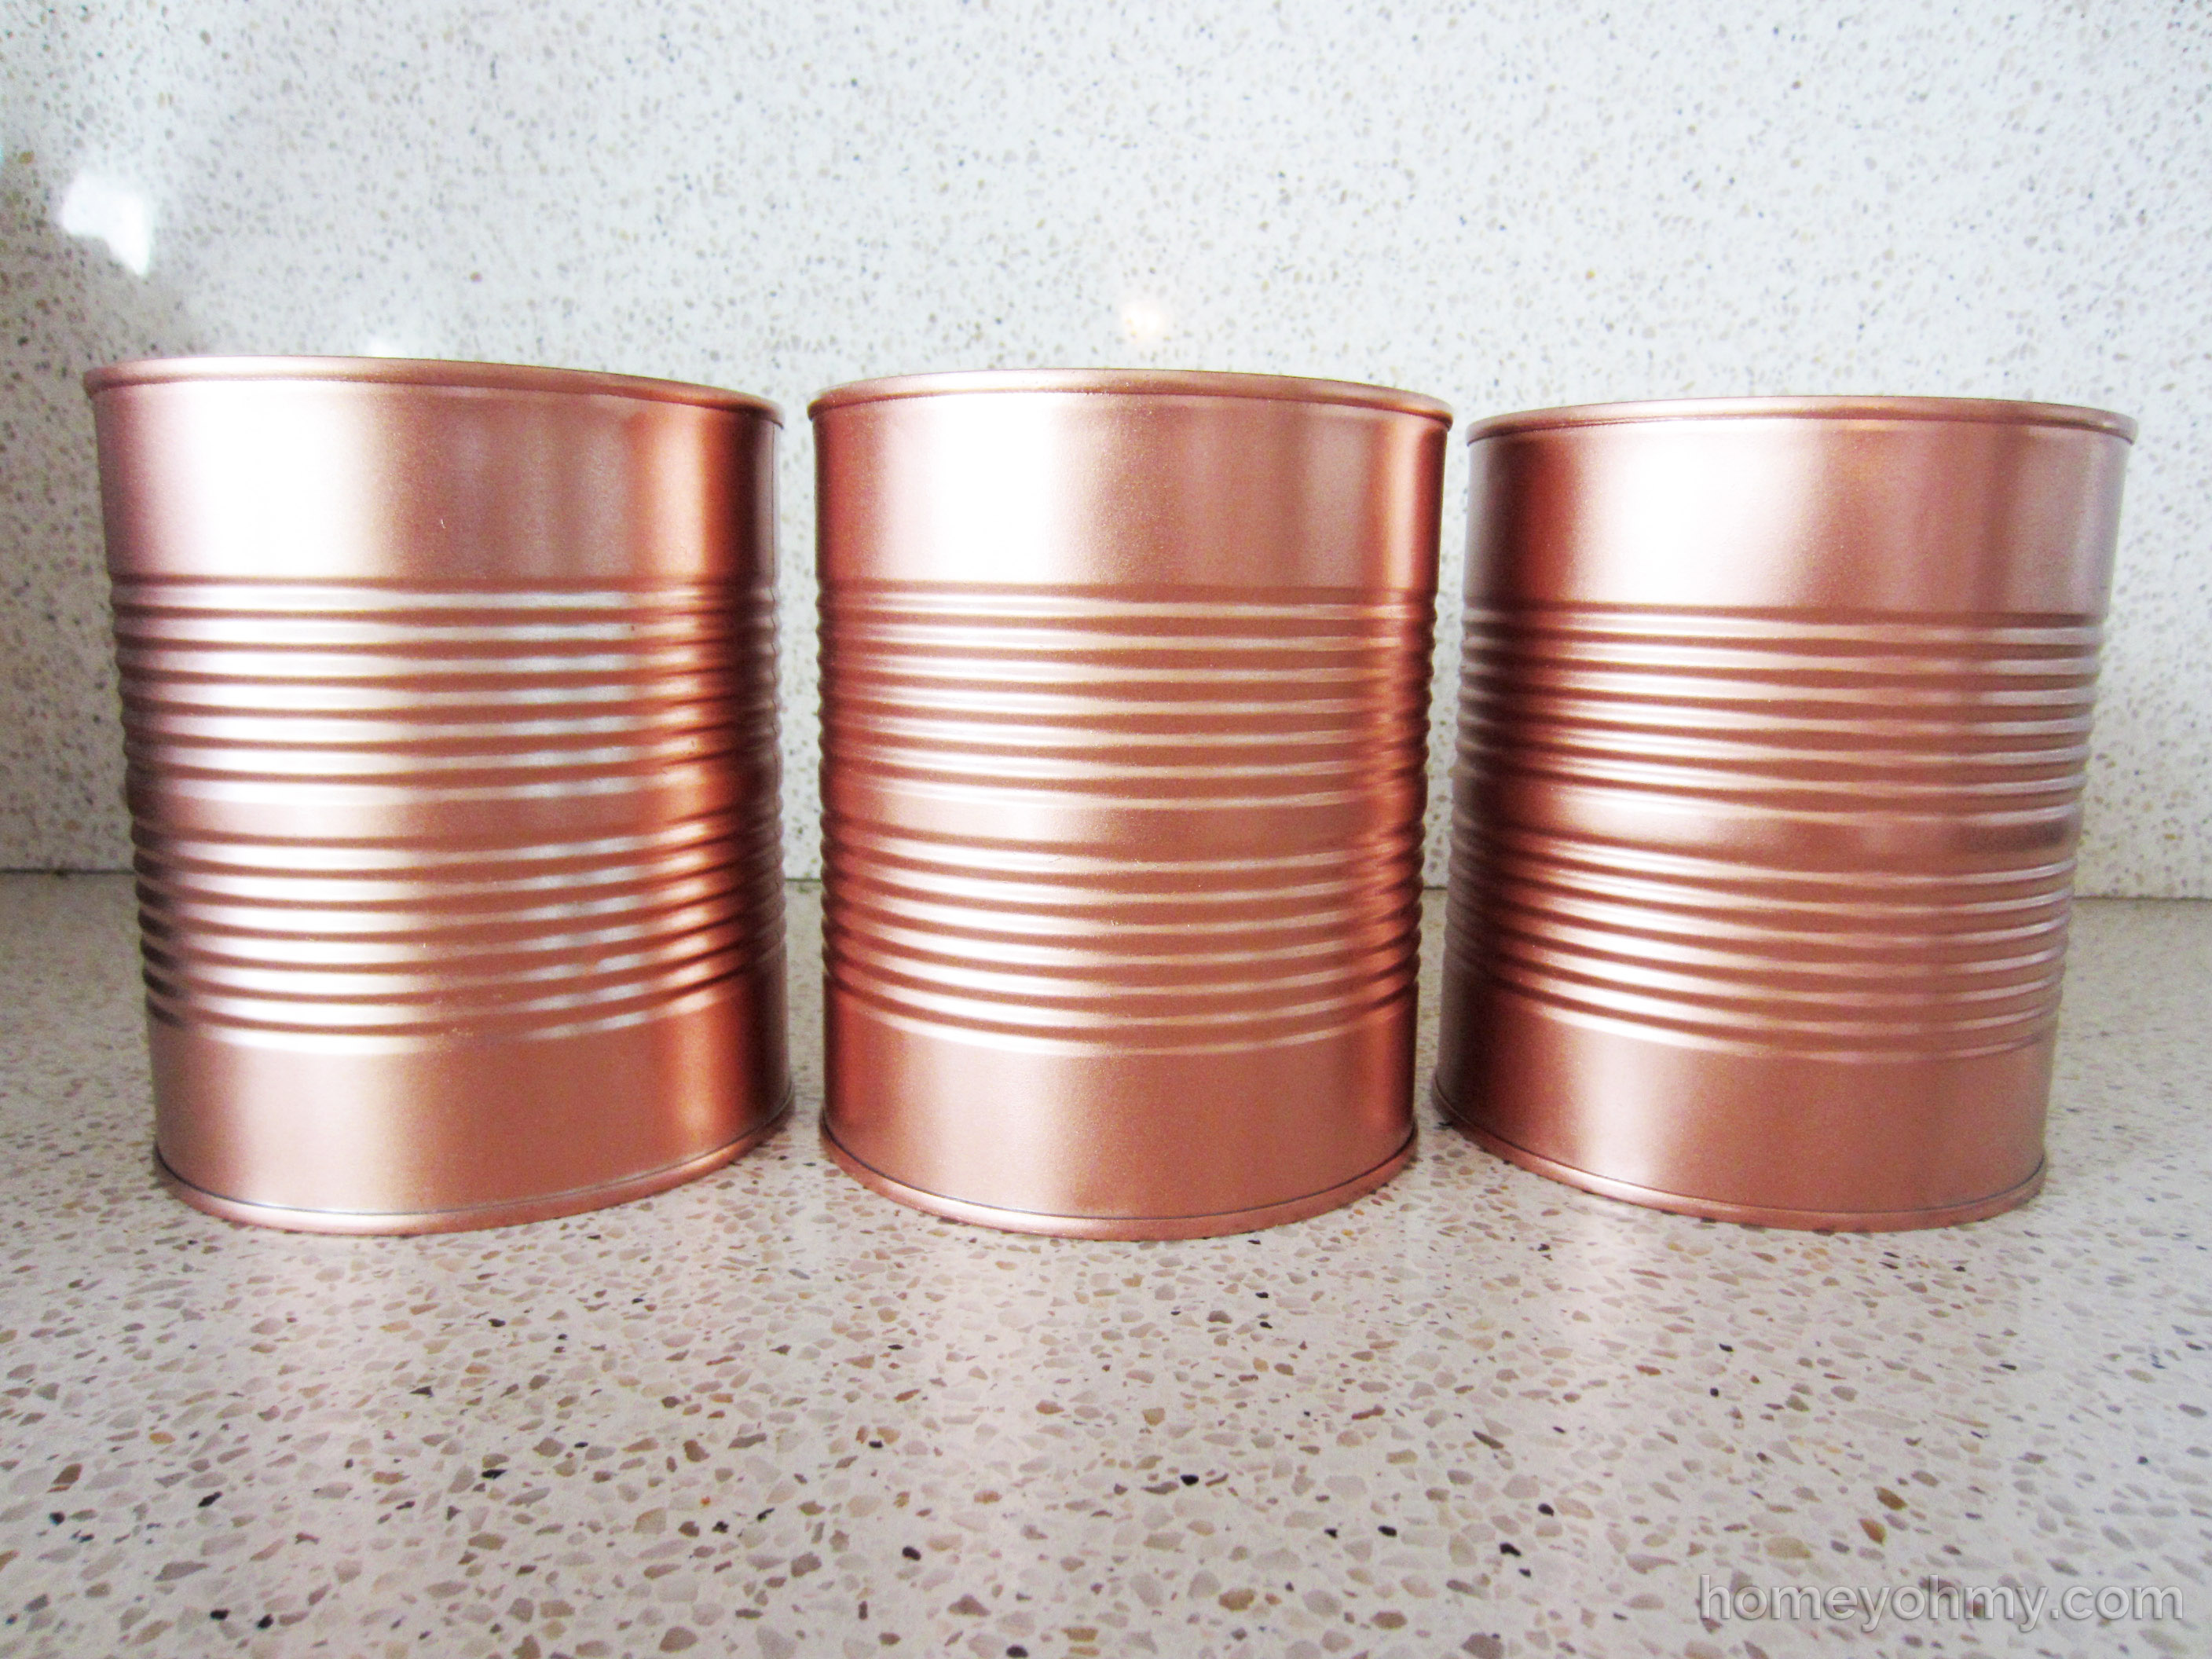
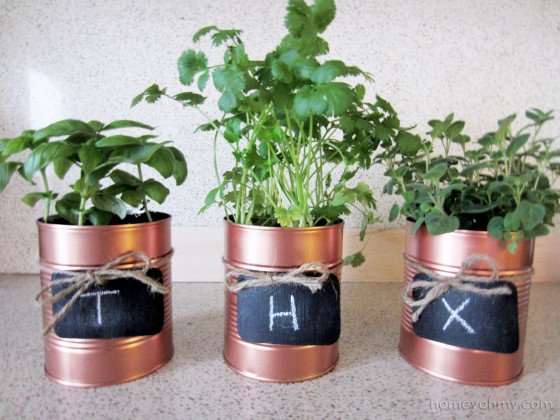
How gorgeous is this copper color??? I didn’t think it was possible… but I may have found another spray paint that I like just as much as my favorite gold spray paint…
Here it is.
Rustoleum Metallic Spray Paint in Copper. I got mine here (affiliate link). Don’t let the weird orange-y looking cap fool you. This paint has the same beautiful sheen as the gold one that I love so much. I wouldn’t say it’s a chrome finish, but it’s more of a brushed metal look.
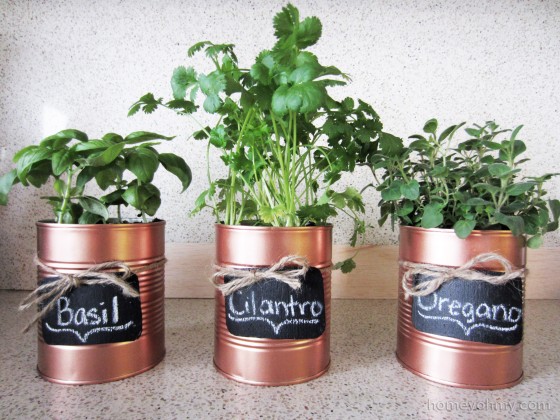
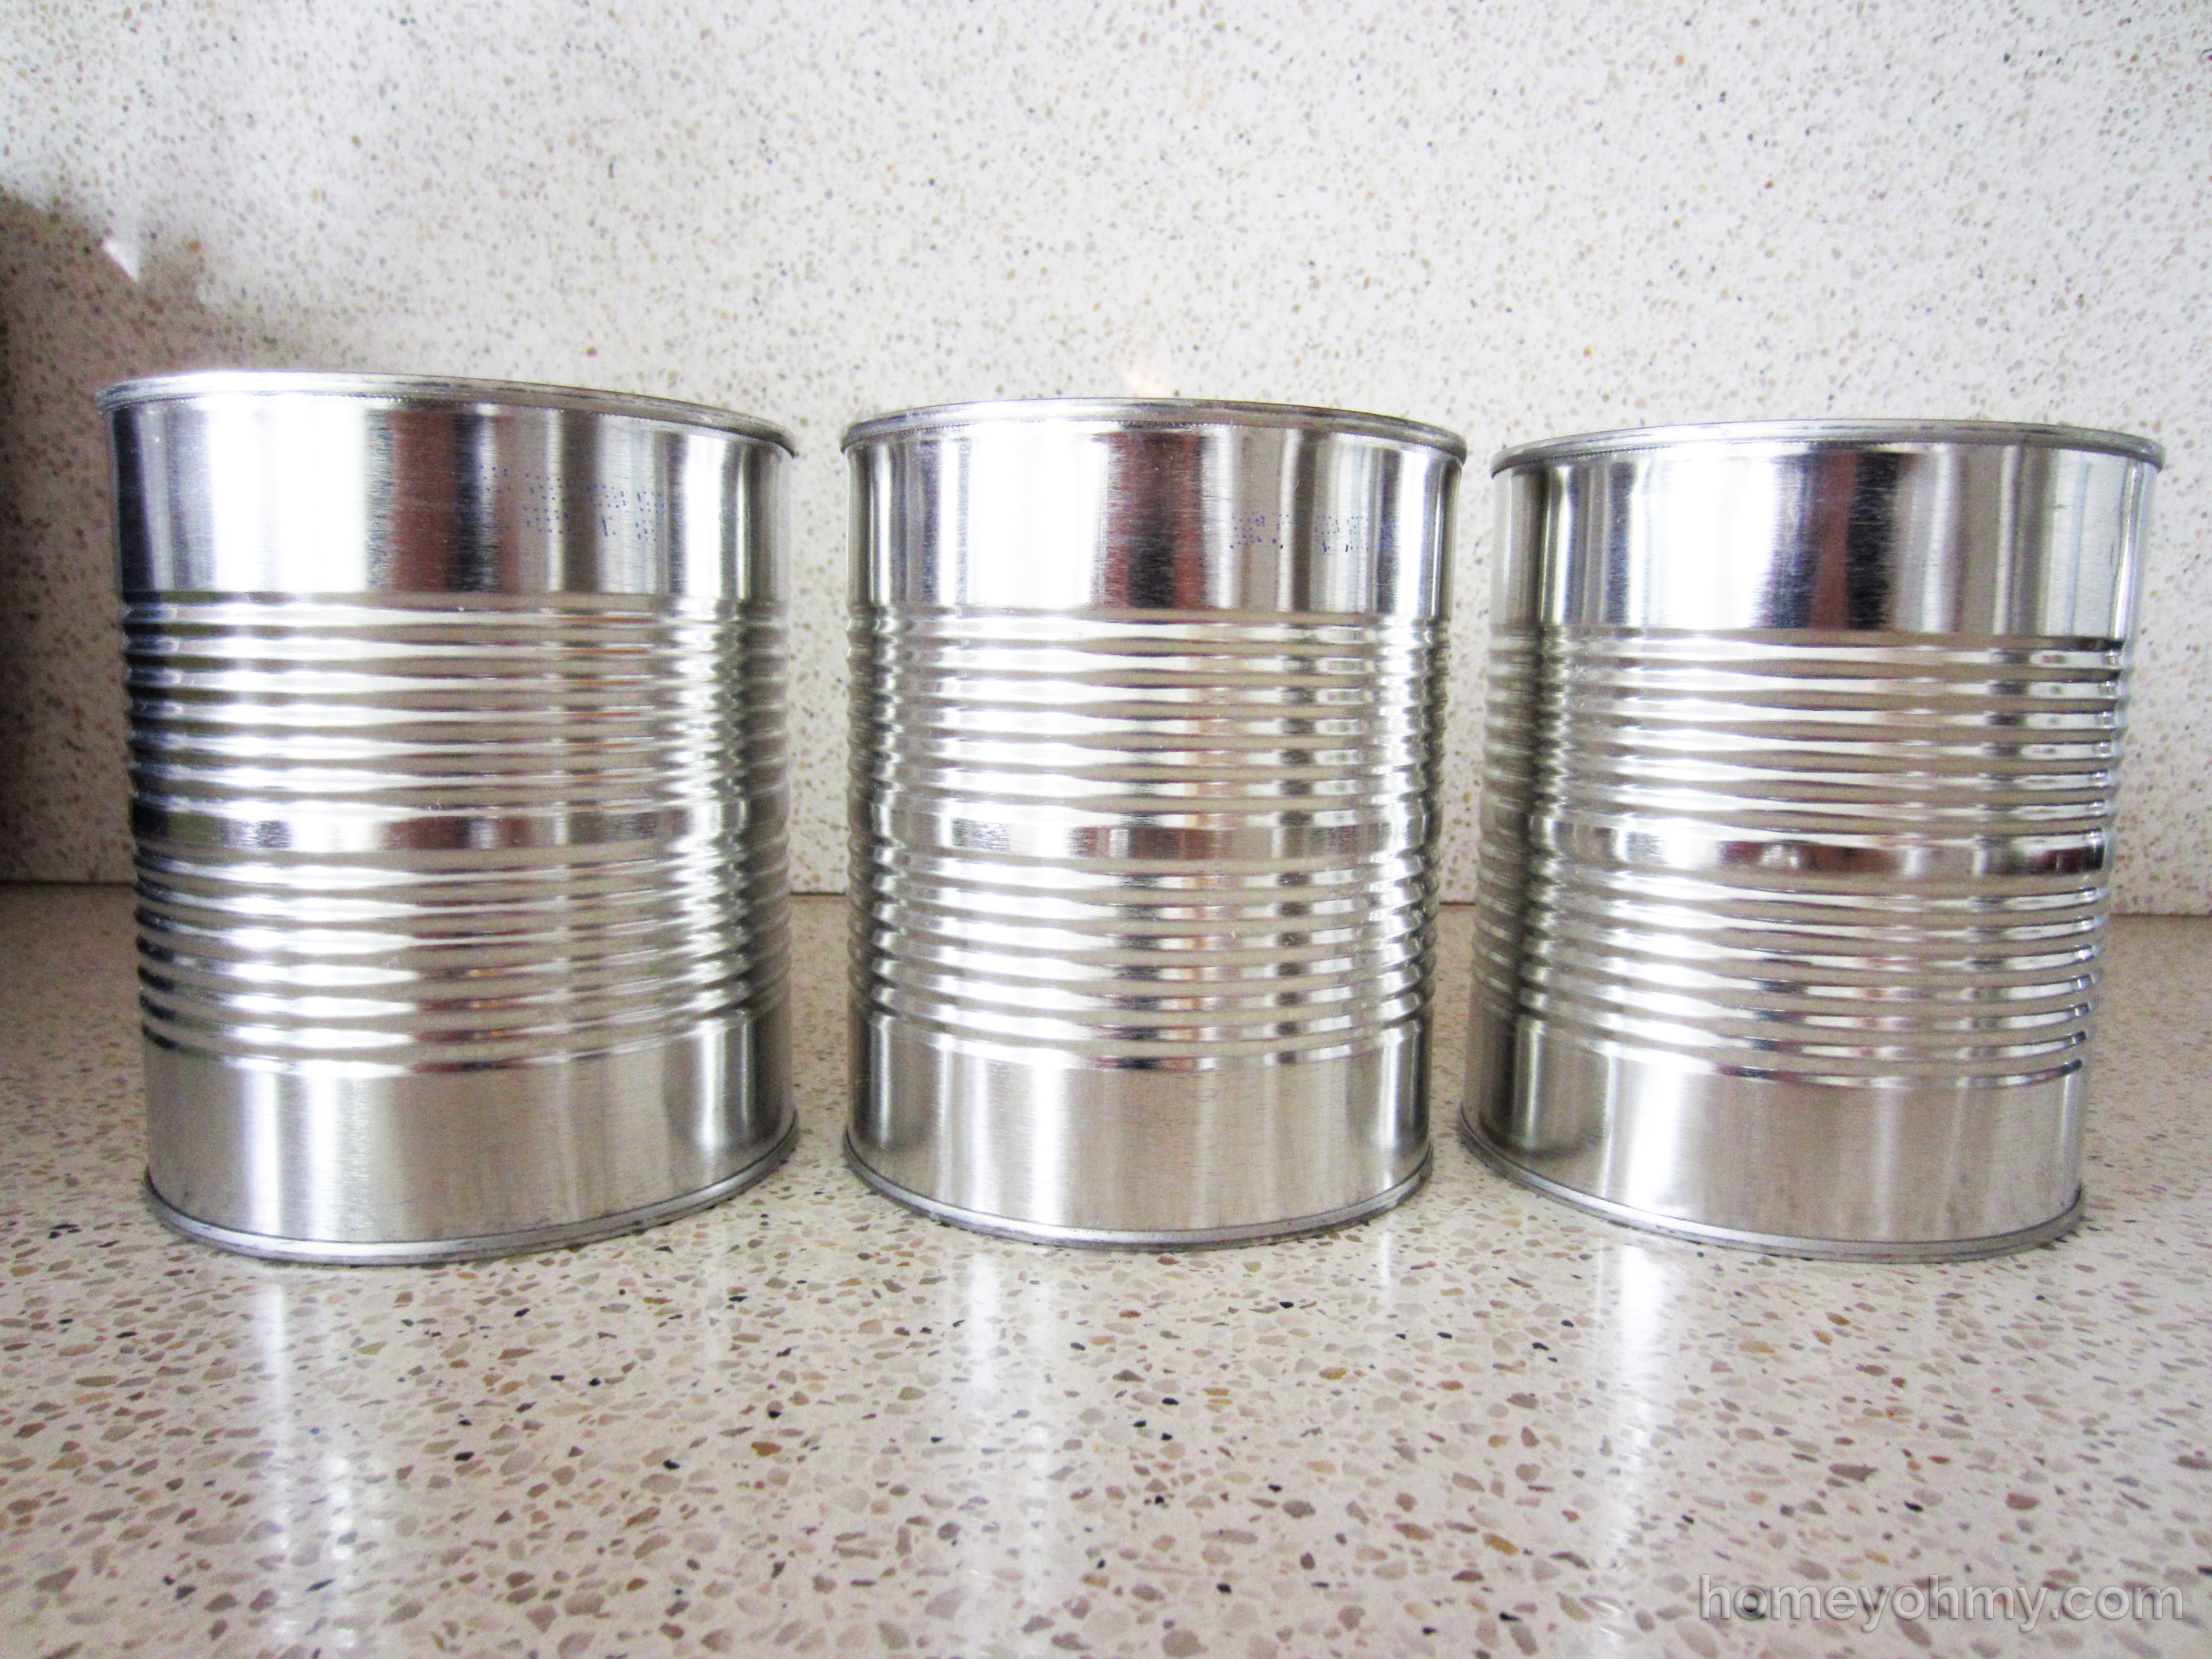
Start with some tin cans and remove the labels and any gunk underneath them.
These cans used to hold diced tomatoes and are about 4 inches in diameter each. I actually really like the way they looked originally and you could totally skip the spray painting if you want to keep the silver chrome. If you’re set on making them copper like I was, then place them upside down and spray them in light coats with the copper spray paint. I sprayed about 3 coats. (If you’re new to my blog, then you will not have noticed that I’ve linked my spray painting tips a bajillion times before and I recommend checking them out to review some basics :)).
LOVE.
Ideally I wanted to apply the chalkboard paint directly to the cans, but I realized later that the ridges would get in the way of creating clean lines and writing smoothly with chalk. So, I came up with a plan to make chalkboard tags.
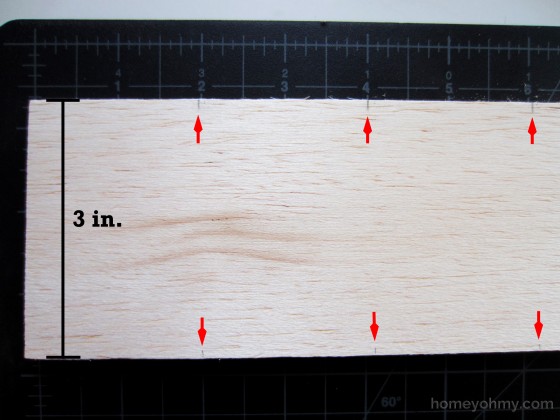
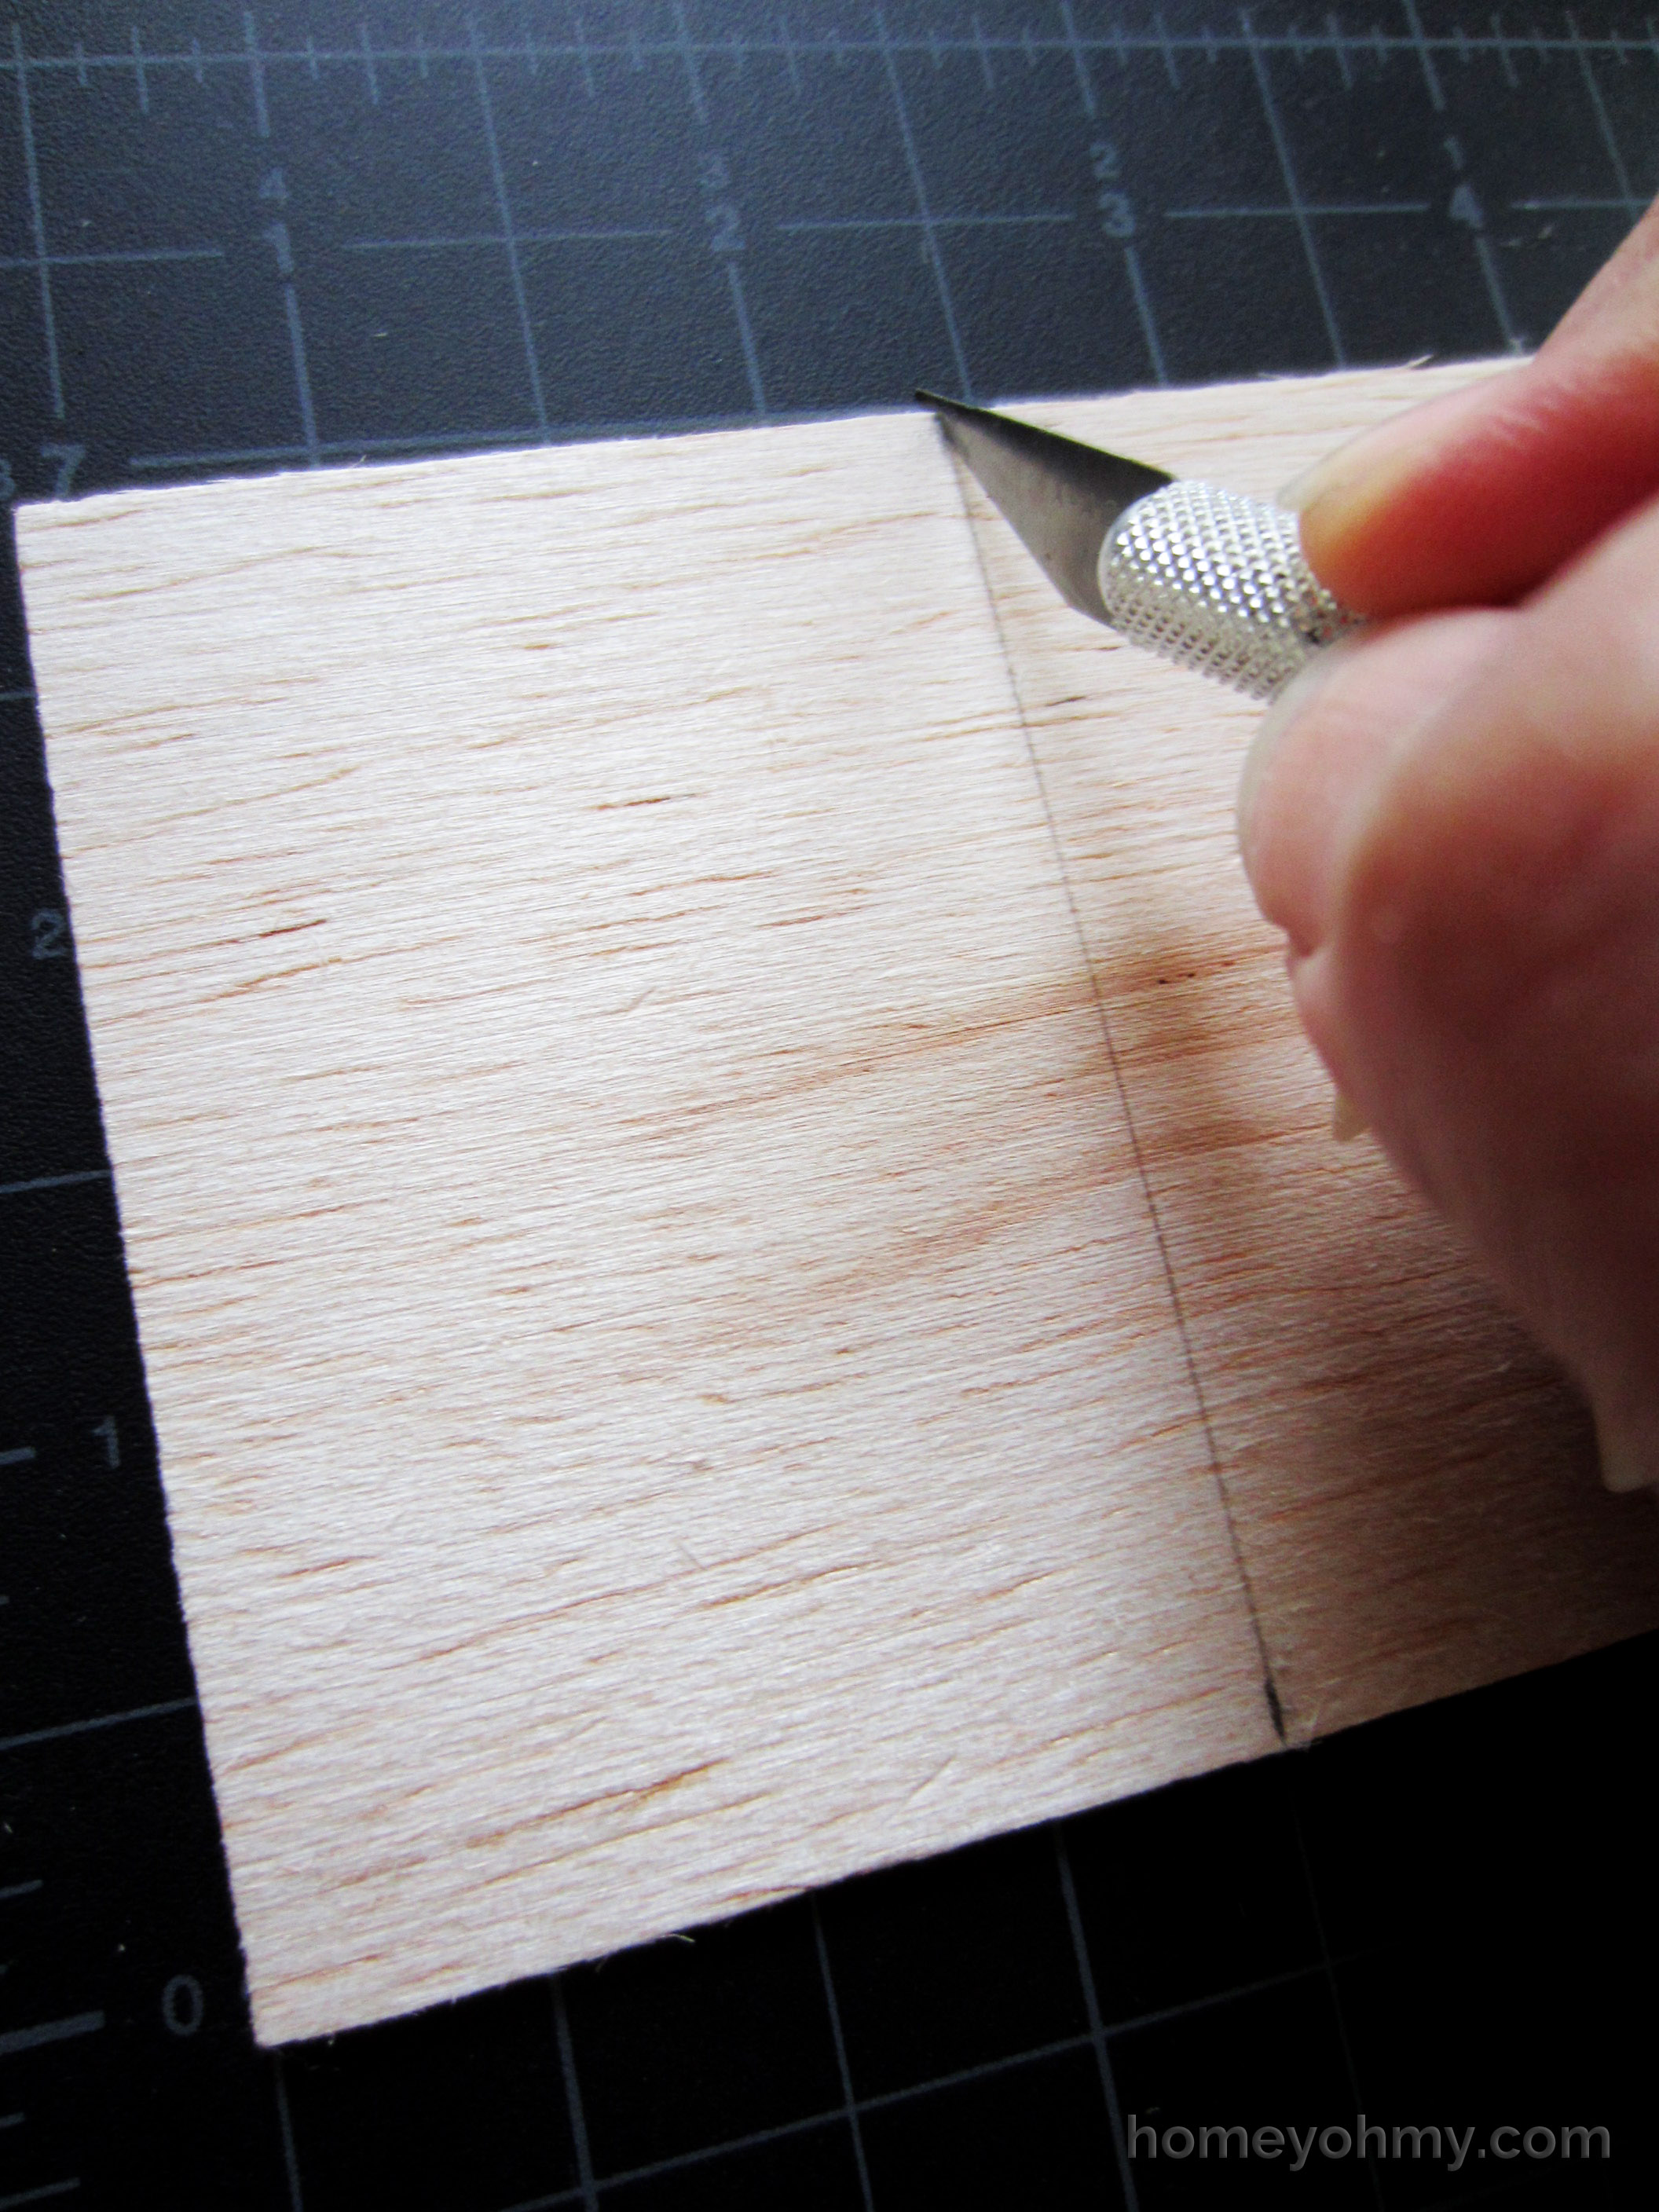
I chose to make the tags out of balsa wood because it’s easy to cut and more durable than something like paper or poster board. The sheet of balsa wood I used was 3 inches wide and 1/16″ thick. Since I conveniently wanted the tags to be 3 inches wide, all I needed to do was measure out the length of each tag and cut accordingly.
With a pencil, I drew tick marks every two inches (each tag will be two inches long) on both edges of the wood and I did three sets of these for a total of three tags to be cut. Using a ruler, draw a line connecting the tick marks across from each other. These are the lines you’re going to cut along.
Make sure to work on top of a cutting mat. Lightly go over the line with your X-acto knife first to create a shallow cut, then go over it again with more pressure to cut through the entire piece of wood. The groove will act like a little track that will help keep your knife guided along the line.
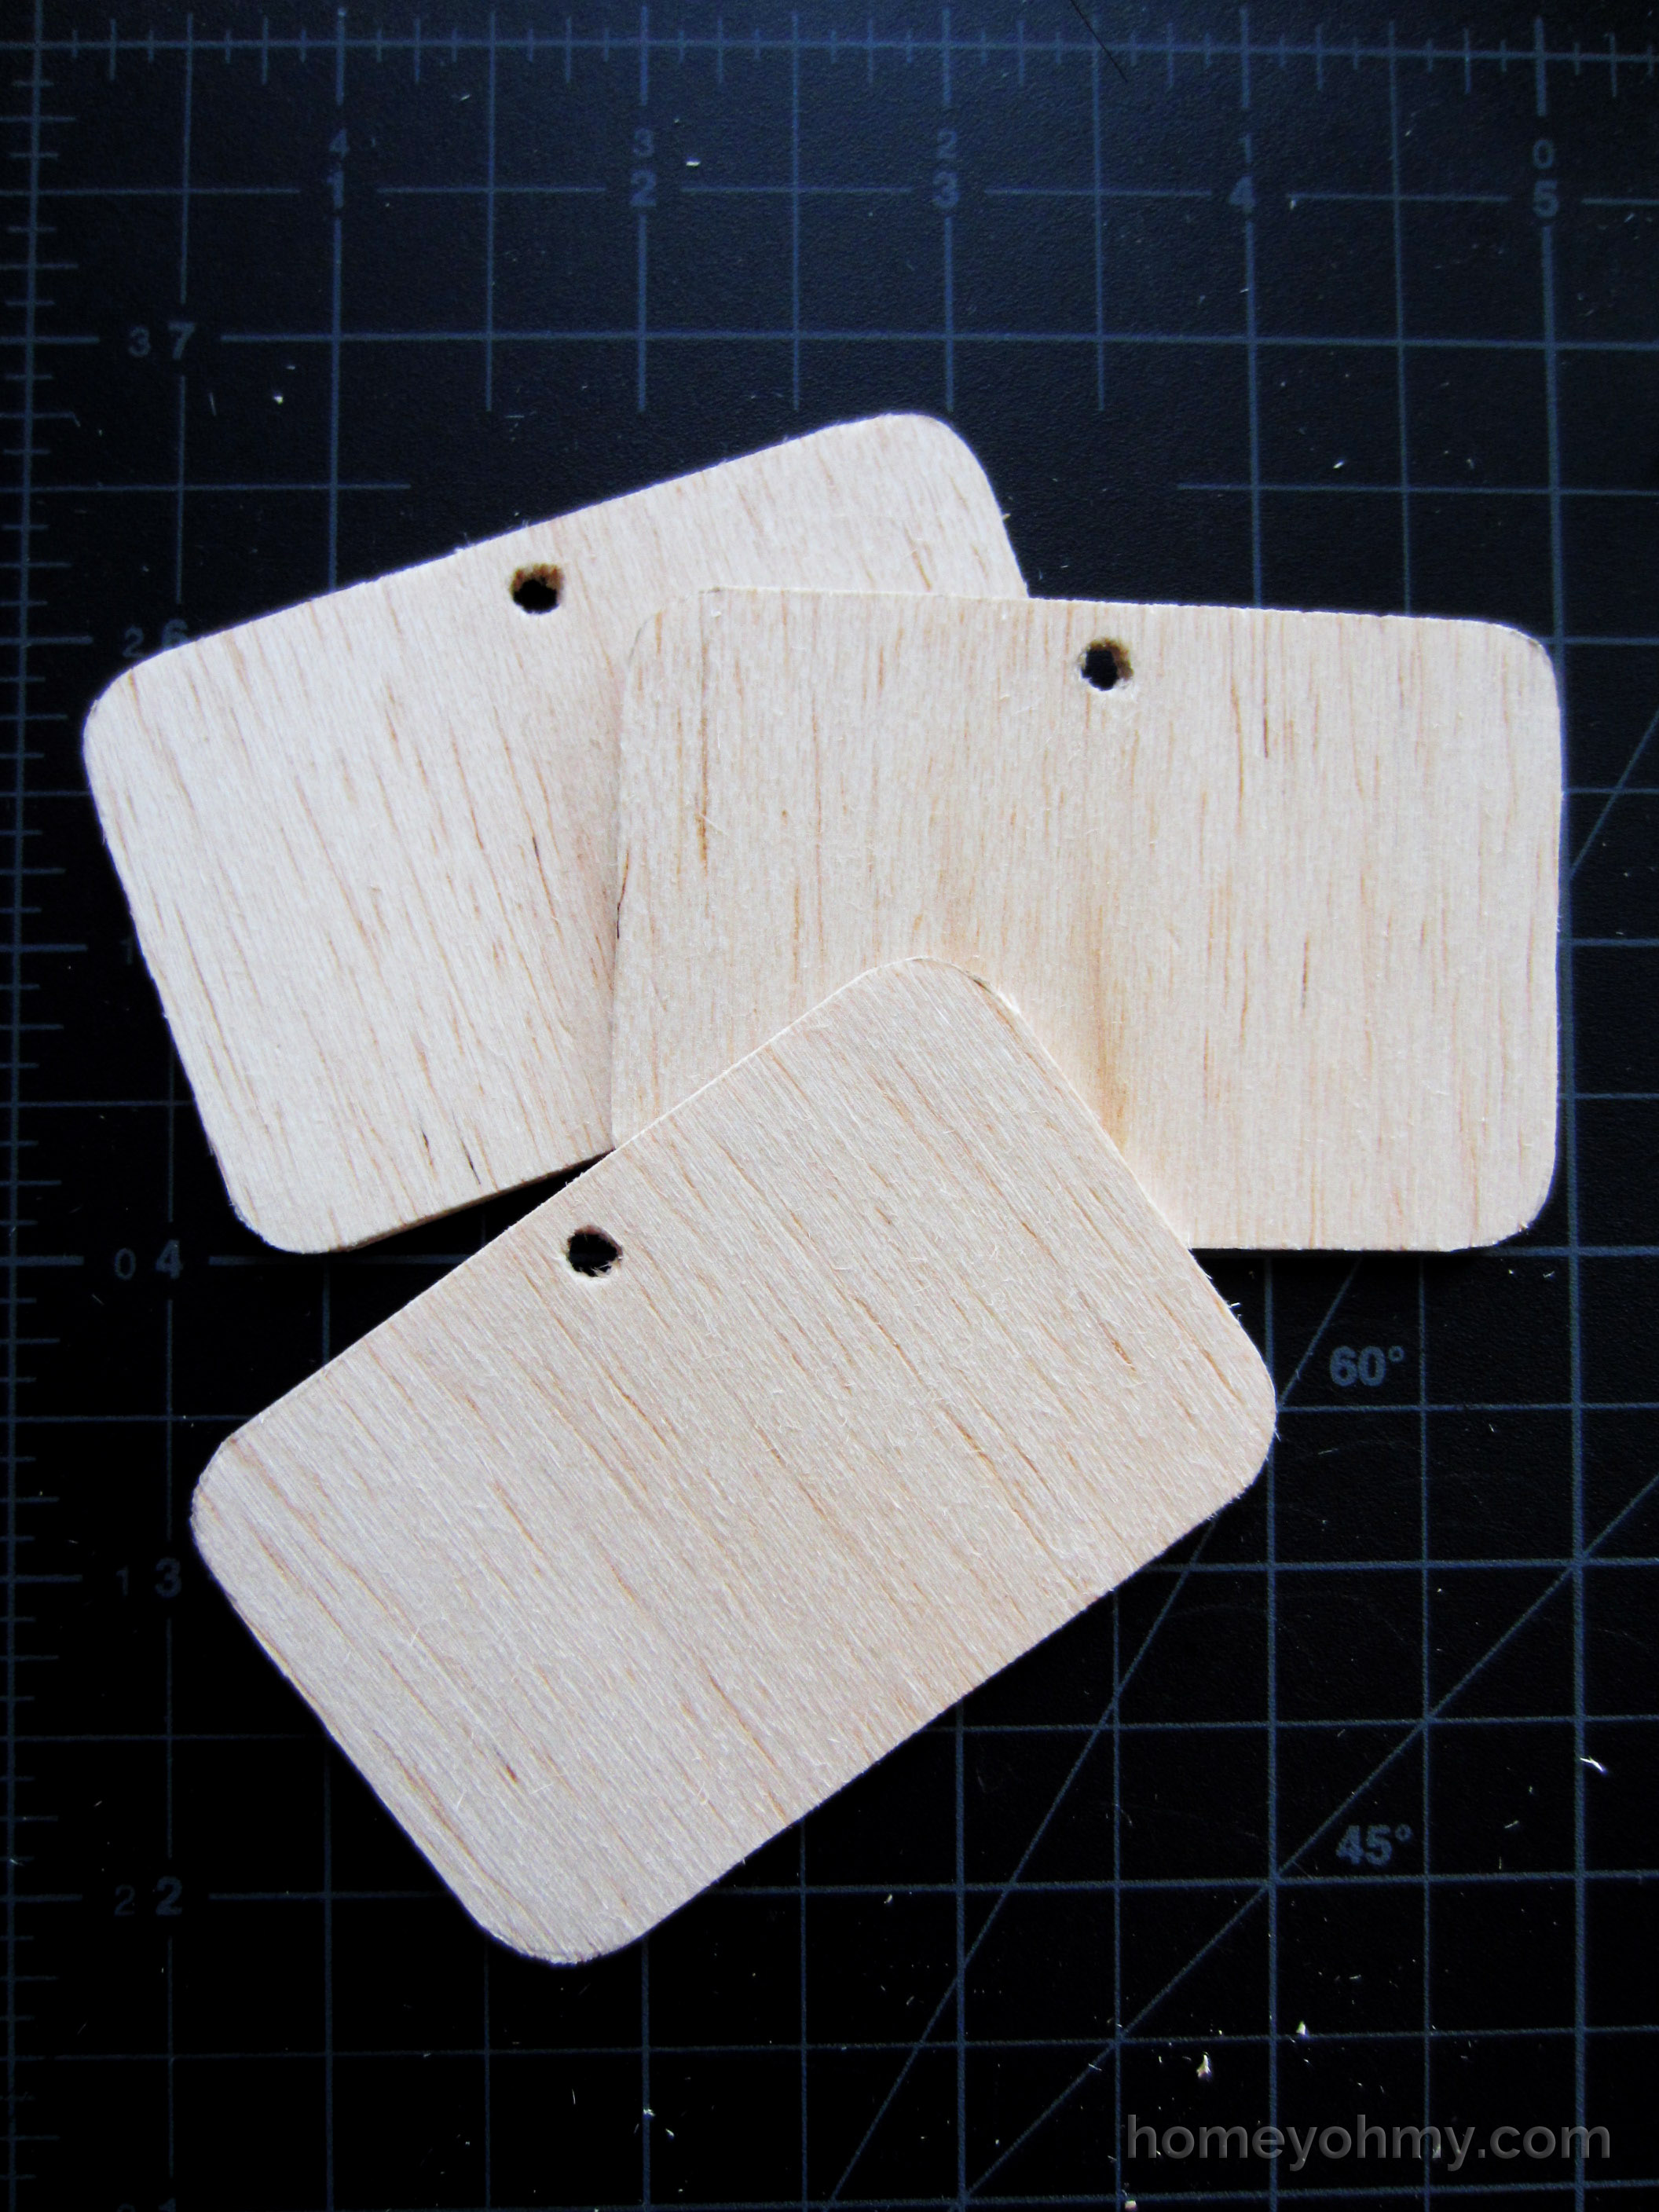
I rounded out the the corners free handed with my X-acto knife and cut out little holes for the twine to go through. First draw a small circle on each tag where you want the holes to be and then cut them out with your knife using more of a poking motion. Keep poking around the circle until the hole is created. Your tags should look something like this.
Paint them with chalkboard paint, allowing each layer to dry 1 hour before adding the next. I applied a total of 4 layers, though the minimum you should paint is 2. I let it dry for 24 hours before rubbing chalk on the surface to prep it for use.
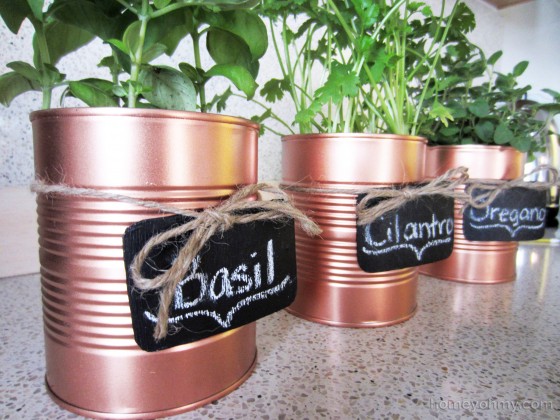
Tie a chalkboard tag around each can with twine, securing it in place with a bow, and you’ll have these *adorable* labeled planters.
I knew I was going to put my herb plants in these cans and the chalkboard tags are a perfect way to label them. Of course, this doesn’t mean you can’t get creative or festive with what you write on them.
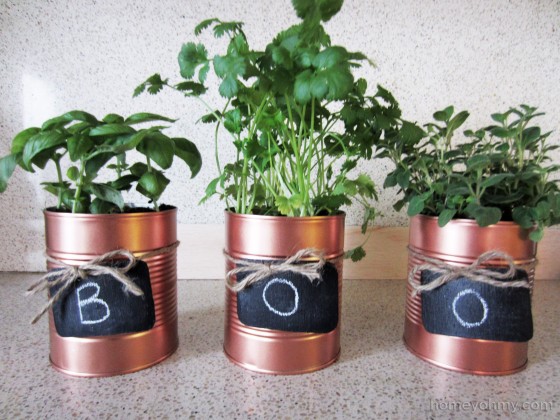
Want some Halloween spirit?
Thanksgiving is around the corner, isn’t it?
Or how about my personal favorite?
“Ugh” is something I say when I really like something, like UGH so good, or UGH these planters are so cute.
What would you write on the chalkboard tags? Leave me a comment and let’s chat :)
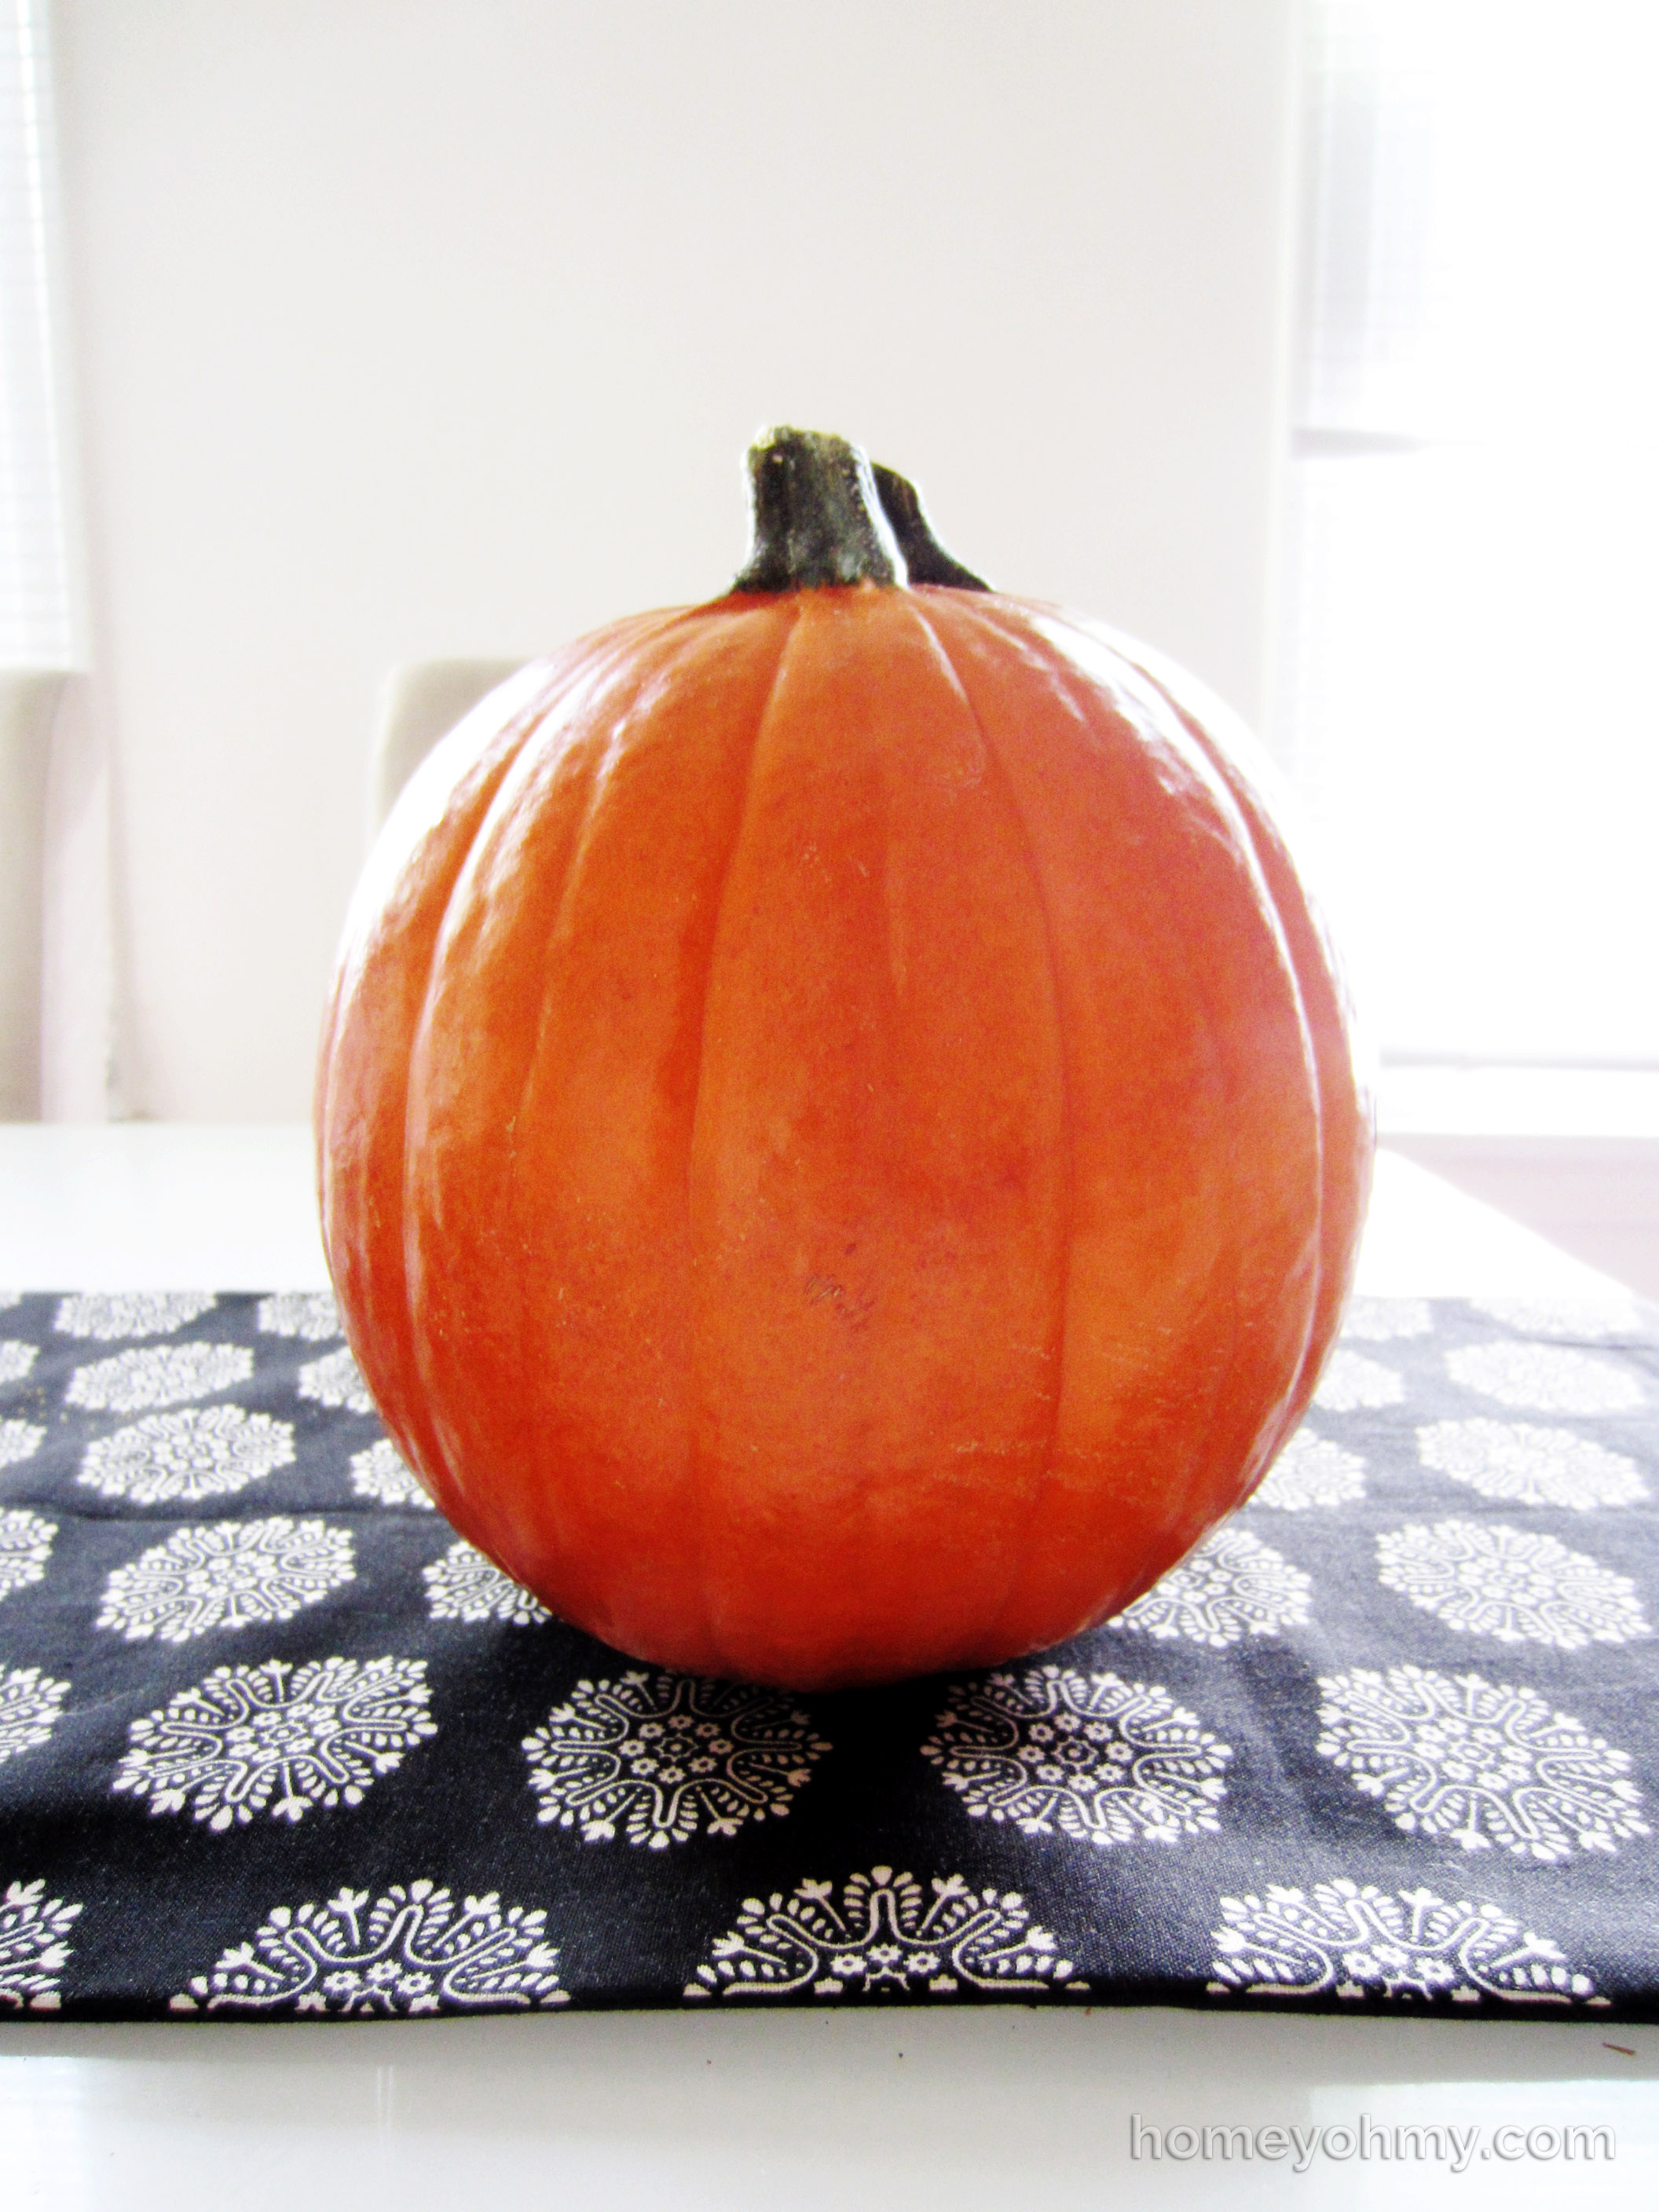
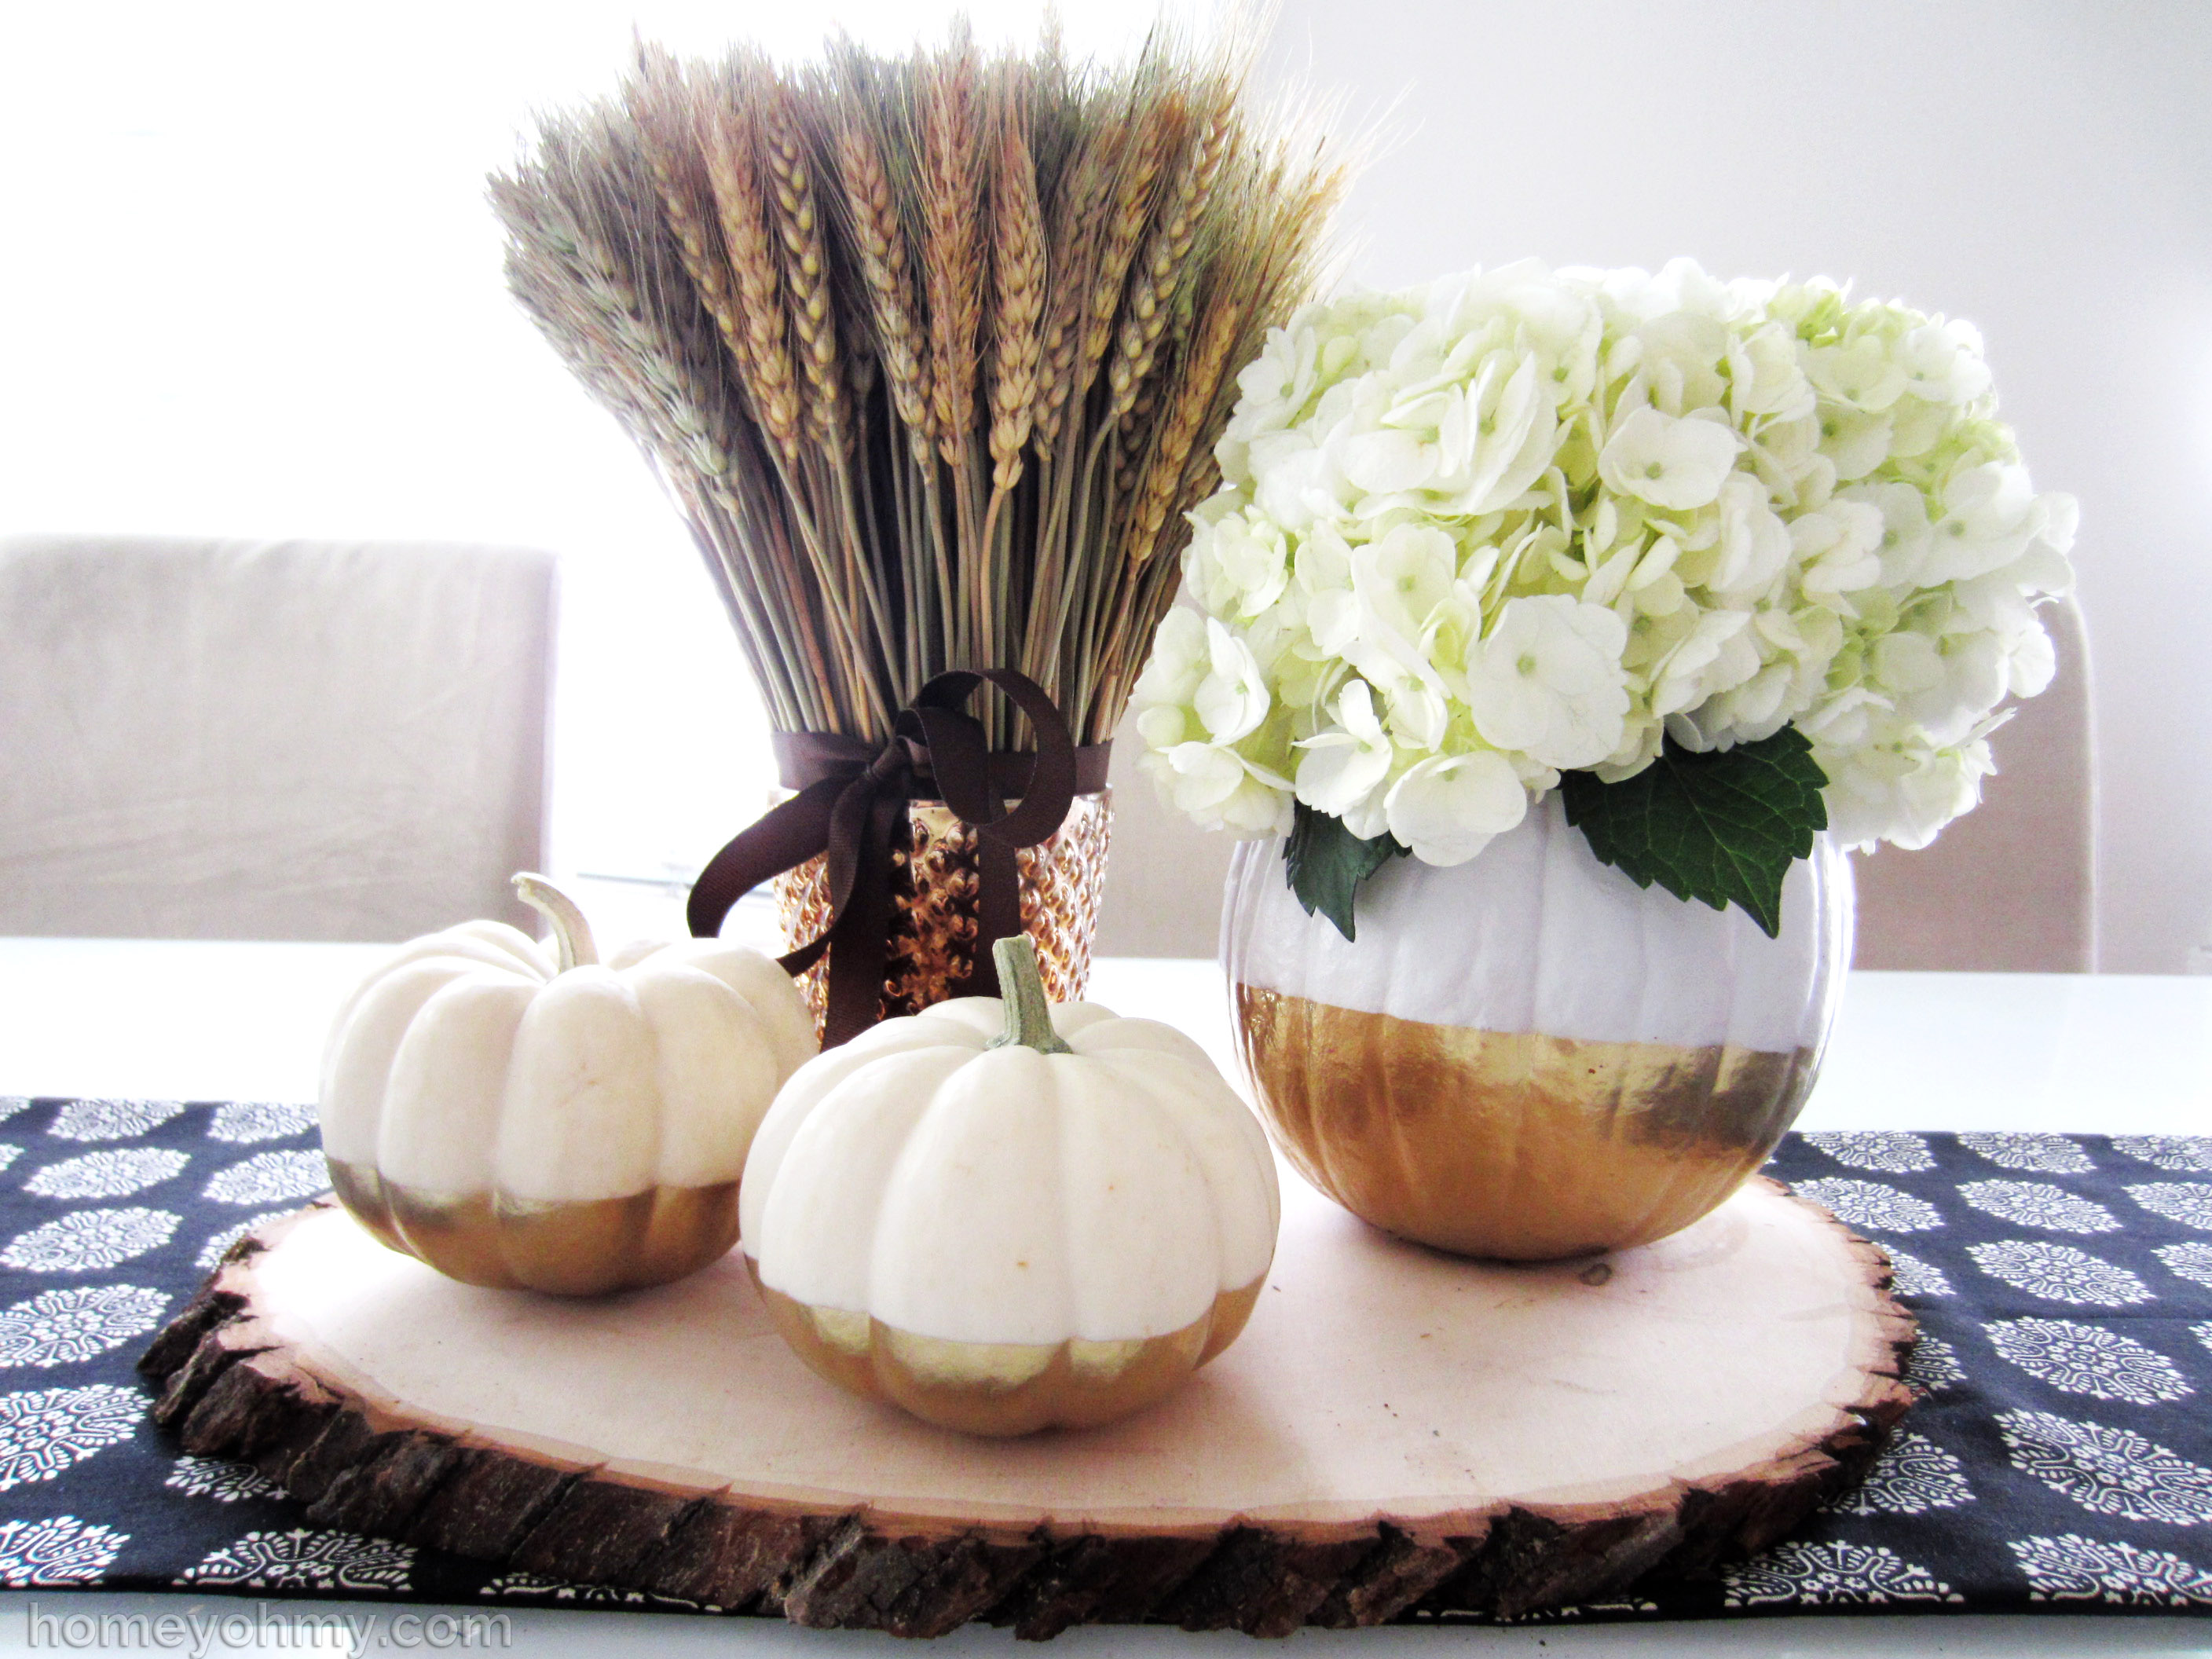
I’ve been loving all the pumpkin vases on Pinterest and wanted to try my hand at it with my gold flair. I set out to look for a naturally white pumpkin, but after a week of searching I couldn’t find any other than the mini-sized ones. So what do we do in these situations? Yup, we DIY.
This is a pie pumpkin. I learned that it’s meant more for eating (pumpkin pie!) than for decorative purposes. For my purposes, it is the perfect and most manageable size for this vase project.
First, cut out the top like you would for a jack-o-lantern and remove the pumpkin seeds and stringy insides. I used a metal spoon to scrap everything out and it worked just fine.
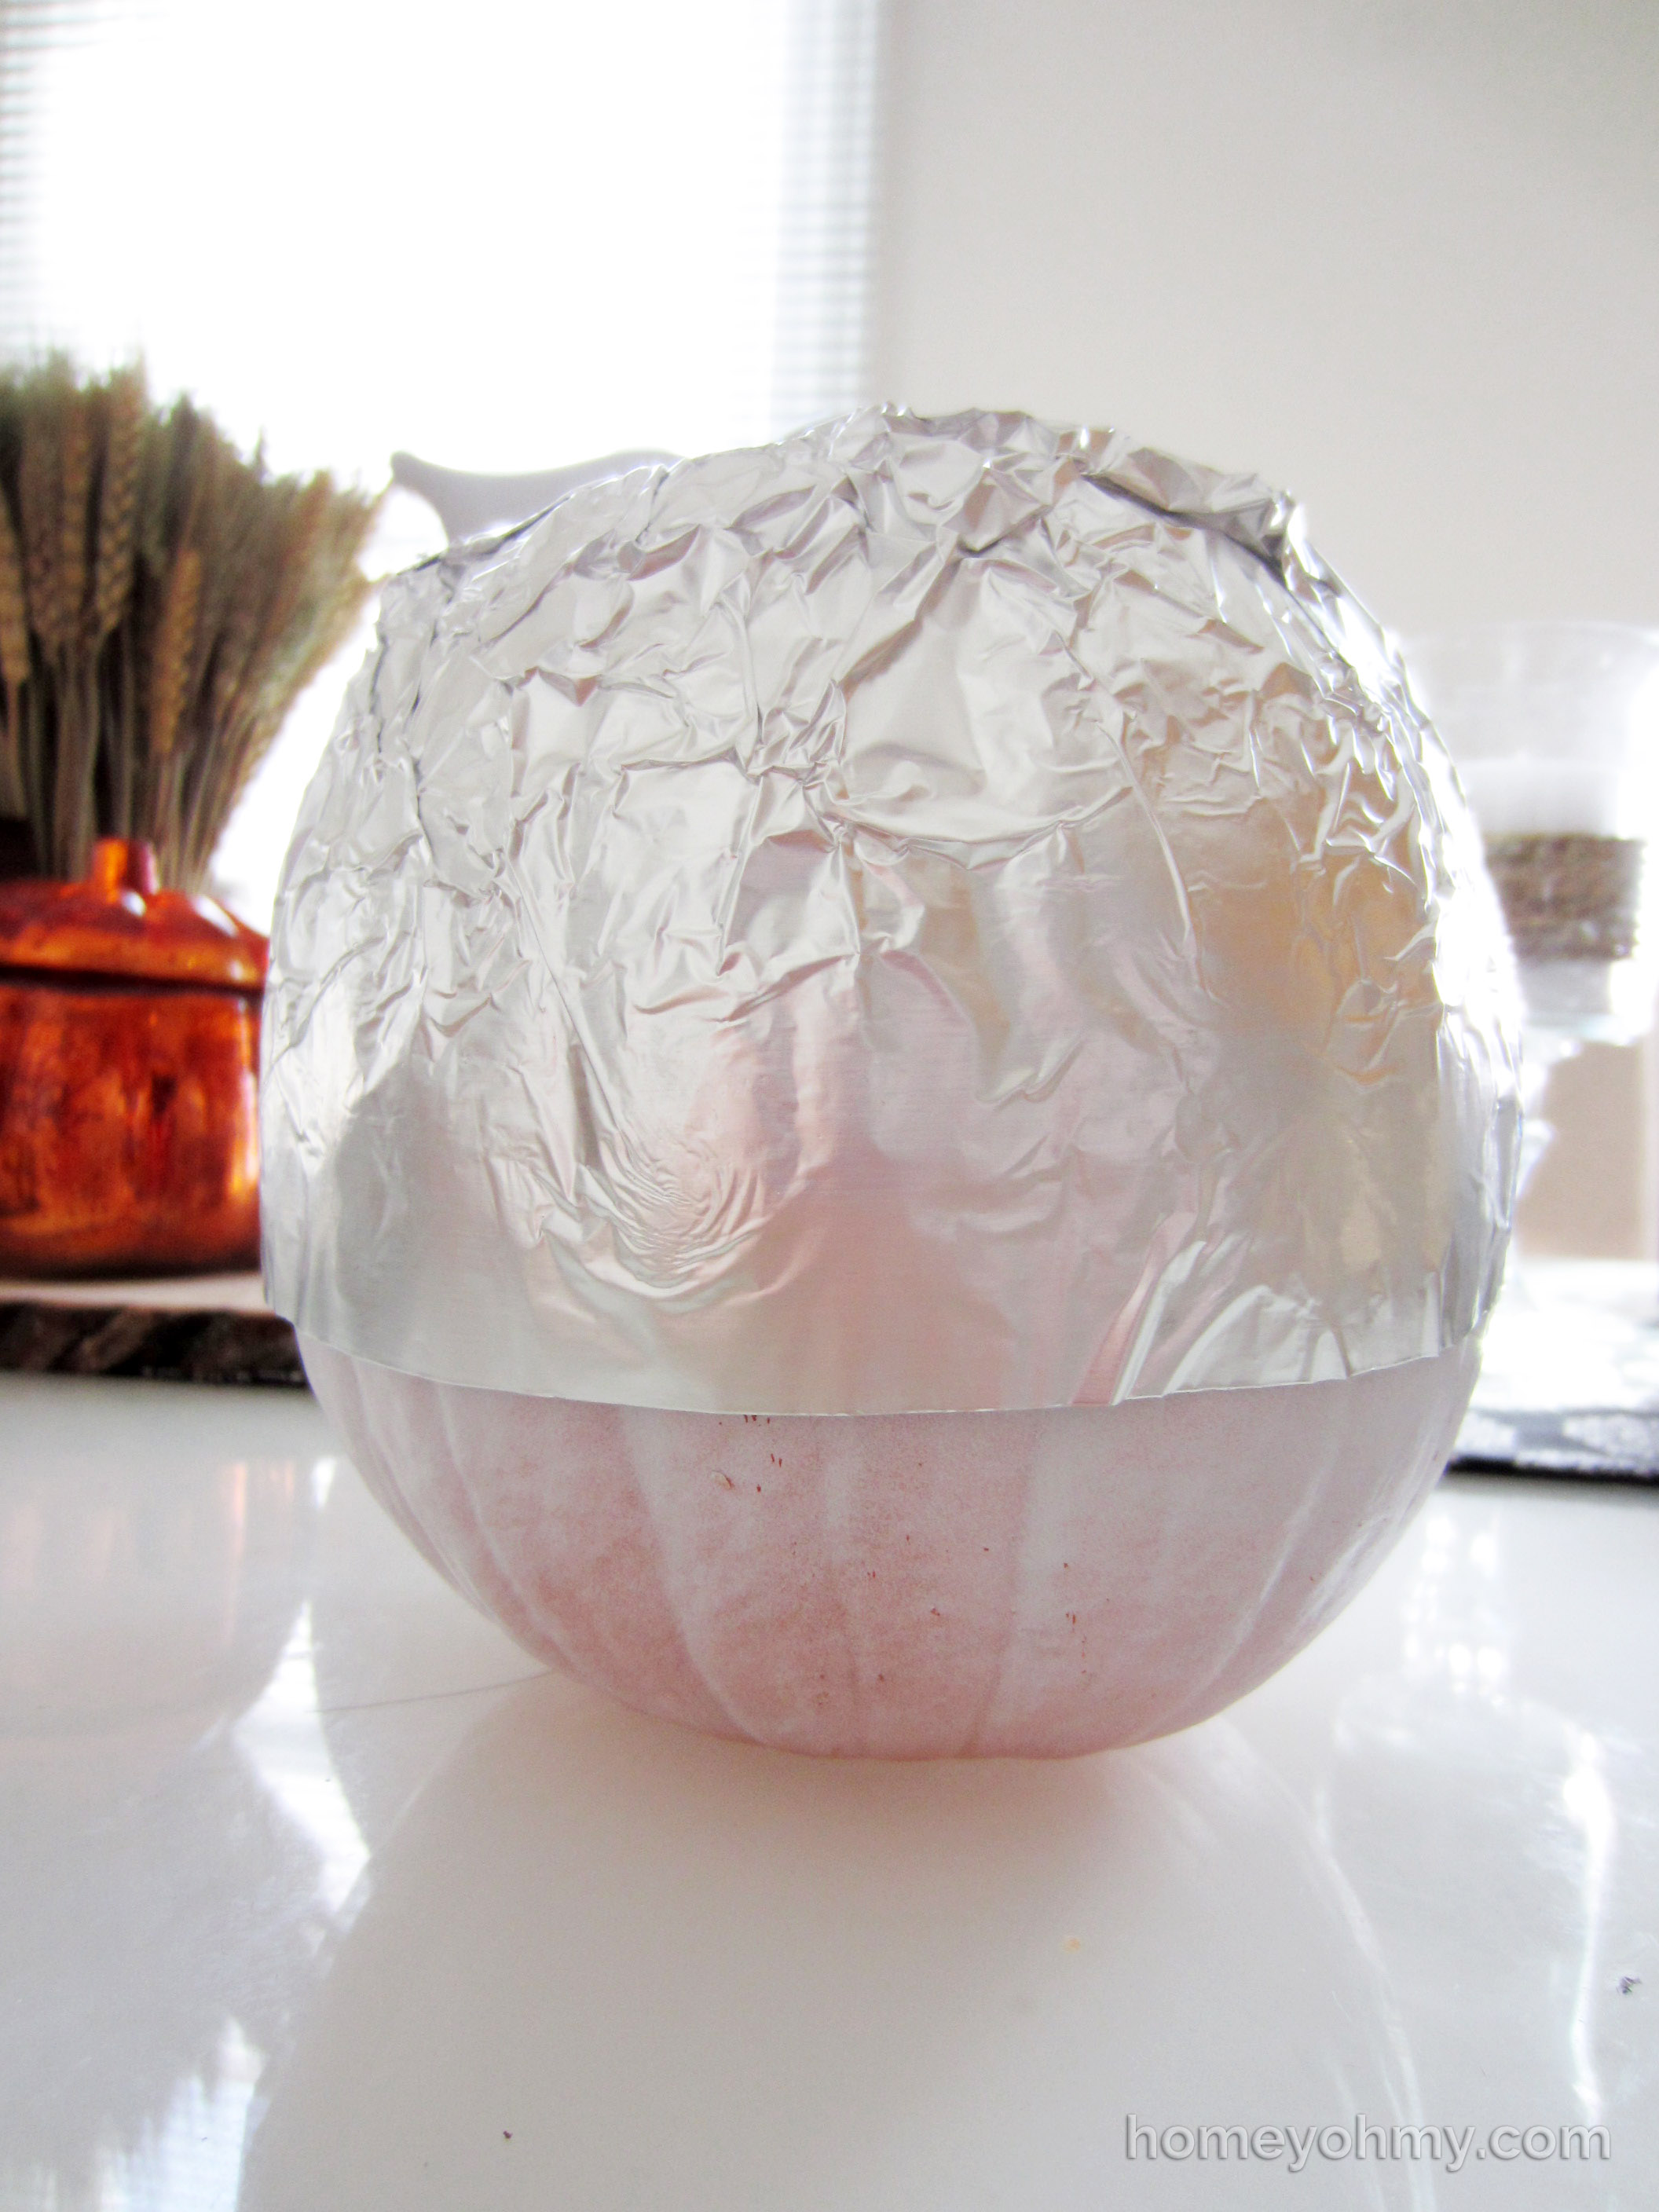
Now if you want the top part of your pumpkin to remain orange, then you can skip the step I took to spray paint the majority of the top portion white. If you’re lucky enough to find a white pumpkin, that would be best if you want your pumpkin to be white and gold like mine. I learned the sad way that painters tape will strip the white paint off of the pumpkin :( This called for improvisation.
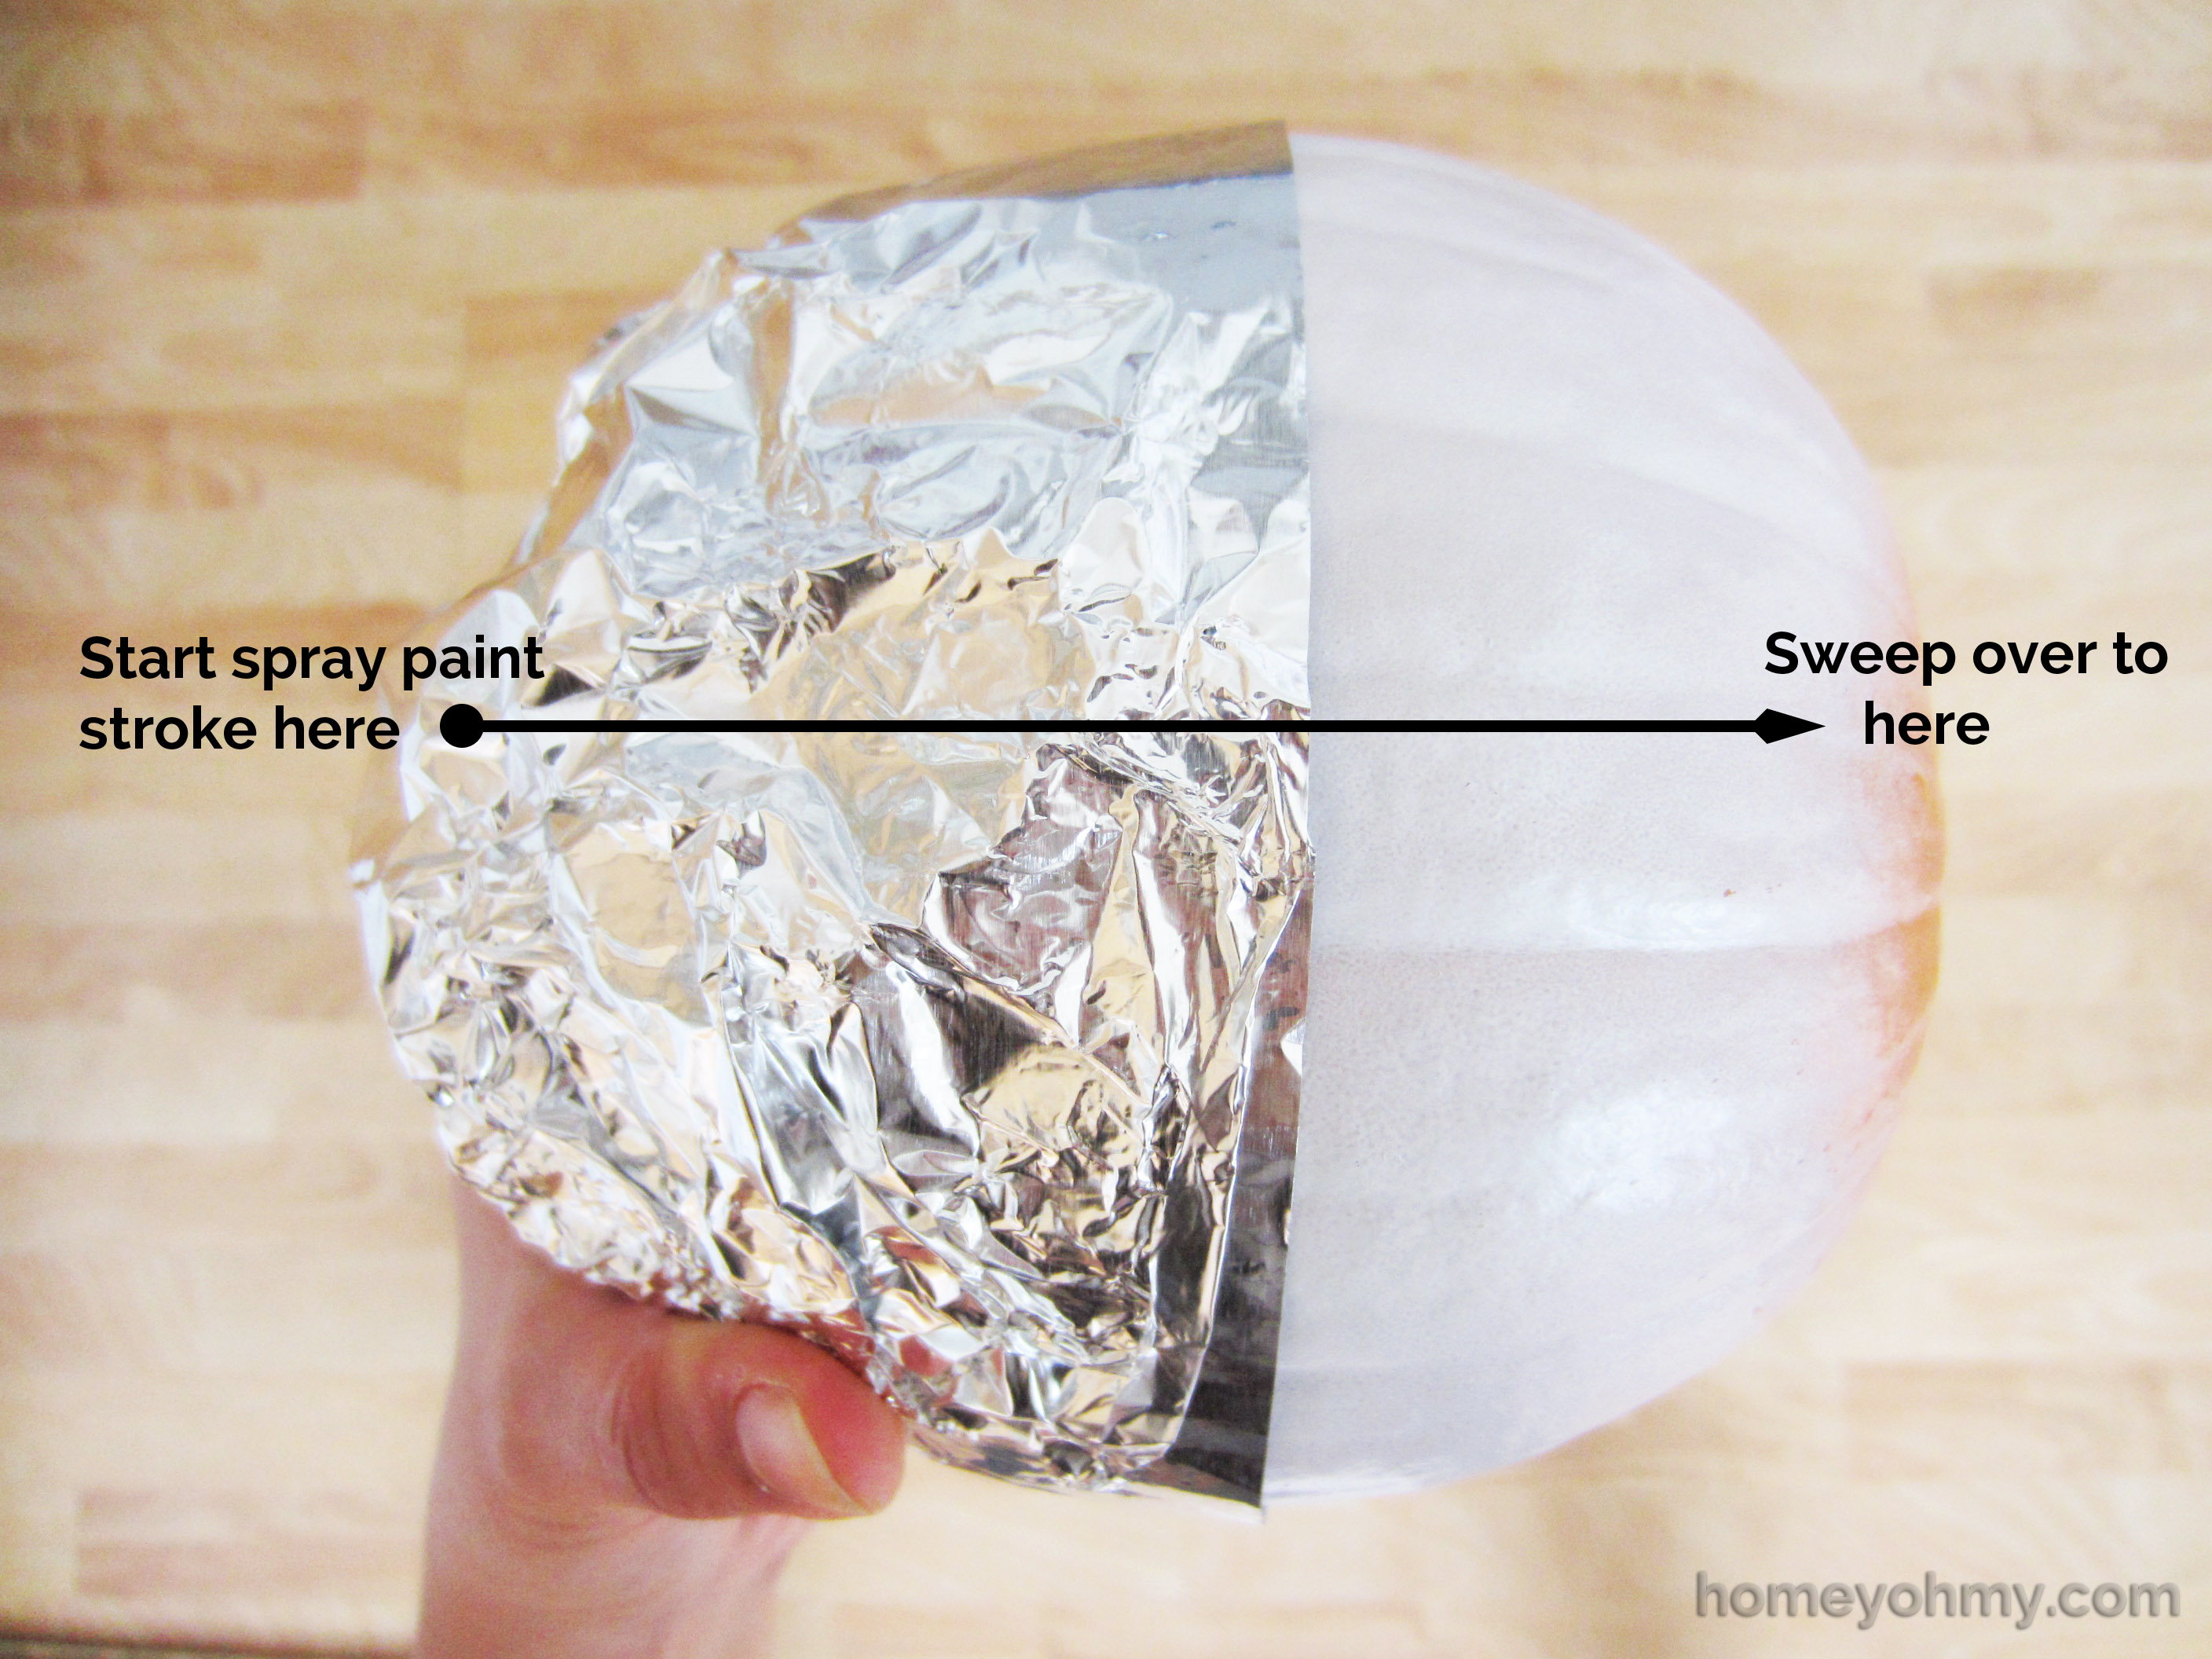
After the white spray paint dried, I wrapped aluminum foil around the top 2/3 of the pumpkin and stuffed the excess in the opening at the top, using the straight edge of the foil to delineate at the bottom where I wanted the gold paint to start. Since there’s no adhesion between the foil and the pumpkin, it is super important to make sure your spray paint strokes go from the foil towards the bottom of the pumpkin.
This actually worked really well! I was surprised. Again, the key is to spray from left to right as shown in the photo above. If you go in any other direction, you are more likely to get the gold paint underneath the foil and won’t achieve a clean line. I held the pumpkin just like I did in the photo and rotated it like a rotisserie chicken, spraying left to right in light coats. Review some spray painting basics here if you’d like. The spray paint I used is my most favorite spray paint ever: Rustoleum Metallic Spray Paint in Gold.
That’s it for the crafting part. The next part is optional, but I highly recommend it.
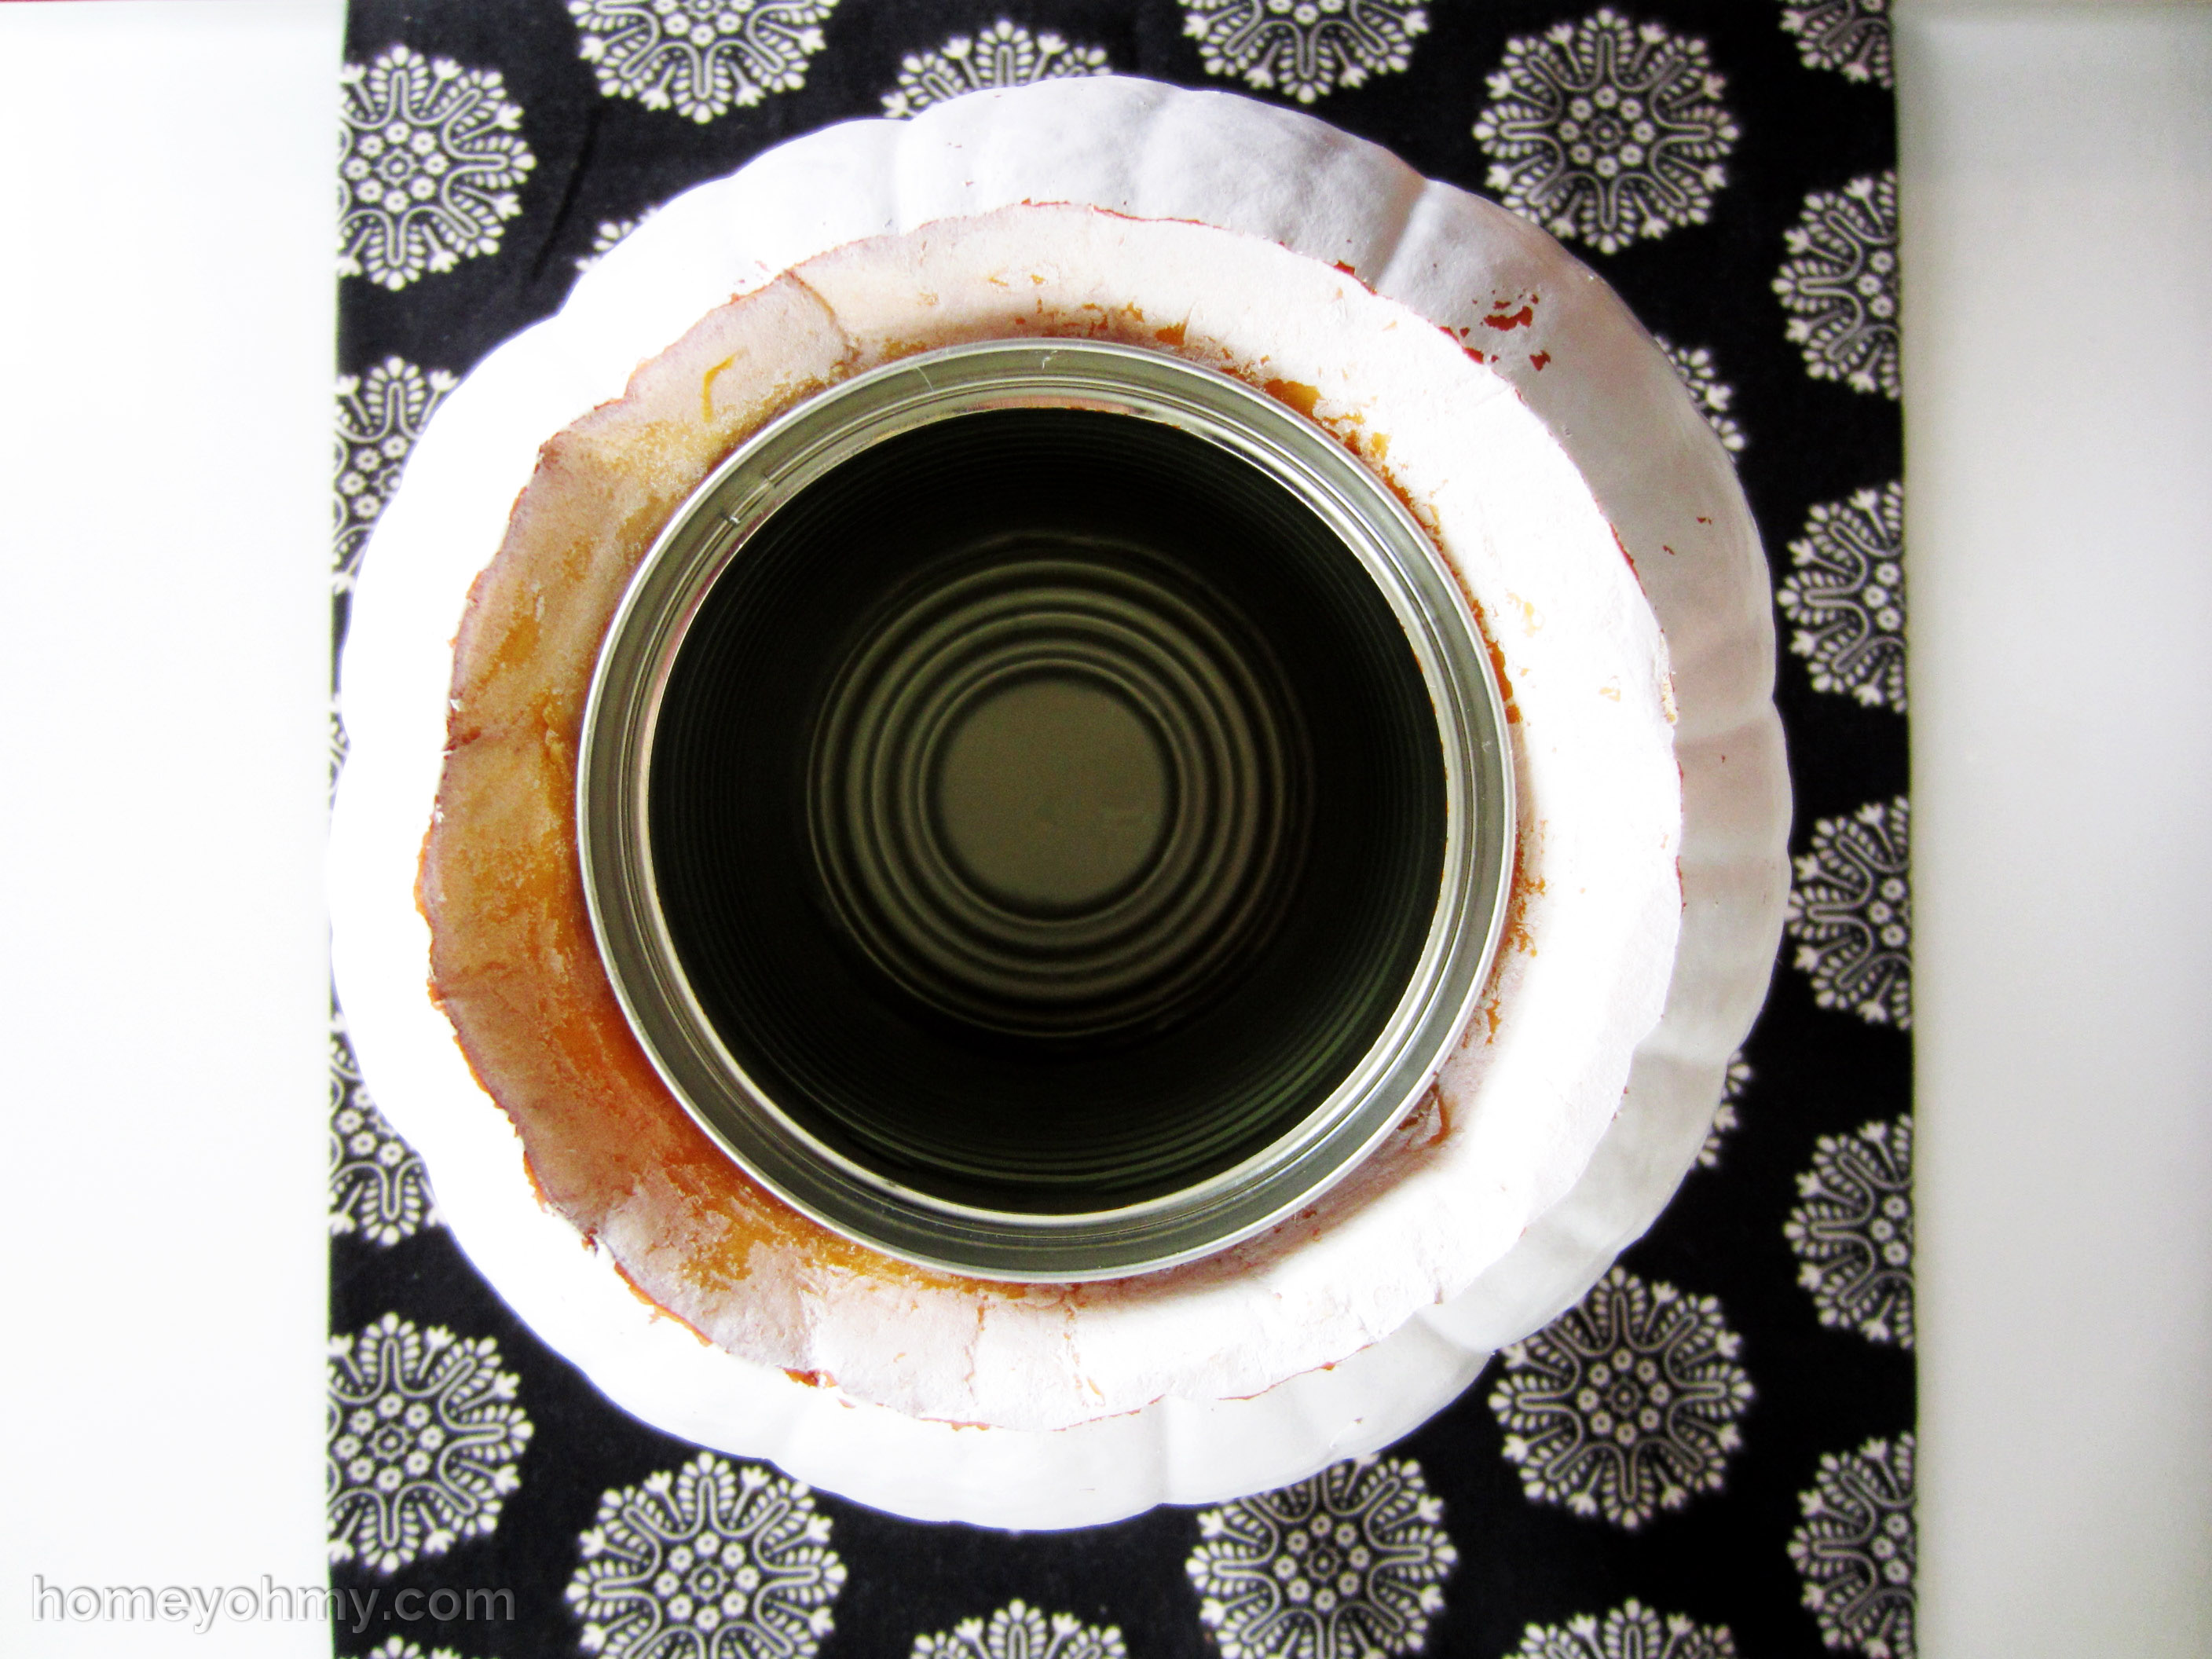
I picked up this tip from Pinterest (Are you following me yet? I’d love to have you!) to place an aluminum can inside the pumpkin for your flowers to sit in. GENIUS. Not only will you not have to fill up the entire pumpkin with water, but the can helps keep the flowers arranged and contained better.
Pour water and arrange flowers into the can and that’s it!
I love fall decorating with hydrangeas. They are so elegant and happen to fit nicely with my new pumpkin vase :) I got a couple of those mini white pumpkins I mentioned earlier and painted them in the same way, except I used painters tape instead of aluminum foil. They’re all sitting on my dining table and are a nice variation to my fall centerpiece.
My boyfriend mentioned to me probably about 26 times that this pumpkin vase is going to “die soon.” While it is always sad to think that my work will be going in the trash, a large part of me is relieved by that in this kind of situation. Apartment living usually doesn’t afford much storage, and I just don’t have the space to store a lot of seasonal decor. Plus, decorating should never be permanent, right? It’s the process that really makes it special and gets you into the spirit of the season.
Take for instance these pumpkins my friends and I carved back in 2010.
Pretty sweet, right? Can you guess which one was mine? Hint: it’s missing a tooth. It just isn’t Fall or Halloween without pumpkins, whether you carve them, don’t carve them, or turn them into vases. Pumpkins aren’t forever, but the memories of them are. :) Cheesy overload.
You don’t have a sewing machine and/or do not know how to use one and/or do not have the patience to sew? Let’s be friends. :)
Learning to sew has been on my to-do list ever since I quickly forgot how to use a sewing machine after learning in my 8th grade Home Ec. class. I envy those who can whip out tote bags, scarves, and other sewing creations with seemingly endless ease and grace. I’d love to say that I’m that girl, but I’m not, and luckily for those of you like me, there are ways to work around this.
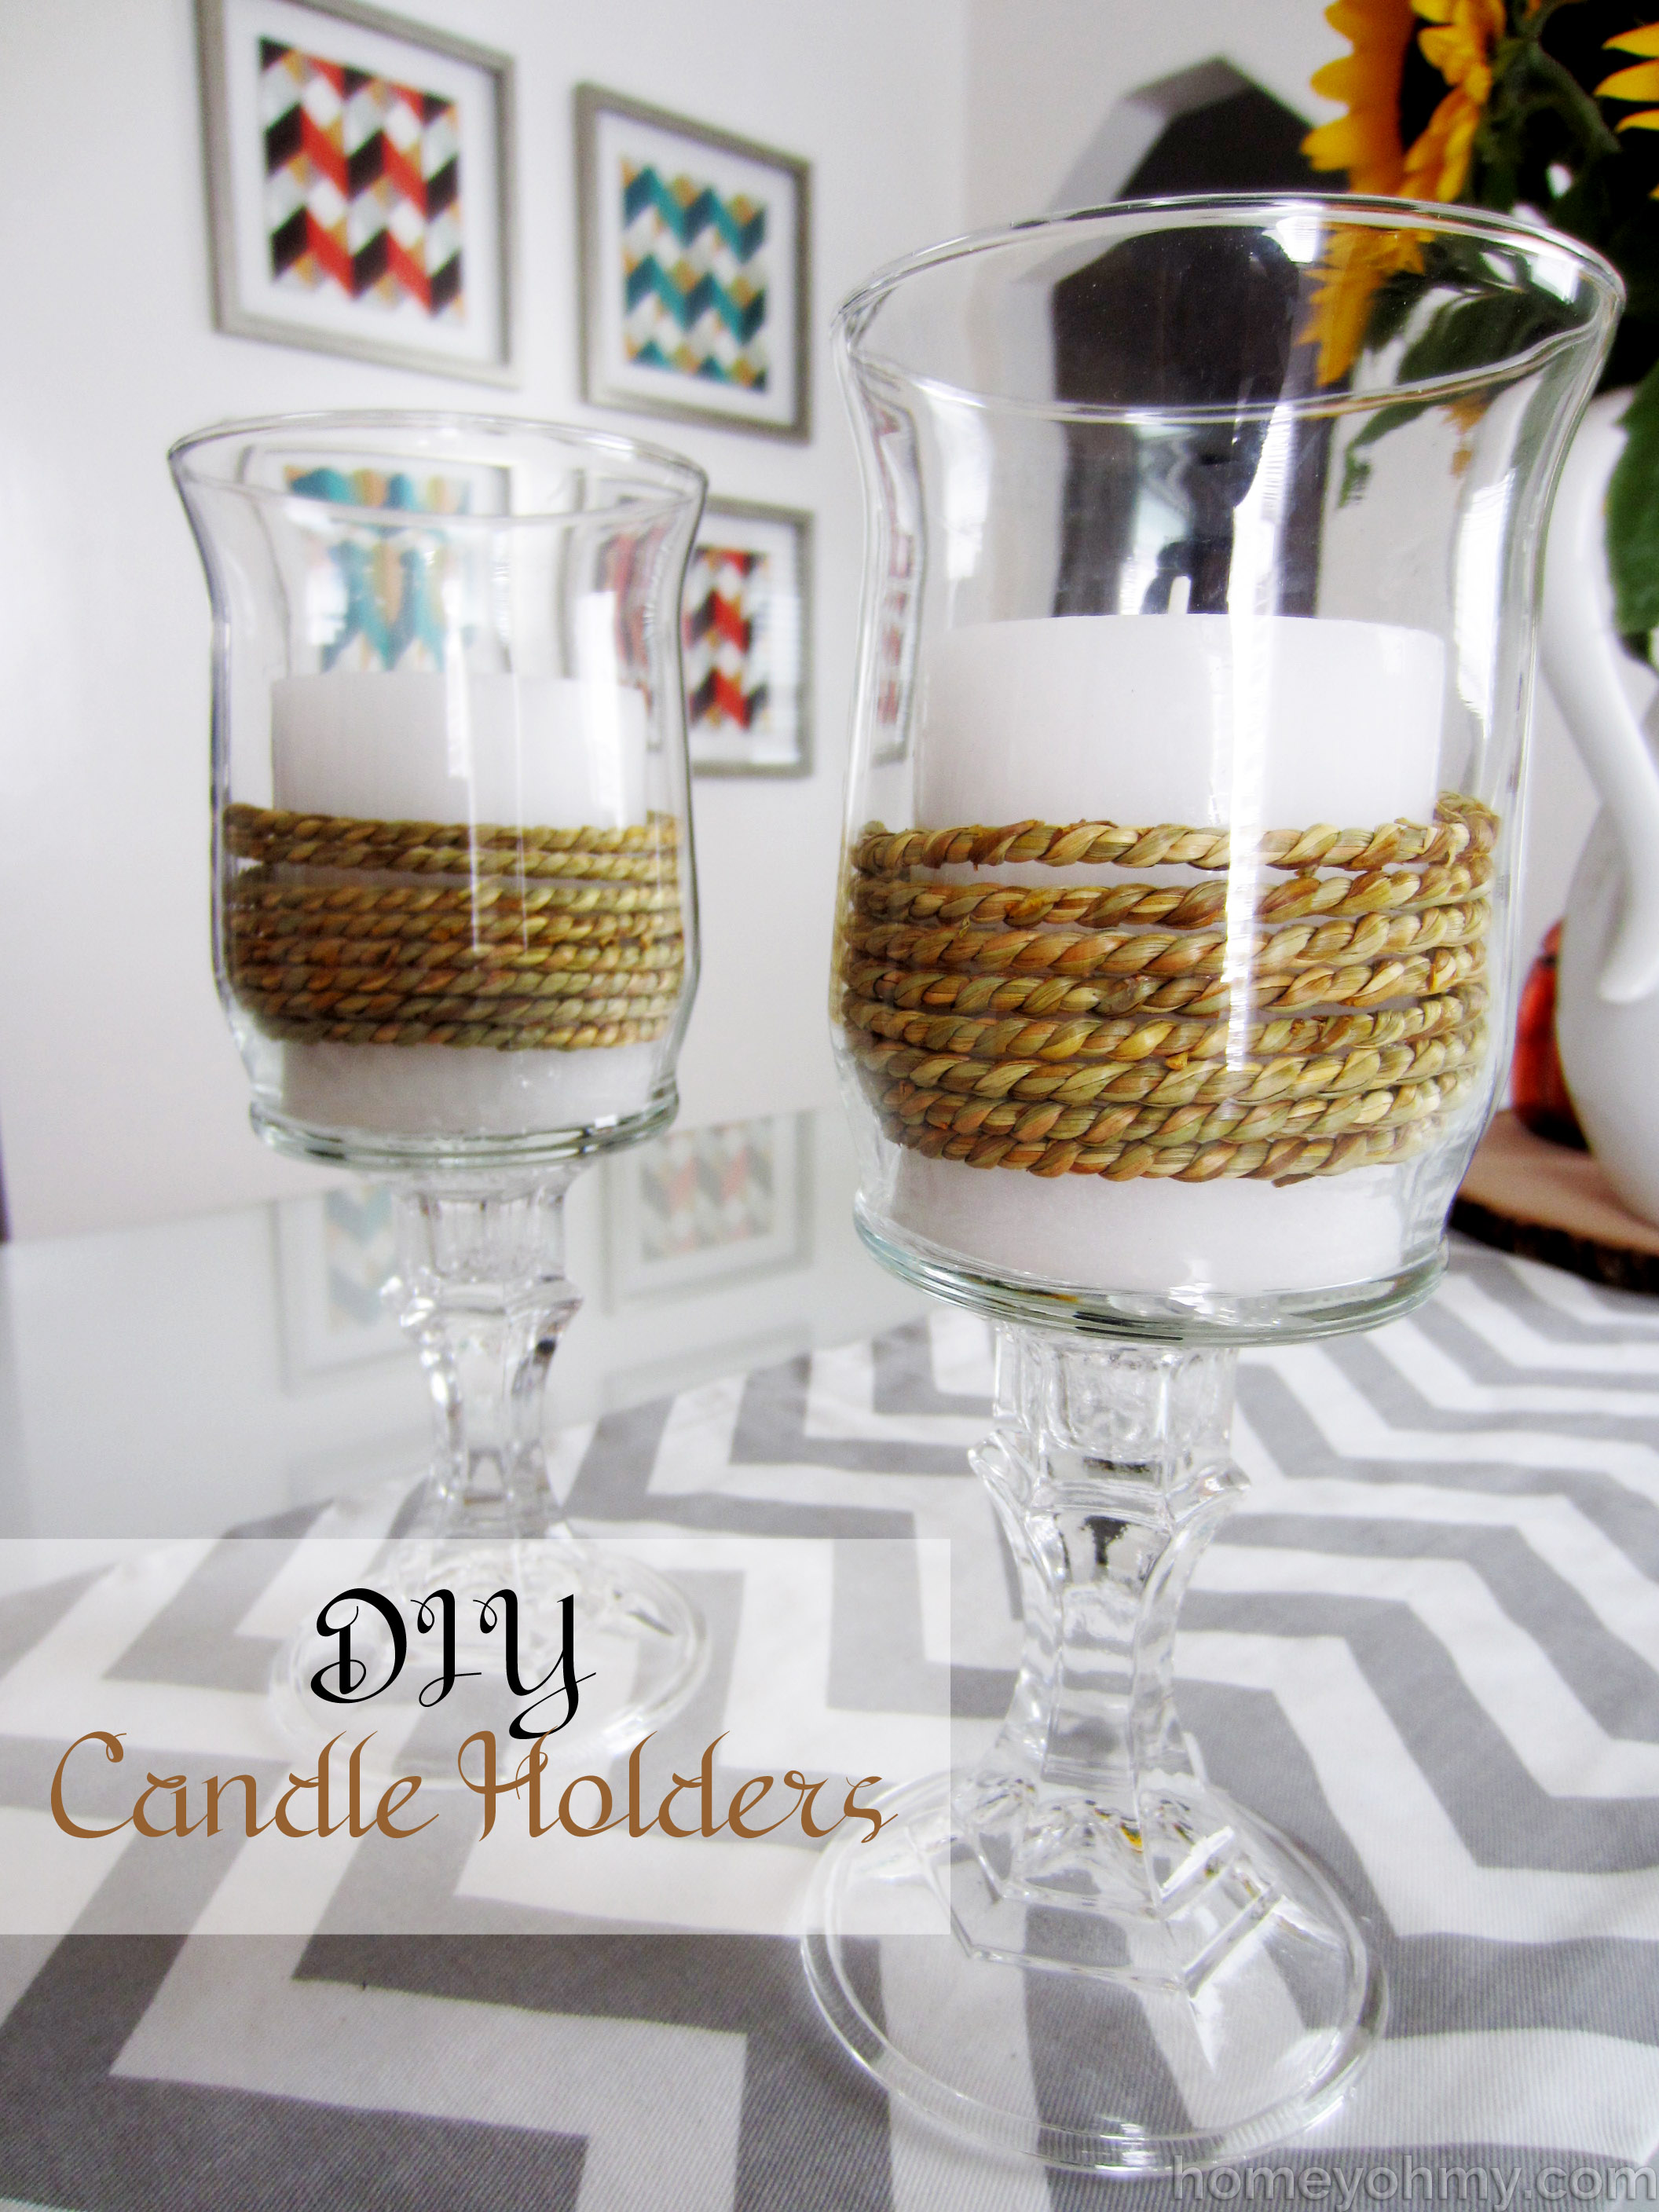
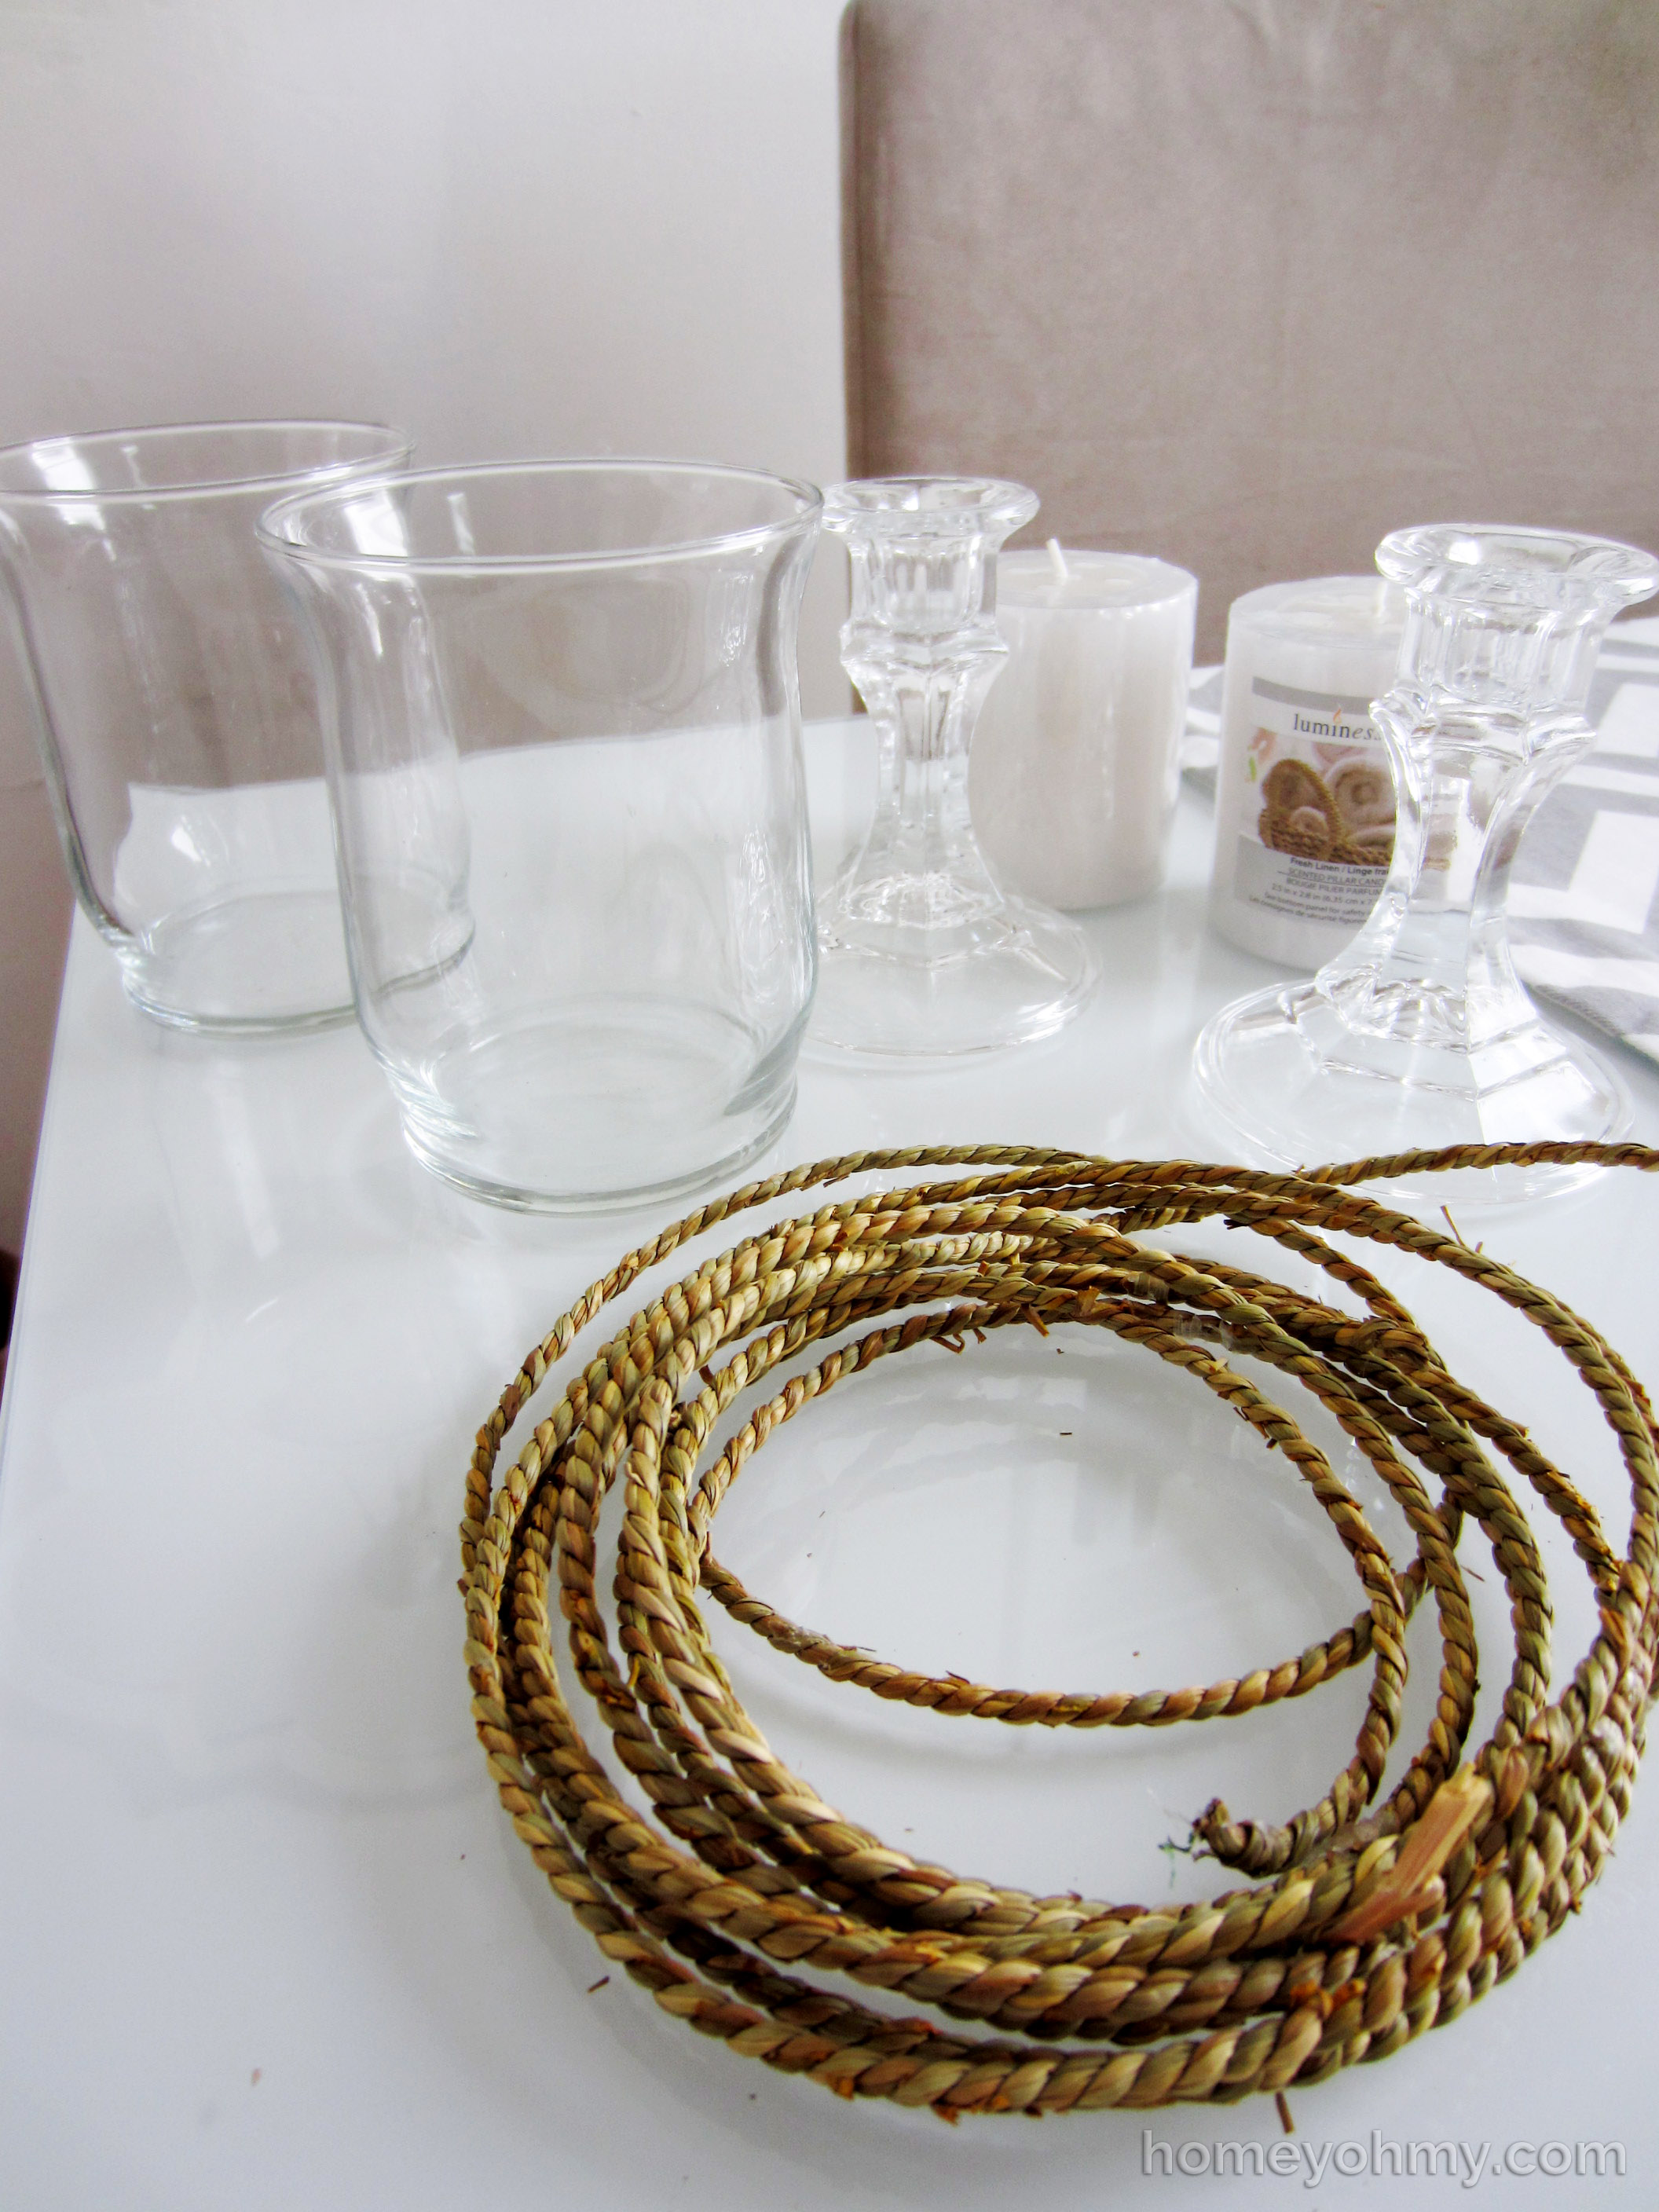
Fall decorating continues with these super easy DIY candle holders. The inspiration came to me when I removed the rope bundled around the wheat grass I used for my fall centerpiece. I wanted to re-purpose the rope somehow and thought an easy, beautiful way to use them would be to wrap them around candles. All I needed next were some affordable candle holders, which warranted a trip to the dollar store.
The votive and candlestick holders were all dollar store purchases, as well as the candles themselves. The only other thing you need is a glue gun.
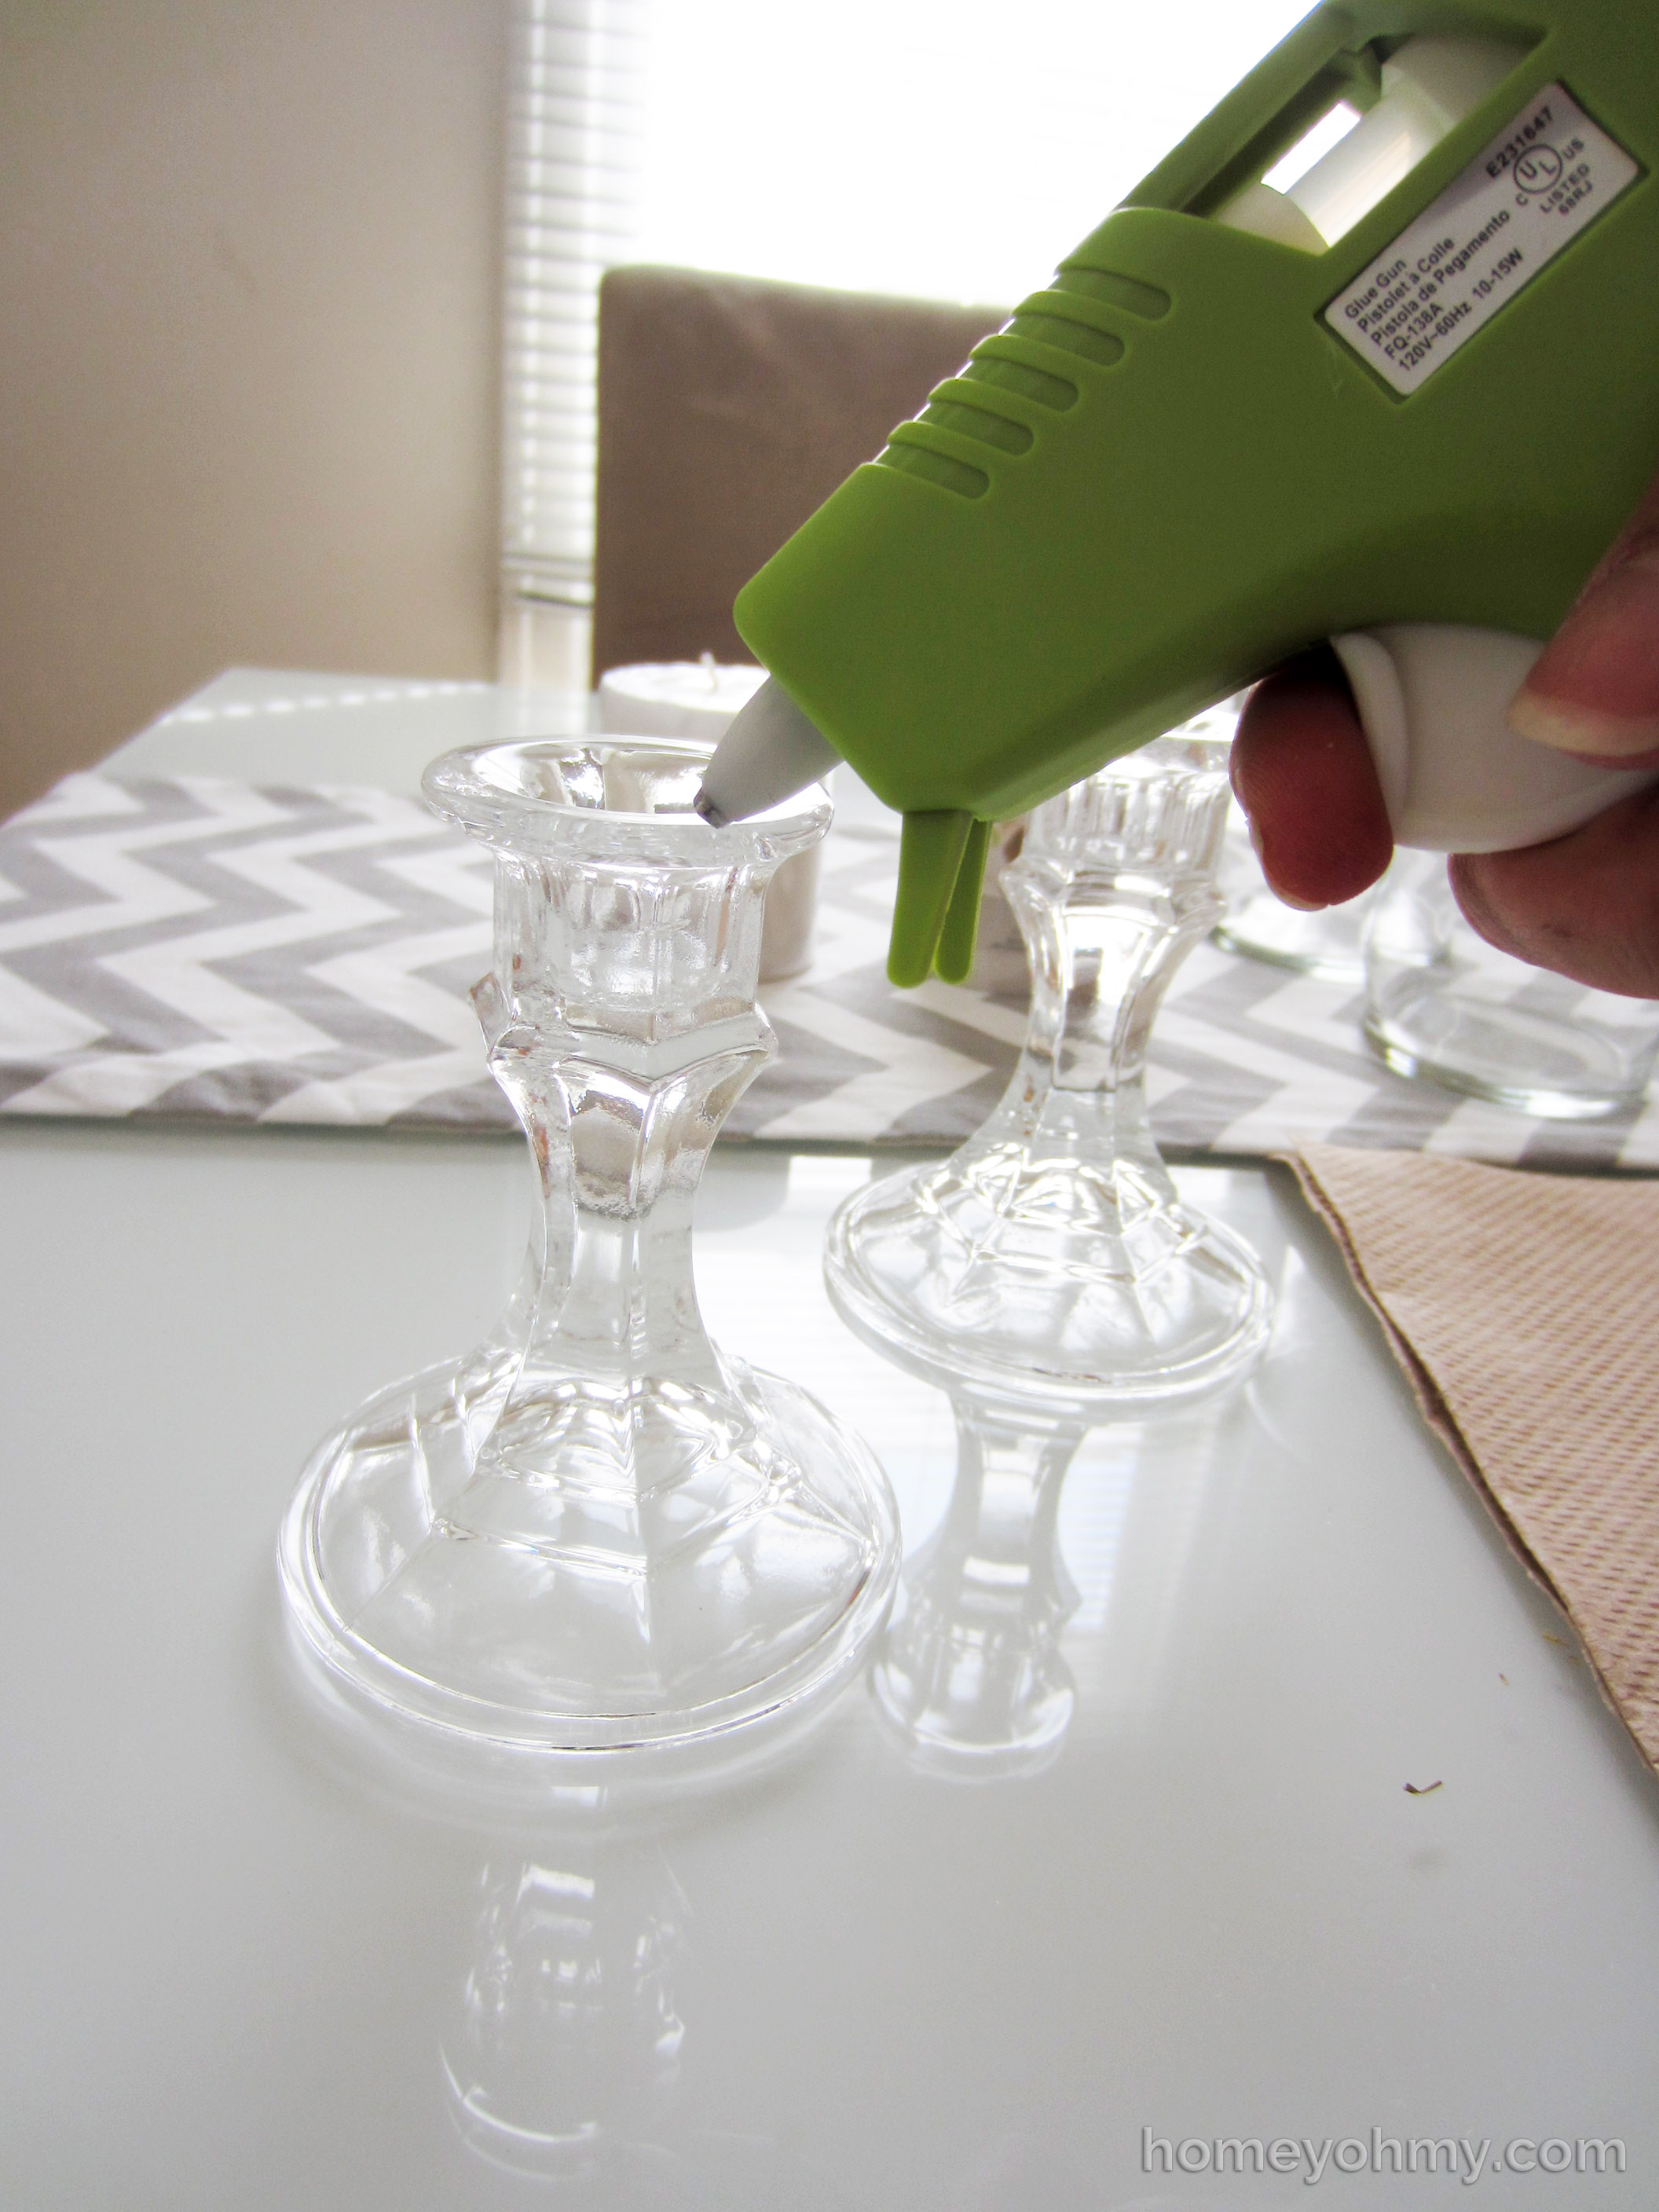
Apply the glue to the rim of the candlestick holder and place the votive candle holder on top. Do this quickly (and carefully) since the glue sets very fast. *Side note: How sweet is my mini green glue gun? Green is my favorite color.*
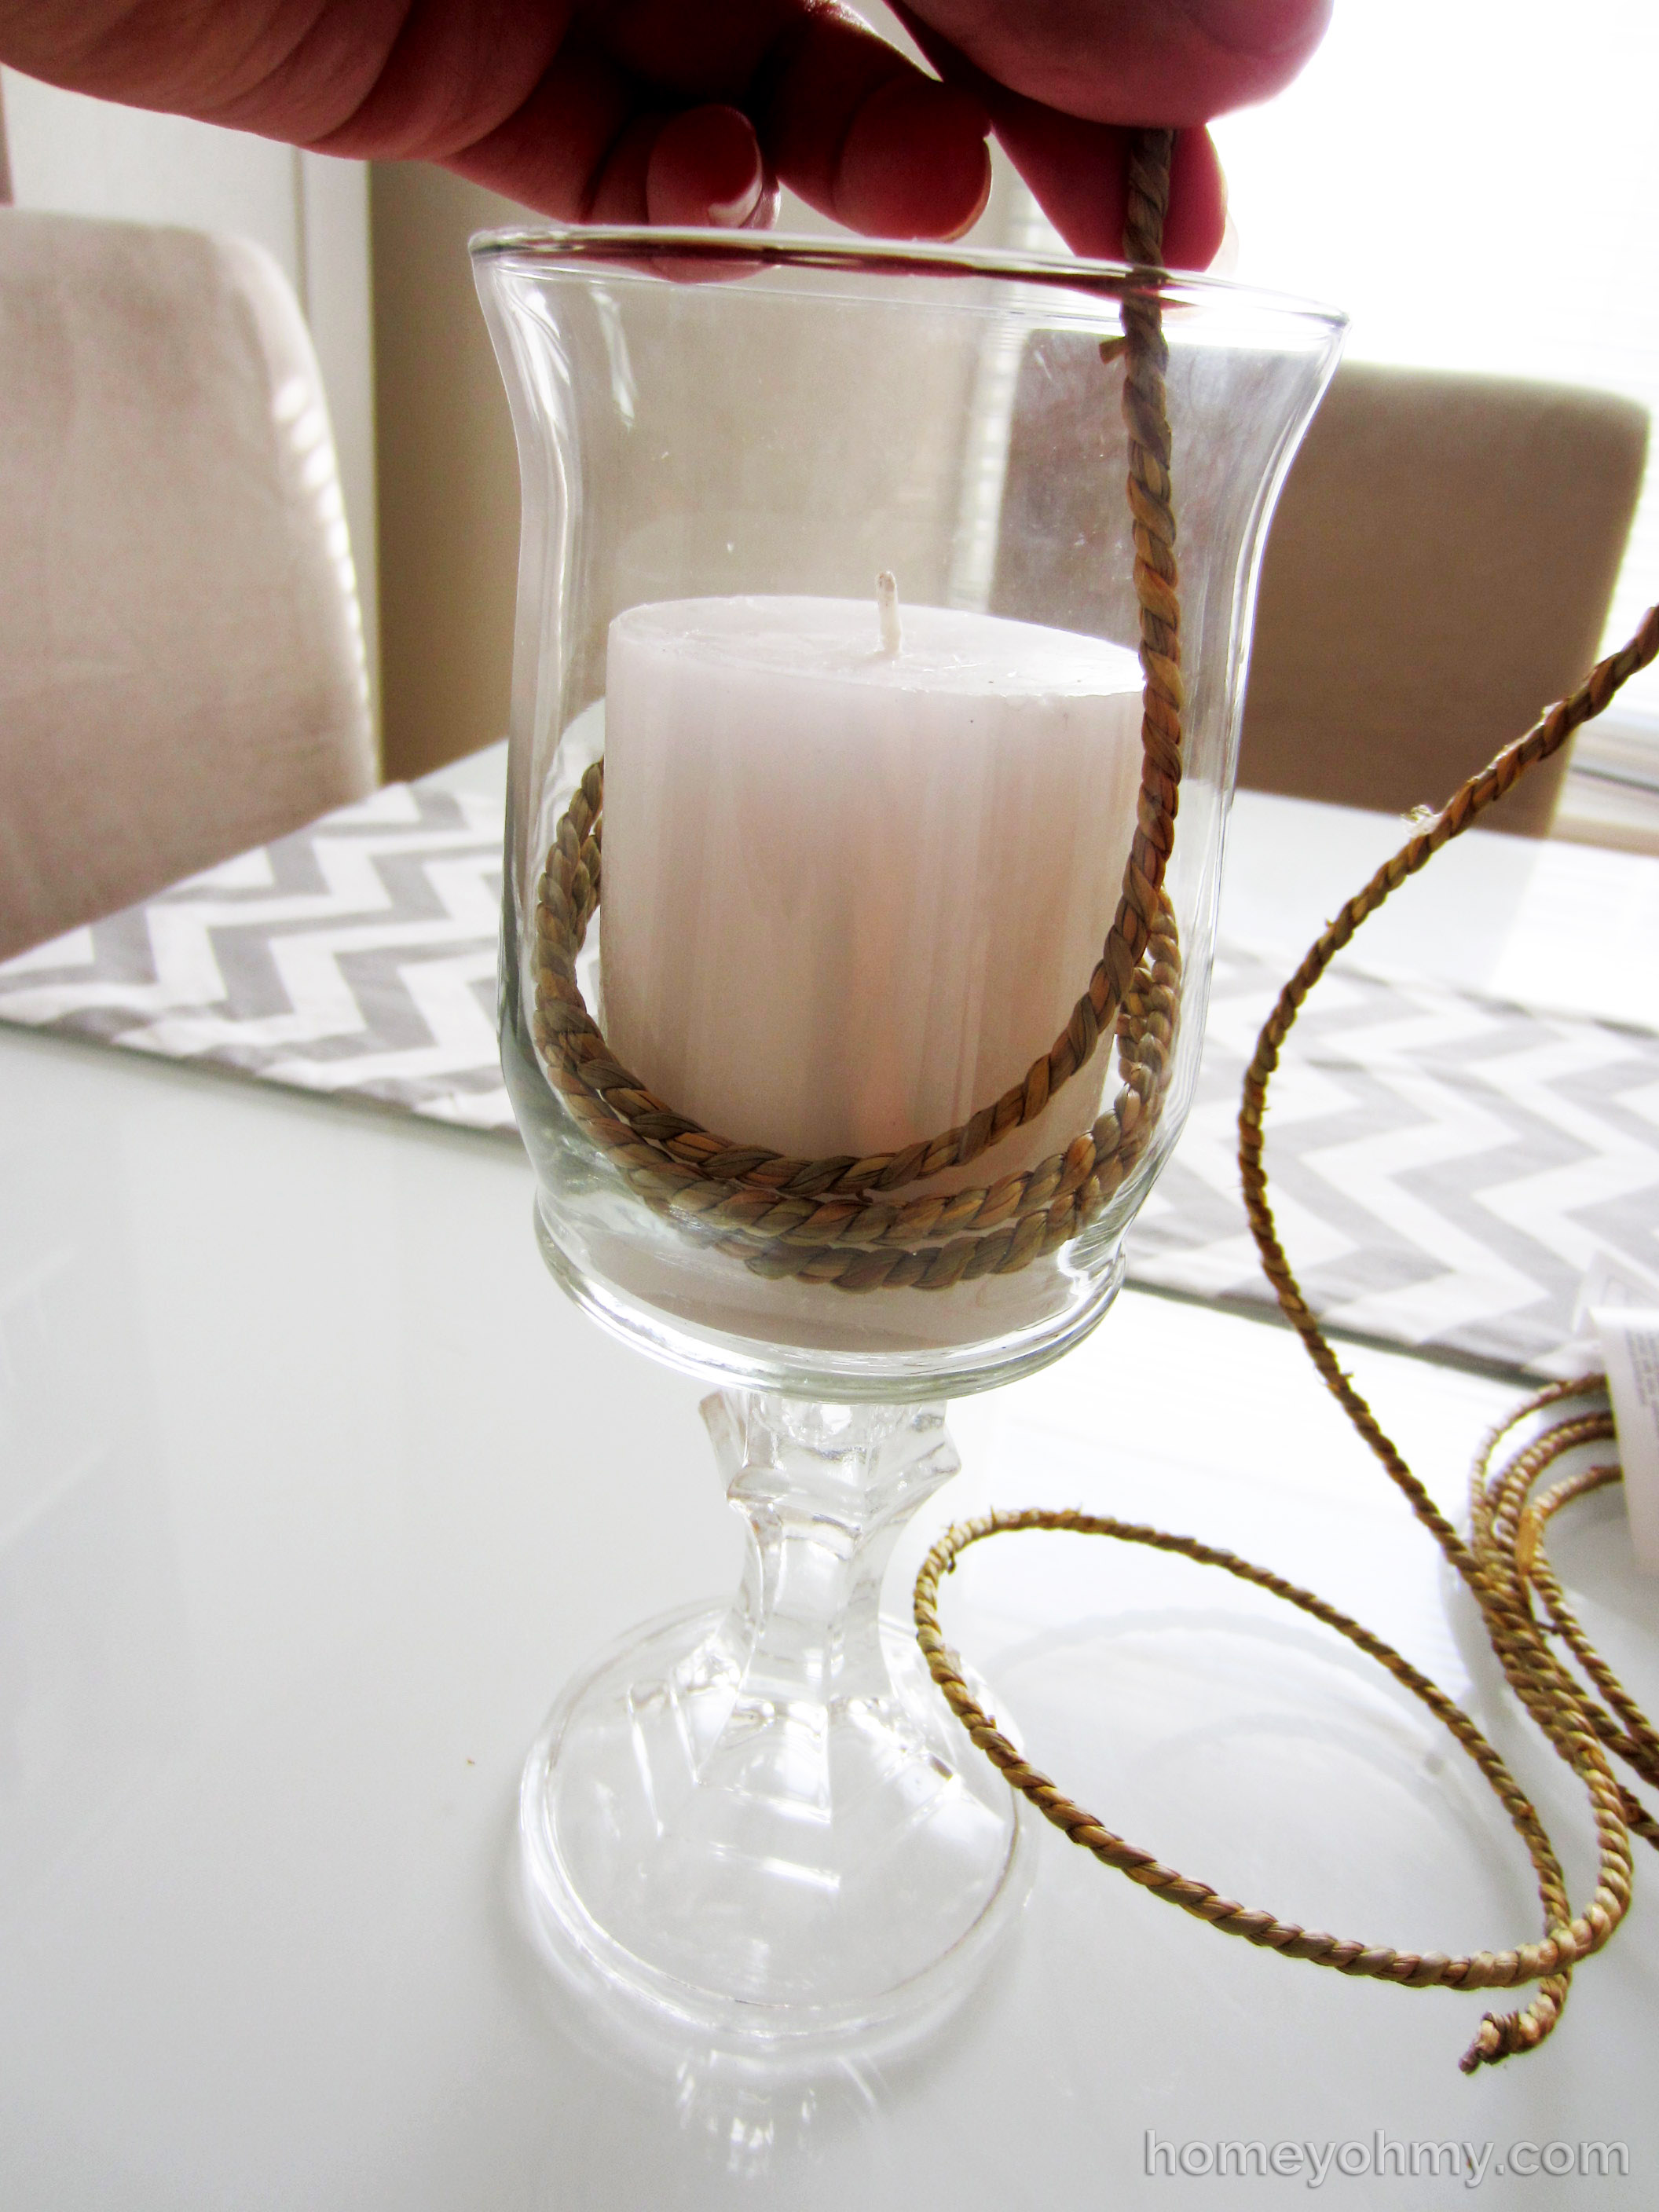
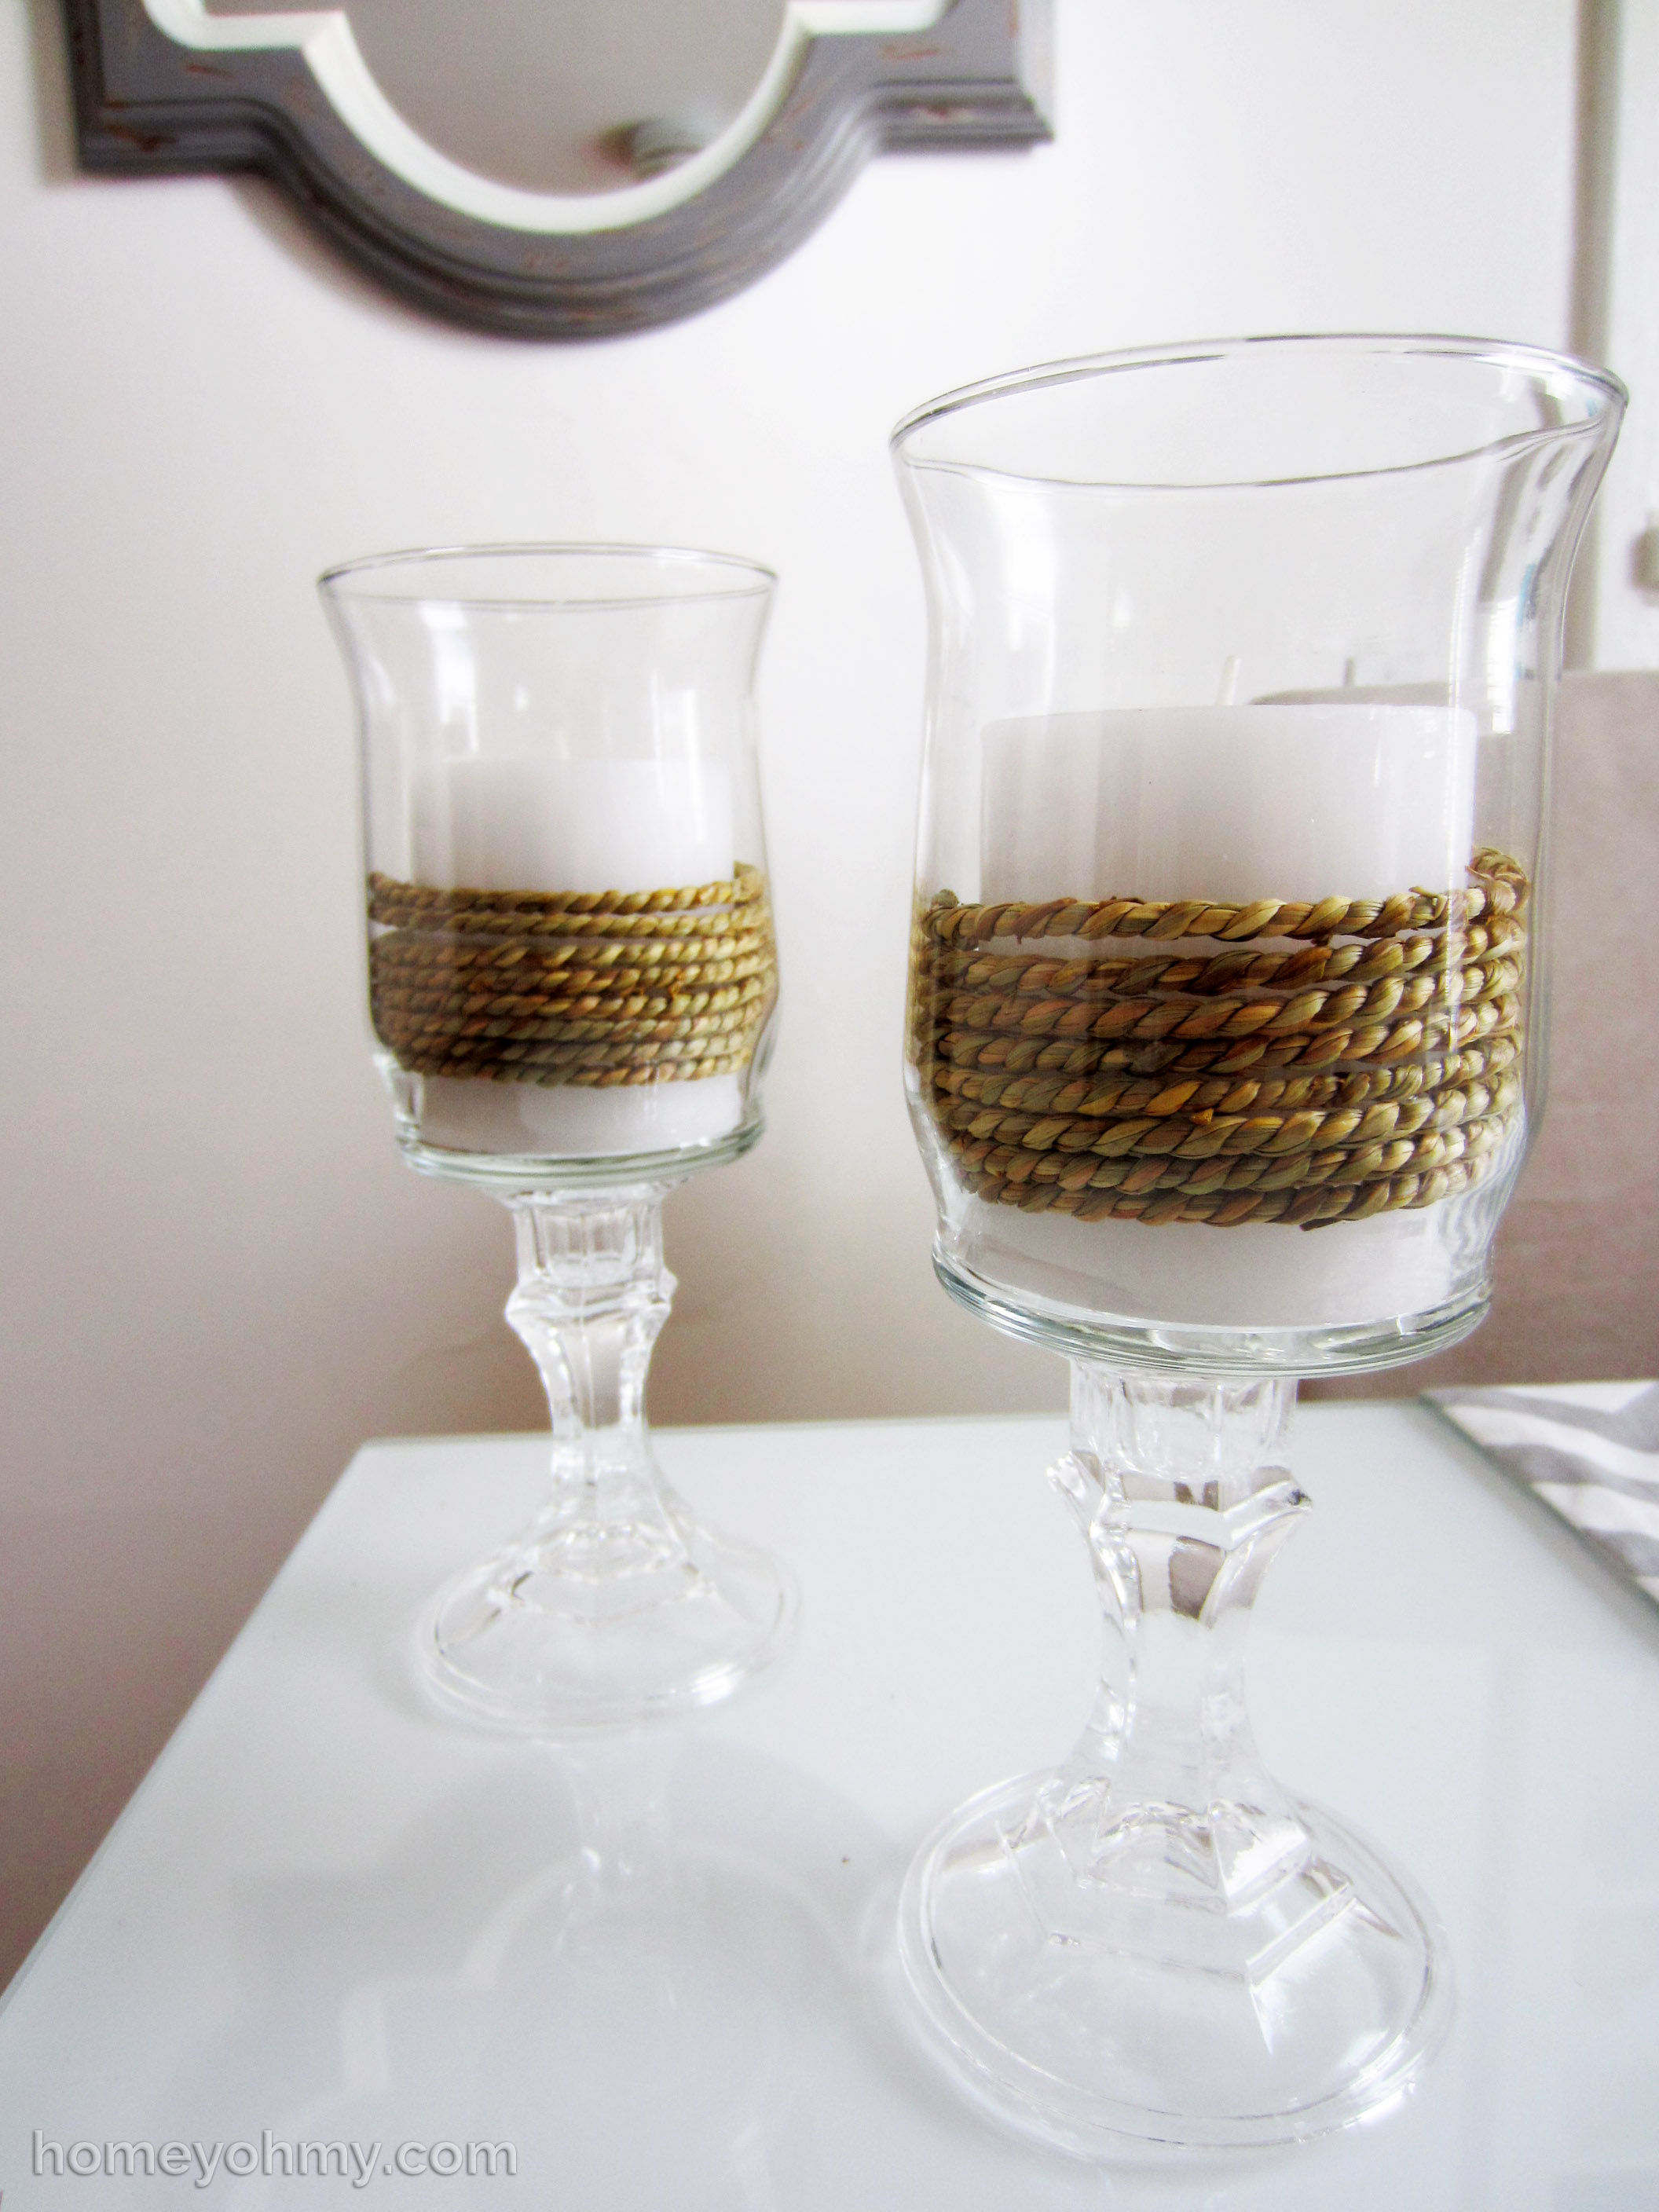
Bam. That’s it! Wasn’t that quick? From this point on there’s a million things you can do with them. I may paint them in the future actually, but for now I just put in white candles and wrapped the rope around each of them.
The rope is actually made from the same stiff material as the wheat grass so it held its shape very well. It may have been easier to use a synthetic fiber rope, but I just love the look of this wheat grass material.
Love how simple and easy these are. I’m a lover of neutral colors and they can make fall decorating effortless and elegant. It’s nice and refreshing sometimes to just keep things simple.