A bit of a rough week- I had three DIYs fail in a ROW. That’s a personal record for me. I notice this tends to happen when I make things too complicated. Simplifying usually does the trick, for a lot of things in life actually if we want to go that deep ha. Feeling a bit defeated but ready to get back on the horse next week.
Thank you guys so much for the positive response to my post about how I grew my blog. Really had been meaning to get that up for so long and seeing how much you enjoyed it made me feel so grateful that there are a lot of us that can relate to each other. If you missed that post or never checked to see if I responded to your comment, go see here, otherwise, enjoy this week’s favorite links!
I’ve put off this post for so long because I felt like I had nothing new to add to what’s already out there. After all, I followed the advice found upon Googling “how to grow a blog” or reading books about blogging (ok it was only one book).
Still, it’s my most frequently asked question, made even more abundantly clear after the reader survey results, and when I thought about approaching it as more of telling my story rather than writing out a guidebook, I was able to stress about it less and get rid of this fear that I might be disappointing people.
I’ve gotten questions like how do you get people to comment on your blog, or how do you get featured on larger sites, and honestly, I don’t completely know how that all worked out. When I look back on the past two years of blogging, it all feels like it kind of just happened, which of course isn’t the whole story because I for sure worked my ass off, but that feeling points out that there is a lot I still don’t know and need to learn.
The bulk of what I know, and the thing that I’m most sure of, is that I spent 82% of my energy on improving my content and 18% on promoting it. Everywhere you look, they’ll tell you content is king, and there is no getting around it. Content is the value of the information you provide, how you present it, and your voice, and it needs to be of highest priority. If I only get one technical thing across, this would be it. That’s why I bolded it.
To stick with my plan of telling my story and to also satiate the interest some of you expressed on knowing this, I’m going to start with how I came to blogging. I’m also going to put titles on sections of this post for better navigating- nice!
How I came to blogging
I shared this before, but I can share it again, no problem. I previously worked in pharmacy. I never called it a career because it never felt like one. I pursued it because I was sold on the promise of a comfortable future, but it was a decision completely devoid of any intrinsic interest, and I needed to get out of it.
I always loved the idea of blogging, and I wanted to do what bloggers were doing- be creative, share things I love, and do it alongside like-minded people. I would have loved to do this through switching to a creative job, but that was proving to be difficult due to my lack of experience.
At that time, I had a friend successfully pursuing a career change, and she was blogging in her spare time as her creative outlet. She encouraged me to start my own blog, recommended a book on blogging, and said Google will have all the answers to my questions, so I did just that: I read the book, Googled my questions, and spent about two months researching and prepping for the launch of my blog.
Sure, I had hopes it would open doors and serve as a portfolio for those creative jobs I couldn’t get to notice me, but even more than that, it was my passion project. I felt like I had forgotten how to access that part of me after years of being a zombie at my job, so it was as exciting as it was terribly scary. That’s one giant thing I’ve learned, by the way: if it’s scary, that means you should do it.
Around this time, I had moved into a new apartment I loved (still here!) and it was tugging at me to share all the things I was going to do to decorate and DIY for it. Was I doing any of that stuff before? No, never, but I really, really wanted to. That’s a great thing about blogging- it makes you improve at your subject. What I didn’t know at the time was that it would turn into my absolute joy, that it would grow into a deep love for design, and that clarity and focus would become one of the best things that ever happened to me.
My plan
There is no plan without a goal. My goal from the very first day was to grow this blog with the hopes that I could go full time with it. I don’t know if I ever said it aloud because frankly I was mad shy about it, but I did write it down in my notebook, which totally counts.
So knowing that I wanted to take this seriously, I stuck to a regular posting schedule and promised myself I’d do whatever it took to get it done. For me, that meant working most of my nights and weekends in addition to my full time job. I don’t mean to say that this amount of time dedication is necessary for blog growth, but when I get asked how I grew “so fast,” I’d owe a lot of it to those long hours.
I came from zero design background and knew nothing about what goes into blogging, so the majority of those long hours for about the first year were spent learning the skills I needed to improve my content (remember what I said about improving content?) I had to learn WordPress, basic coding, photography, photo editing, Photoshop, social media marketing, research equipment I’d need for production, research materials and techniques for DIY, learn blogging/internet etiquette, keep up with trends, how to find my style and voice, the list goes on.
There’s a million things to learn, and once there, those things need to continually be improved upon. It’s what I love most about blogging, that constant learning, and keeping up with that will yield results, absolutely.
Yes, but how did you get people to come?
I didn’t do anything crazy, or at least not as much as I sense people think I do. I don’t have any secrets or insider tricks on super boosting blog sharing. I just stuck to the basics.
–link-ups
These were so instrumental to the very early days of my blog when I was getting like 6 views a day. A blog or multiple blogs host a weekly link-up where you submit your blog post through a widget and everyone can browse the submissions live. Hosts would then pick their favorites and feature them in the following link-up while also sharing them on social media. Getting featured is what really helped bring more eyes to my blog, and it also connected me with bloggers that I’m still buddies with today.
–submission sites I only submit to Craftgawker or Dwellinggawker because they have been the most successful in how much traffic they bring. Other than having submitted one of my posts to Apartment Therapy, this is it for me! For a comprehensive list of submission sites for home, craft, and DIY content, go here.
–Iposted regularly to social media There’s so much that can be said about strategy for each platform, but I’ll touch on the two most important.
Pinterest is the most important one because it brings the most traffic. I didn’t see my Pinterest following really start to grow until I joined large group boards and got really picky about what I pinned, making sure everything was in line with my style and aesthetic. My best guess for how my work was found for getting featured in larger publications is through Pinterest.
While Instagram makes it hard to track how much traffic is being referred to the blog, many of the inquiries I receive about collaborating indicate that they found me through Instagram, so I consider it a very important platform to stay regular with. Also, a lot of you said you stay up to date on new posts by following me on Instagram, so that’s important! My following started growing faster once I got specific about my style and aesthetic (this seems to be a recurring theme), used popular hashtags, and actively interacted with other grams.
-I commented on blogs/social media posts I genuinely liked I was definitely guilty of doing that “Hey come check out my blog!” commenting in the very beginning, and I learned very quickly that’s not effective, or appreciated for that matter. So if I came across something through a link-up, Craftgawker, or social media that I liked, I’d read the post and leave a comment responding to it. Simple. It’s how I connected with some of the bloggers that are still my buddies today (this also seems to be a recurring theme).
Advice for new bloggers
This is essentially a summary of the main points to take away from my story and then some, and is maybe all you wanted to know from this very long post ha.
1. Be very clear about your goal.
It will guide your plans and pretty much every decision you have to make about your blog. There can be more than one, but they need to be written down and looked at regularly so you don’t forget them. This is mandatory.
2. Improve your skills.
I put high priority on improving photography and styling to present my work in the most beautiful way I could, and still do. I’d owe a lot of my blog growth to this. Whatever technical skills you need to get your story across in a beautiful and effective way, work to always improve on them.
3. Focus on sharable content.
It’s a lot easier to gain traction on a post about “The Softest Chocolate Chip Cookies” than a post about “My Trip to Grandma’s House.” Which one are you more likely to check out as a brand new reader? As a reader myself, I like the personal or random posts if I’ve established a connection with a blogger that I regularly follow, but if we’re talking about growth in the beginning and bringing in new readers, the sharable content (anything that teaches something valuable) is what’s going to do it.
4. Stick to a consistent posting schedule.
Quality is more important than frequency, but it is not likely that the content you produce in the beginning will be your best work. We all start somewhere (I dare you to look at my blog posts from when I first started my blog but also please don’t they are so embarrassing) and if you wait to only post things you think are perfect, you will never start. Posting regularly forces you to put yourself out there and get better, so long as you can be real with yourself about what needs to be better next time and then do that next time.
5. Find your style and voice.
I was lost on what my style was, or would be, before I started blogging, but I knew that blogging would help me find it and once I did, everything became infinitely more natural and clear. So much of what I did in the beginning was to emulate what other bloggers I admired were doing, so in a sense it was difficult to feel like myself. It basically took me until yesterday to be really comfortable about the way I write and what I love, so that goes to show that it takes time and practice. It’s easy to feel like we’re chasing after predicting what other people want to see, but if we can focus on what we love most with our whole hearts and continually search for it, it will attract the right people- this is really what we all want, and what makes all of this so fulfilling.
Blogging is essentially soul searching. It is a hard, time-consuming, and at times a lonely and scary thing to pursue. You’ll work so hard on an idea you believe in and might have to face that no one shows up or comments on it. You’ll go after collaborations and might face the rejection of them not seeing your potential the way that you do. The biggest thing that will push you through is if you truly care for what you blog about and stay honest about what you love, if you can enjoy the learning process and connect with people who relate to your highs and lows. As difficult as it can be, it’s a lot of fun- let’s not forget that among the pressures of trying to grow and build our visions.
Thanks a million for reading and for your support on sharing my story. If you have more questions or general thoughts/insights/advice you want to share, leave them in the comments below. I’ll get back to you. <3
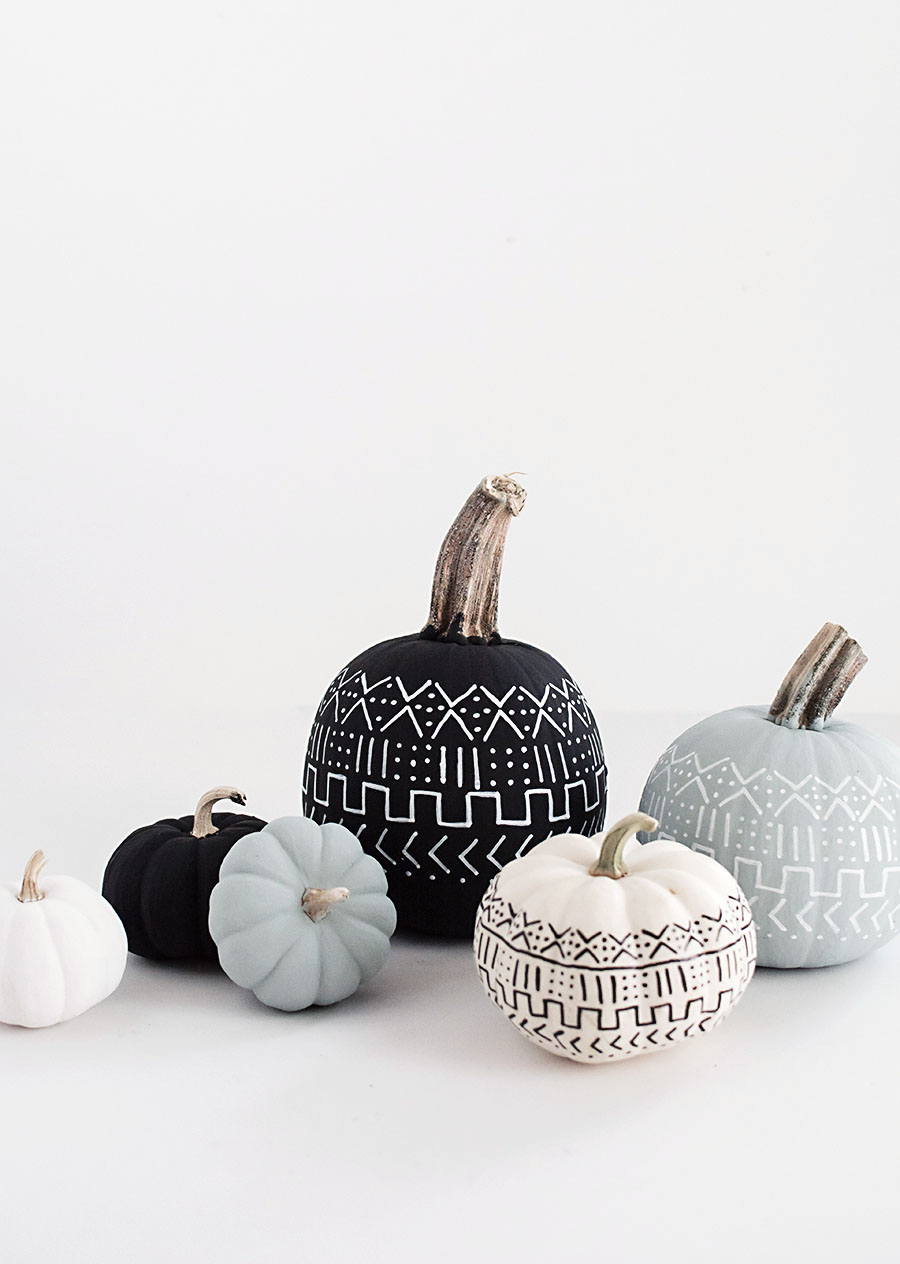
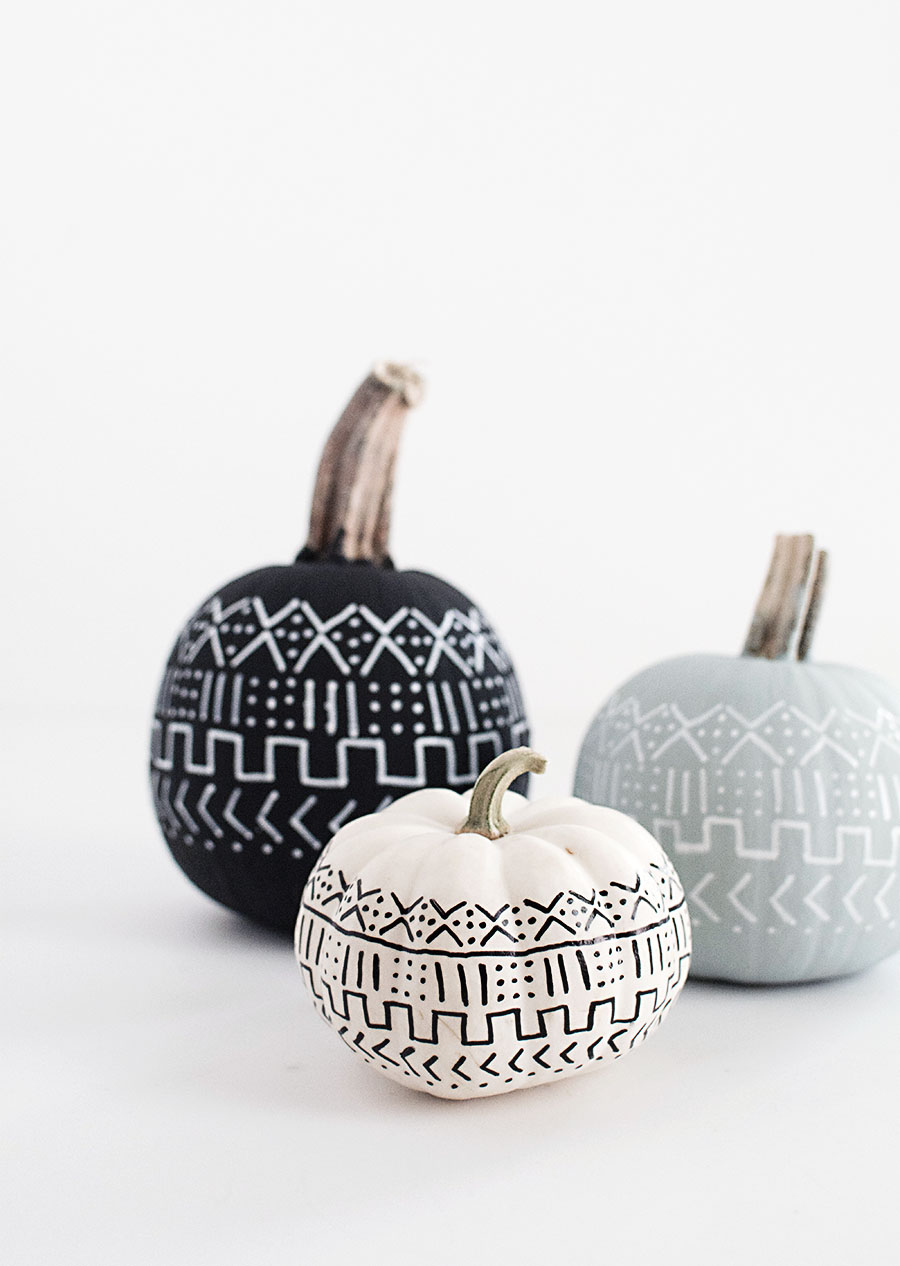
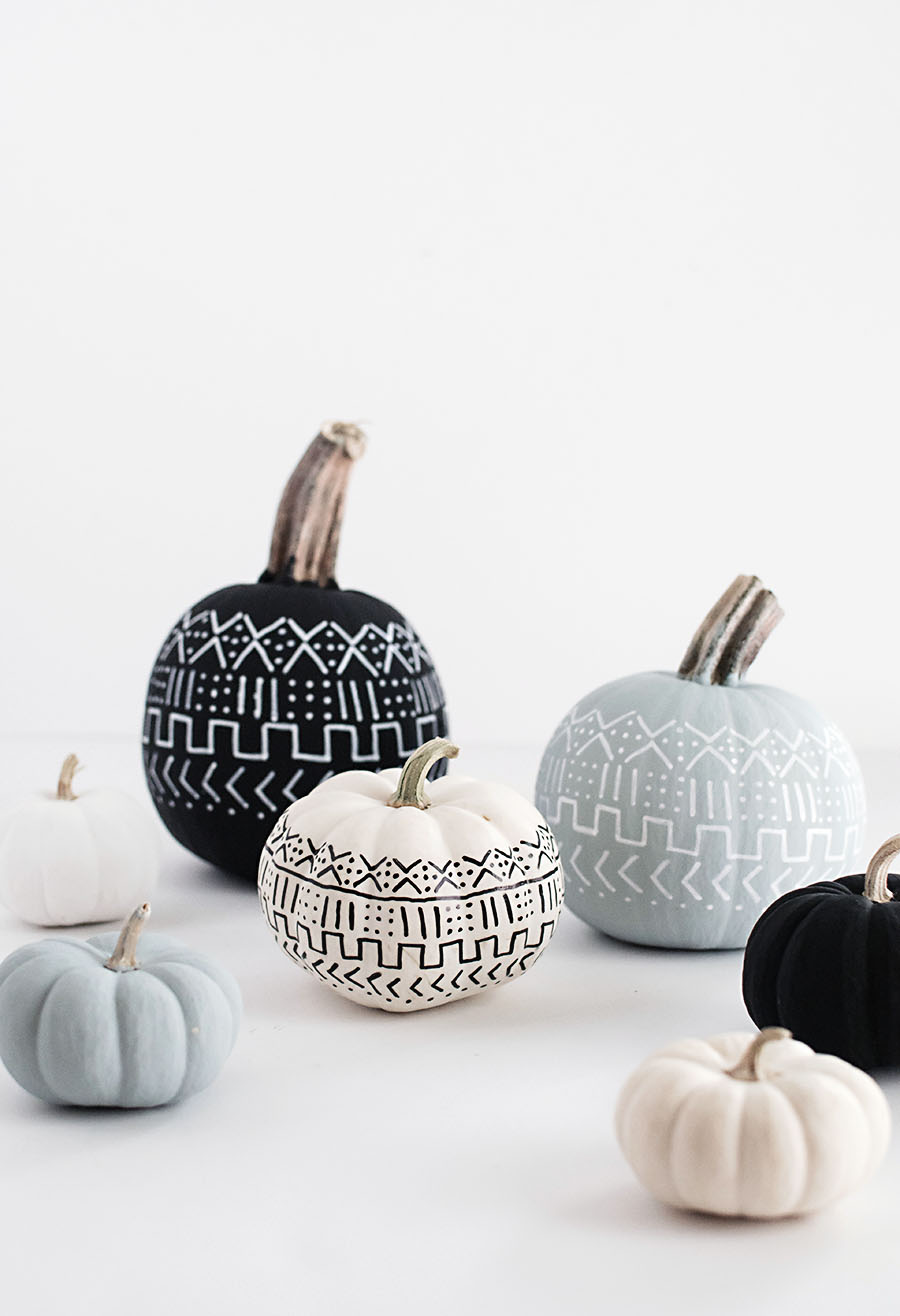
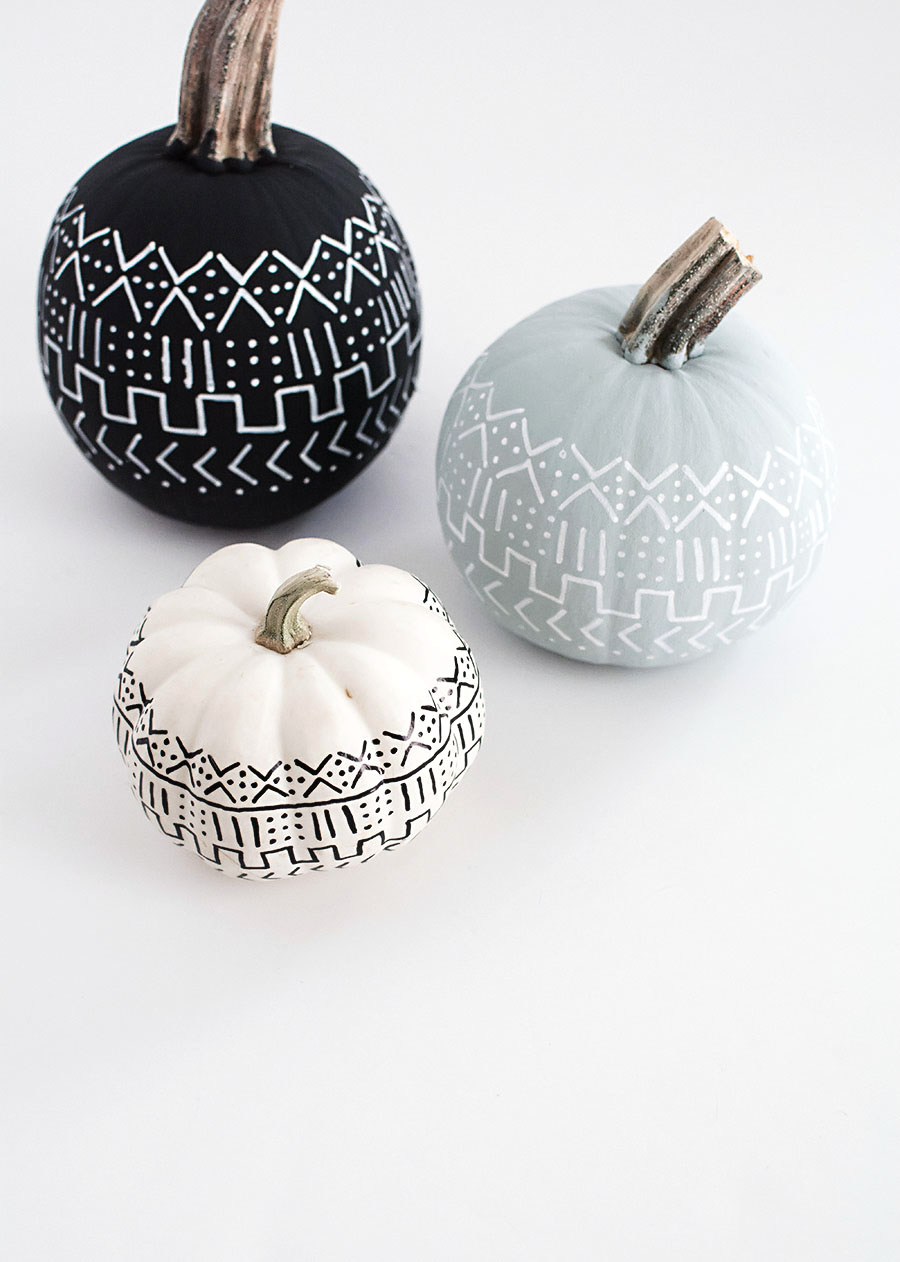
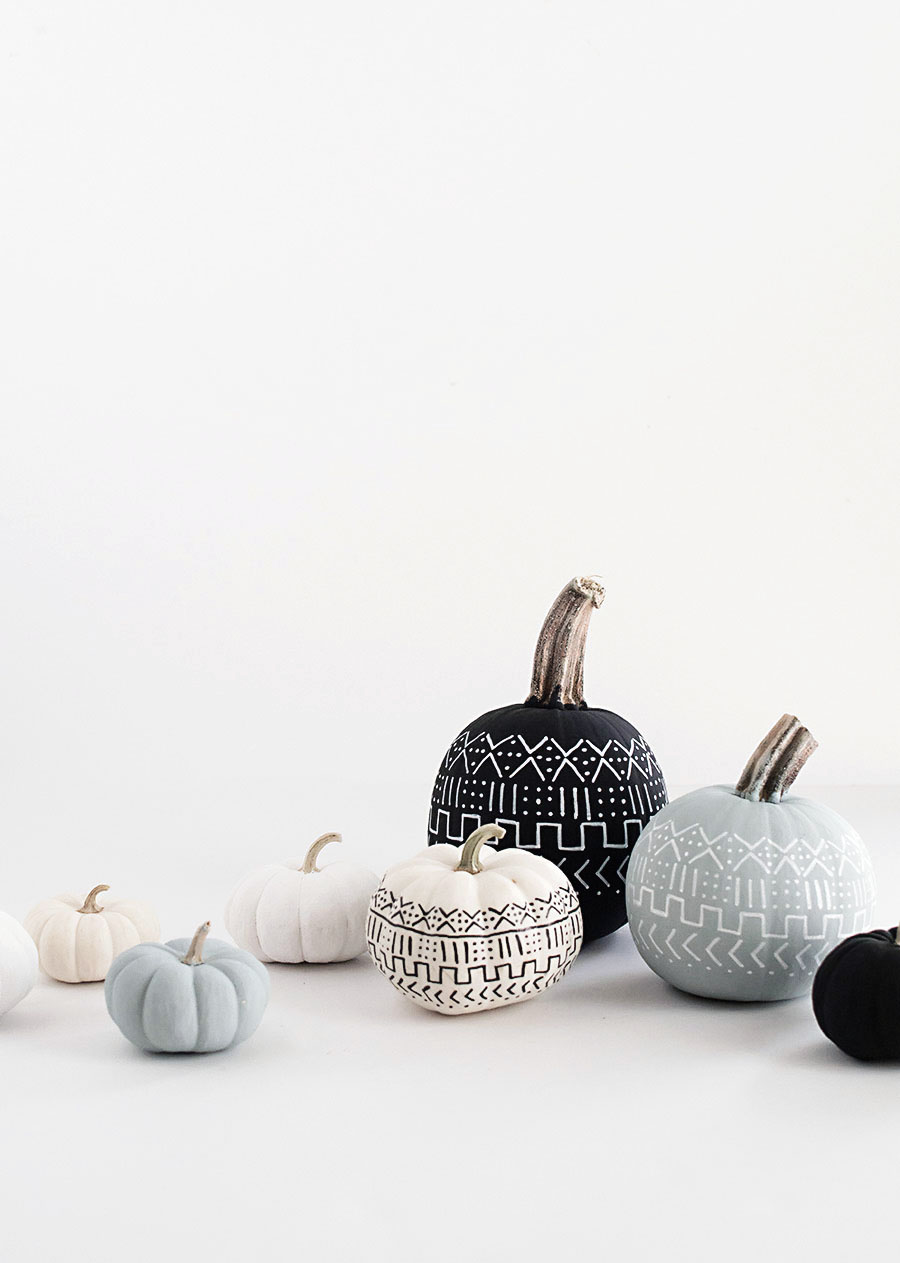
Ok, just one more pumpkin DIY, because it’s so easy and there isn’t even much to tutorialize (??) on other than a few important tips. Aside from that it’s seriously just painting and doodling on pumpkins aka fun.
I’ve also for a long time been meaning to do something inspired by mud cloth patterns and realized… pumpkins are a great low commitment way to try out trends or designs. Really. Ombre, donut, gold foil, marble, cactus, this, that- put it on a pumpkin, enjoy it, then toss it when it dies. Easy. Just try it.
Materials:
-pumpkins, washed
-chalk paint (I used black, white, and “vintage” and got 2oz bottles from the craft store)
–foam brush
-oil-based paint pen (I used white and black)
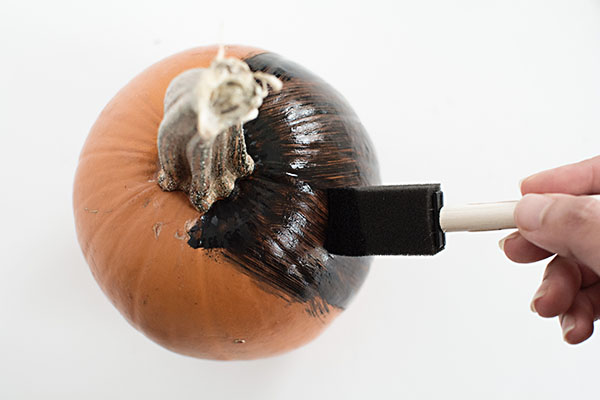
So this was my first time painting pumpkins by hand, and already we’re at tip #1: Use a dabbing motion to apply the paint to the pumpkin. The way I’m showing it above streaks the paint around and will require way more coats to get opaque coverage, so save yourself time and dab (I did this later, it’s much much better). The paint needs to dry completely after a few coats before moving on.
Referring to mud cloth patterns as inspiration (search “mud cloth” on Pinterest), I planned out my design on paper first, then started with the center pattern of the design to draw around the pumpkin.
Tip #2: Don’t press too hard with the pen or it will scrape off the chalk paint on the pumpkin.
Tip #3: Keep the paint pens wet and loaded. These pens have those tips that depress to release paint, and regularly depressing (on a scrap piece of paper) and keeping the tip loaded with paint will reduce any drag on the pumpkin surface, therefore reducing chances of scraping off the chalk paint.
Next, I drew on the row above the center pattern…
…then the row below…
…then one more row on top.
Tip #4: Wait for each row of paint pen to dry before moving on to the next row. This will reduce the chances of smearing a still wet row with your hand as you draw the next row (yup, this happened to me).
How about that gray/periwinkle/jade/mint color?? So dang pretty. We’ll call it my “it” color for fall.
I would’ve loved these pumpkins even without the mud cloth patterns because the chalk paint looks so good. The matte finish keeps it looking more organic and just generally more awesome. White chalk paint is also really good to use with those white pumpkins that look too yellow, which I already did with some of mine, which kinda feels like what’s the point of getting white pumpkins if you’re just going to paint them white, but I regret nothing.
Have you been decorating pumpkins or nah? What designs have you tried, or are wanting to try?
I never print my photos. Never. As much as I love taking them, I rarely go beyond having them exist anywhere other than on my phone or the blog. Oh, but you already see where this is going, yea? I had some printed out! For all that effort I put into snapping shots of my favorite places, things that inspire me, and moments I loved, it’s nice to have little mementos to actually look at IRL.
So I came up with this really simple wall hanging DIY in partnership with SnapBox to put those Instagrams on the wall in a cool and modern way, perfect for hanging up inspiration in a work space or just a casual way to house memories.
Note: the long list of materials does not indicate the difficulty of this project. It’s easy, really.
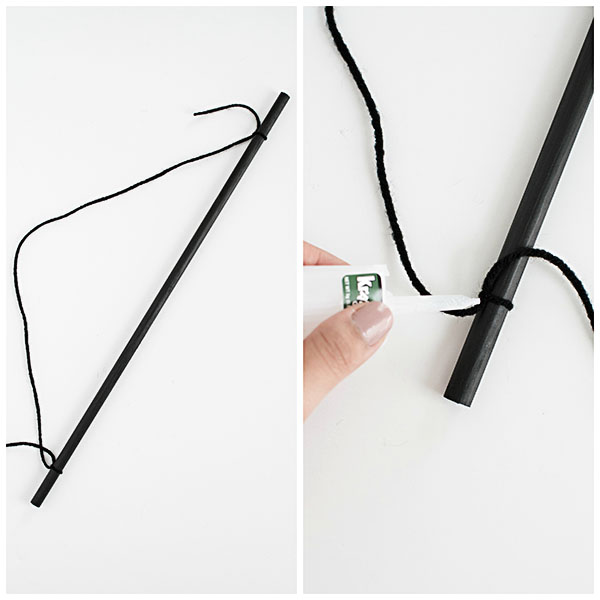
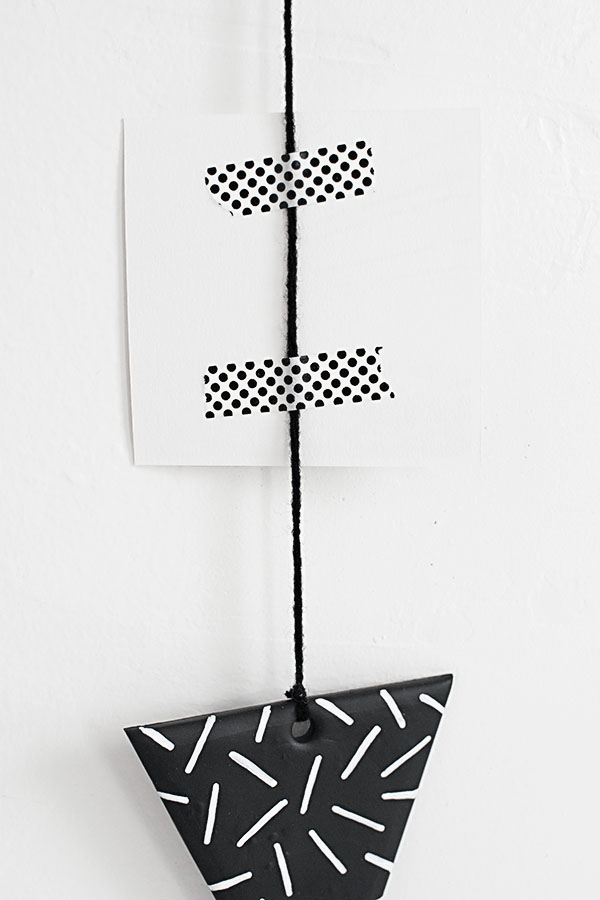
I painted a round wood dowel with black acrylic paint using foam brush. Once dried, I tied each end of a piece of yarn to each end of the wood dowel, applying super glue to each double knot to secure in place before cutting off the excess yarn. From this point forward, every double knot of yarn is secured with a couple dabs of super glue.
Next, I double knotted three long pieces of yarn across the dowel and cut off the excess yarn.
We could stop here and be totally fine. BUT, I wanted to add an ornamental element because that’s fun, and it helps weigh down and keep the yarn taut, so the next steps are for those triangle thingies that are hanging at the bottom.
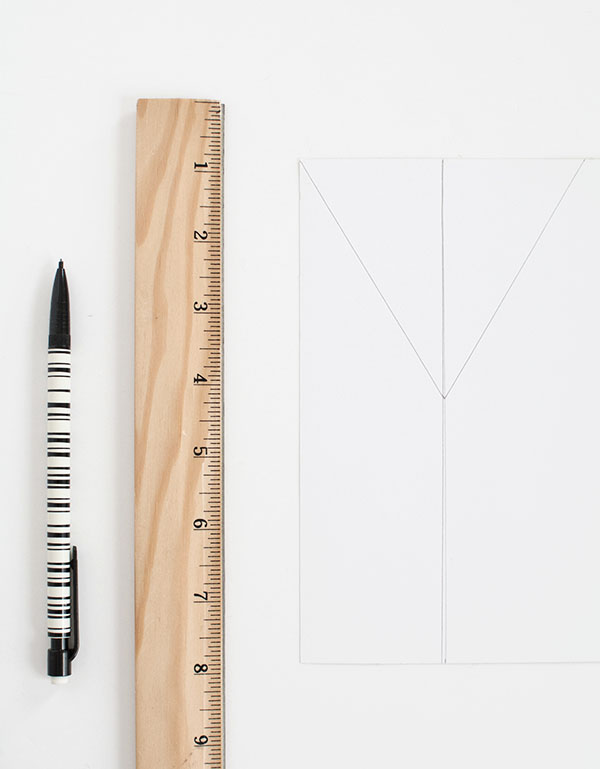
I measured and cut out an equilateral triangle from a piece of card stock. Really simple: I measured 4 inches for the base, drew a straight line down at the midpoint (2 inches in), then drew 4 inch lines from each end of the base to the center line. I did the same thing for the larger triangle, only I made the two longer sides 5.5 inches long.
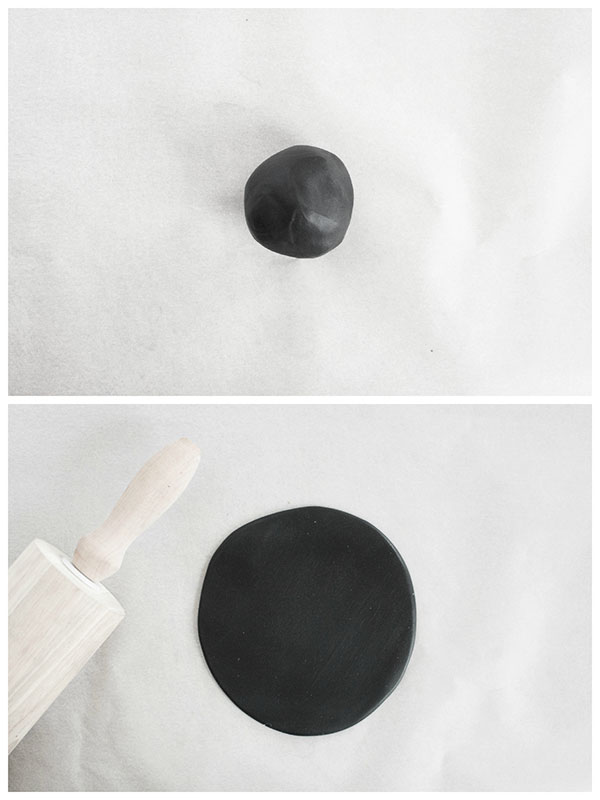
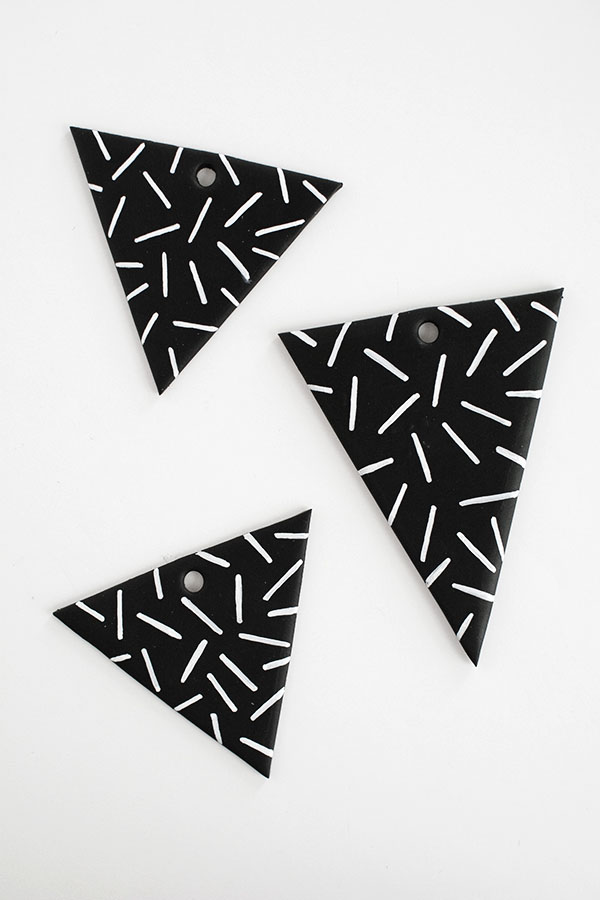
Working on top of a cutting board lined with parchment paper, I rolled one block of black clay into a ball then flattened it out until it was just large enough for the triangle card stock.
I cut along the triangle with a knife. The “proper” thing to do would be to use a clay blade, but a knife works perfectly fine heyyy. This also cut out the parchment paper backing with the triangle, which I left stuck on to the triangle.
For each clay triangle, I used a straw to poke a hole out from the top. The key is to twist and wiggle the straw so that the clay from the hole pops out with the straw. I then transferred each triangle to a baking sheet lined with parchment paper. Baked them at 260F for about 30 minutes, and honestly, I don’t know the science to this and just played by ear. All that the instructions on the plastic packaging of the clay said was not to exceed 265F. Hopefully your clay has more to tell ya.
Once cooled, I used a white Sharpie paint pen (oil-based) to draw this sprinkle-like pattern on each triangle.
Each triangle was double knotted at the end of each yarn that I previously tied to the dowel. I feel a strange urge to eat them.
Now the fun part.
I ordered 4×4 prints of some of my Instagrams through SnapBox, which was so so easy to do because the photos were imported directly from my Instagram account. What I loved most was that I was able to make edits to the photos (have you ever posted a photo to Instagram and later wished you had edited some aspects of it more? Am I crazy?) I definitely did all those “wish I had done that” things to some of these Instagrams, like bumped up the brightness on that one, or turned down the saturation on this one. LOVE that feature.
I planned the layout before putting the photos up on the wall hanging.
I used Washi tape on the back side of each photo for three reasons: 1) it looks cleaner than other methods like paperclips or punching holes in the photos 2) it allows the photos to be easily swapped out with your mood and 3) it makes photo placements adjustable once stuck on by gently pulling the photo up and down the yarn.
I’ve said multiple times how much I love wall hangings, and I dig this one for how it serves a function while still being decorative. It’s also the first time ever I’m displaying my grams. Do you print your photos? Am I super late to the game??
This post is sponsored by SnapBox. All thoughts and opinions are always my own. Thank you for supporting brands that keep the fun stuff coming!
I’m ready to eat pumpkin everything and for cooler weather to put an end to continually sweating in my own home (we complained so hard this summer about no AC- it was extra bad this year!) I love October for how it marks the start of all the fun happenings that make the end of the year go by in two days. It’s such an exciting time, and maybe this will be the year I learn that Christmas planning should’ve started yesterday. Every year I think this is the year I’ll be prepared enough so that I can enjoy the holidays HA. Have you started?? I applaud you if so.
Happy weekend, guys <3
I loooove this home and you won’t be surprised to see why.
I’m the type of person that decides what I’m going to be for Halloween somewhere between the day before Halloween and Halloween. Every year it’s the same struggle of spending too much time not knowing what I want to be and defaulting onto something easy or basic, then seeing other people wearing really cool costumes and wishing I had thought of something more clever.
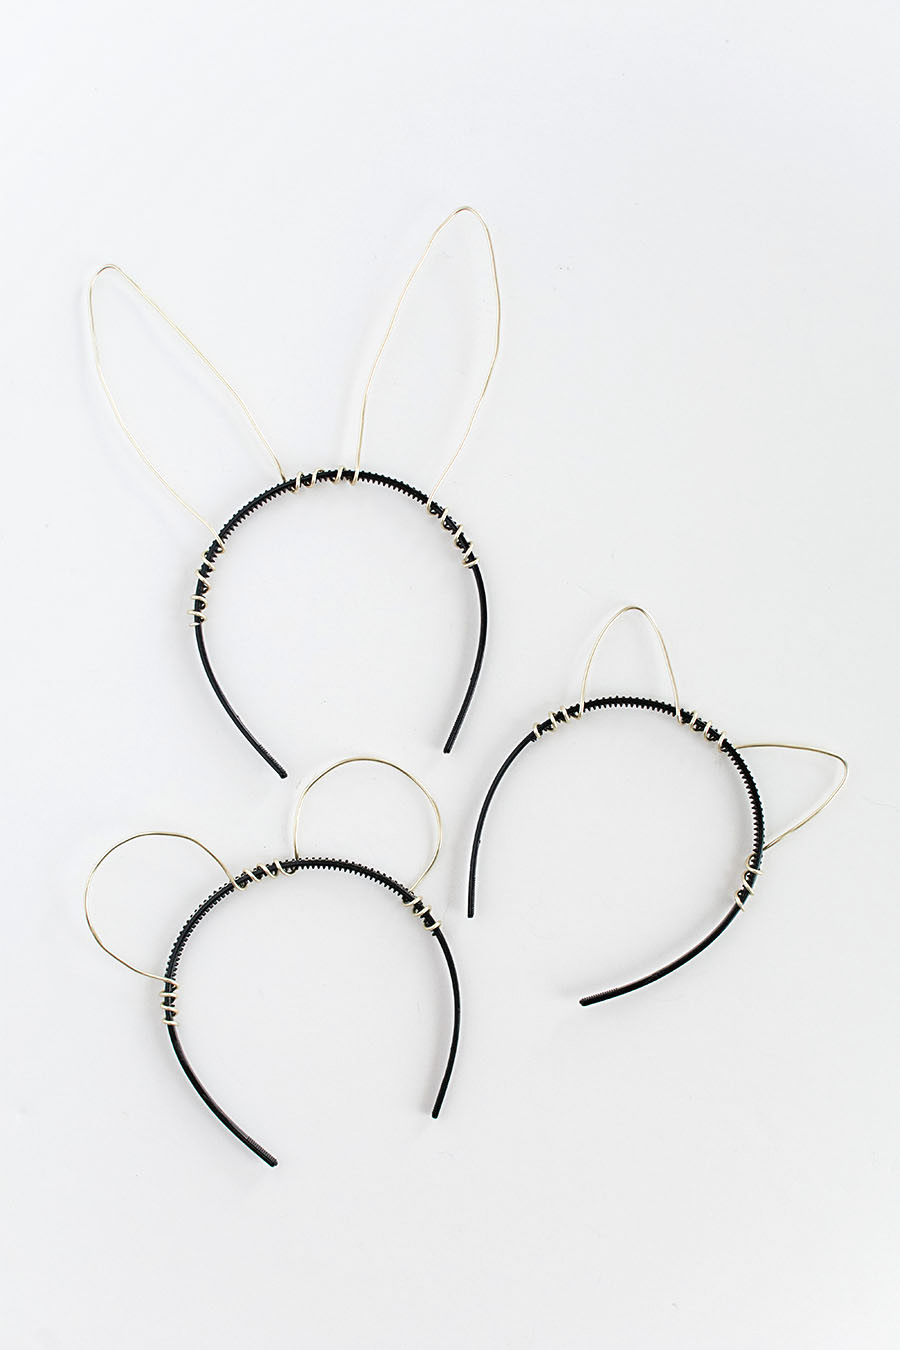
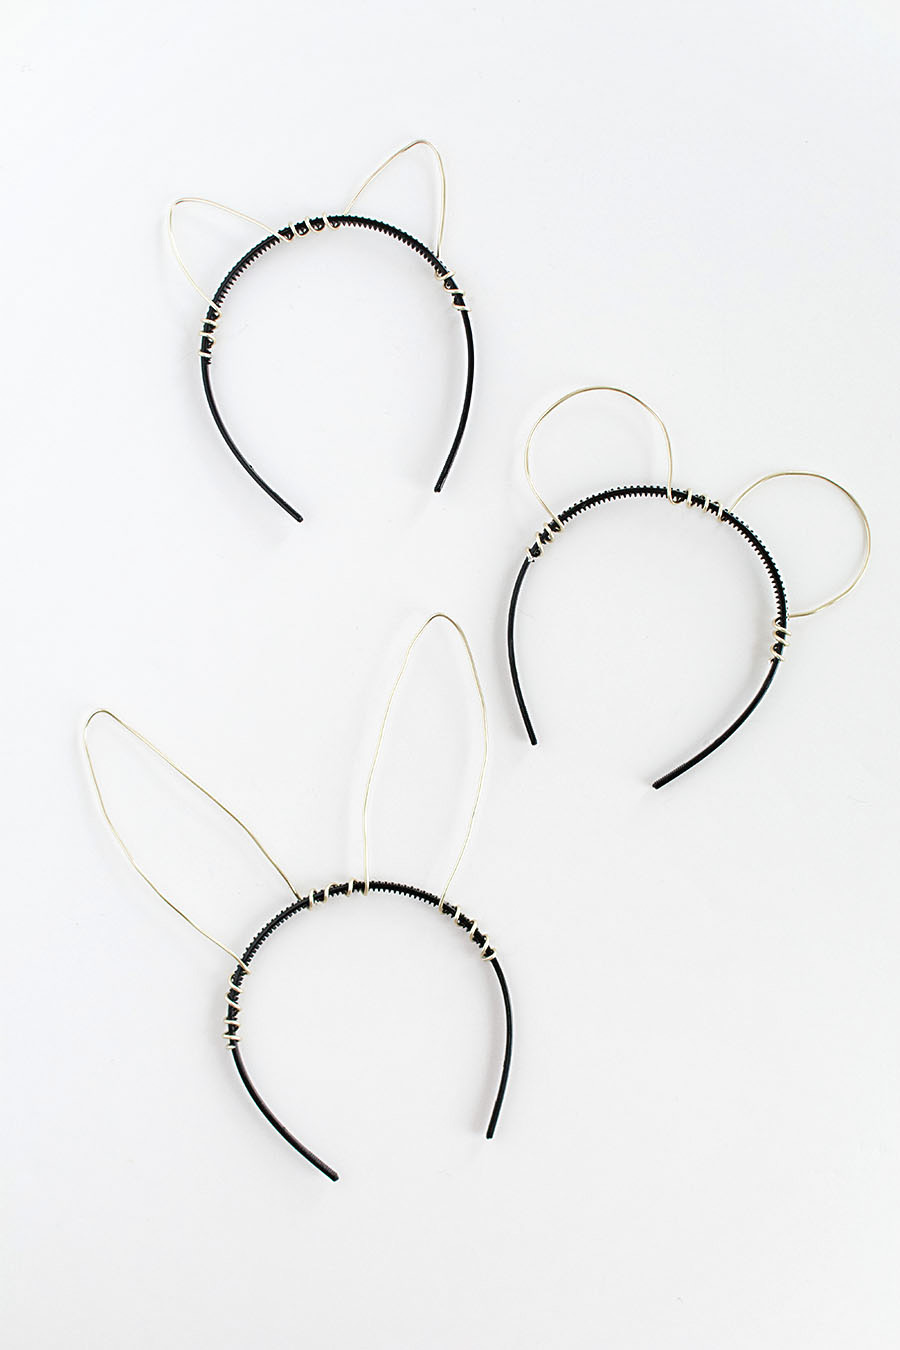
Well, this year with the October Michaels Makers DIY being a costume challenge, I’m thinking a month ahead. But surprise- I still don’t know what I’m going to be for Halloween. History repeating, I’m defaulting on trying out a basic idea, like these animal ears, which maybe instead of basic we can call them classic. Oo, nice.
I’m a fan of an accessory that can just be thrown on (hello, safe for work), probably because it’s an easy last minute idea and I’ve had a lot of practice with that. To make it even easier, I gave the animal ears a little twist with this really minimal look using gold floral wire from Michaels. It’s a 5 minute DIY, guys.
I started by wrapping the gold wire on one side of the headband. That little end part can be painful to push down (I tried. It hurt) so I used pliers to clamp it down and make sure no pointy sharp end was sticking out.
After looping the wire about three times around the headband, I created this cat ear shape, then looped the wire around the headband about three times again before creating the other cat ear.
At the other end, I wrapped the wire around three times before cutting off the excess wire and clamping down the end of the wire with pliers. All done.
Boyfriend asked if I was trying to be Ariana Grande. I wasn’t thinking that at all! Just a cat!
It’s the same process for all of them, just a different shape for each set of ears, the most complex probably being the bunny ears but they were still simple to achieve. I think the bottom one is supposed to be a mouse, though it could be a bear, too.
Can I tell you guys a secret? Halloween is not my favorite. Because I’m scared of everything. I refuse to go to a haunted house/anything (bye Knott’s Scary Farm) or watch scary movies. So, I like to keep things cute. Or funny. What’s your Halloween style??
 So this was my first time painting pumpkins by hand, and already we’re at tip #1: Use a dabbing motion to apply the paint to the pumpkin. The way I’m showing it above streaks the paint around and will require way more coats to get opaque coverage, so save yourself time and dab (I did this later, it’s much much better). The paint needs to dry completely after a few coats before moving on.
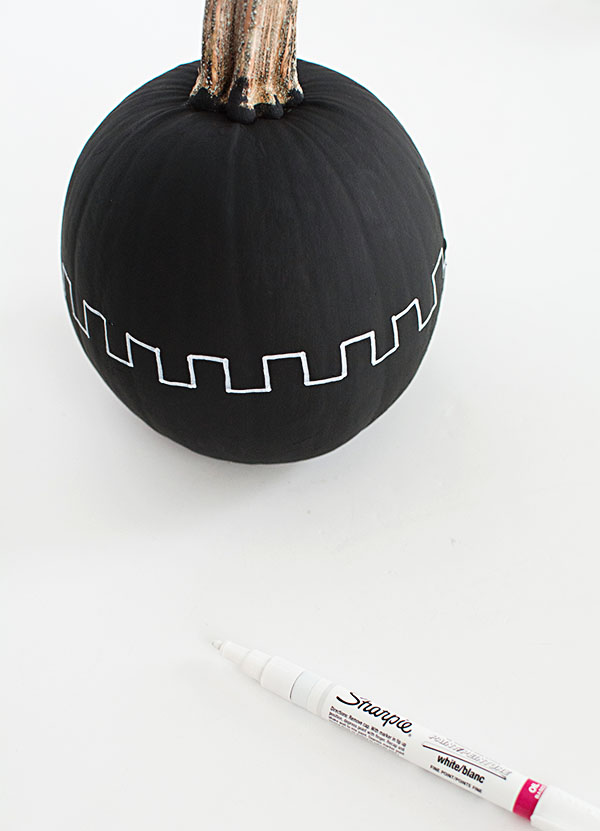 Referring to mud cloth patterns as inspiration (search “mud cloth” on Pinterest), I planned out my design on paper first, then started with the center pattern of the design to draw around the pumpkin.
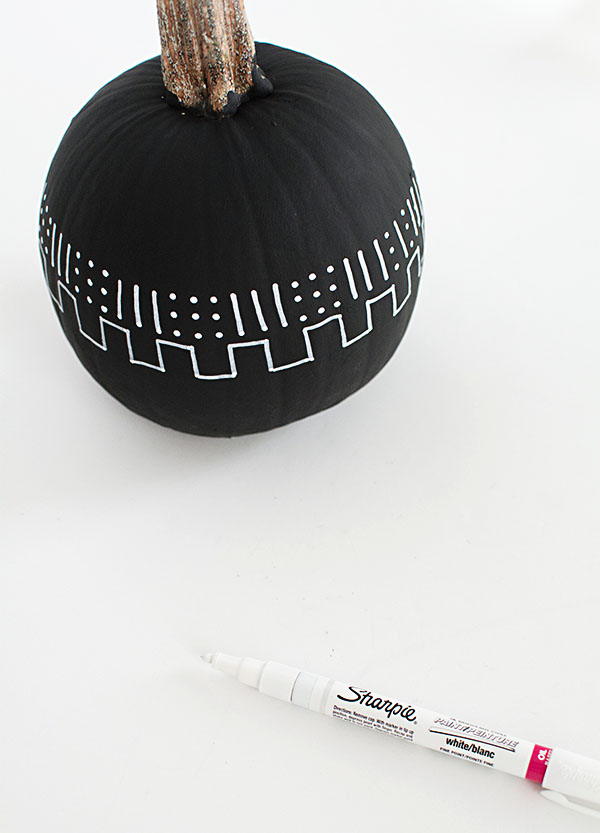 Next, I drew on the row above the center pattern…
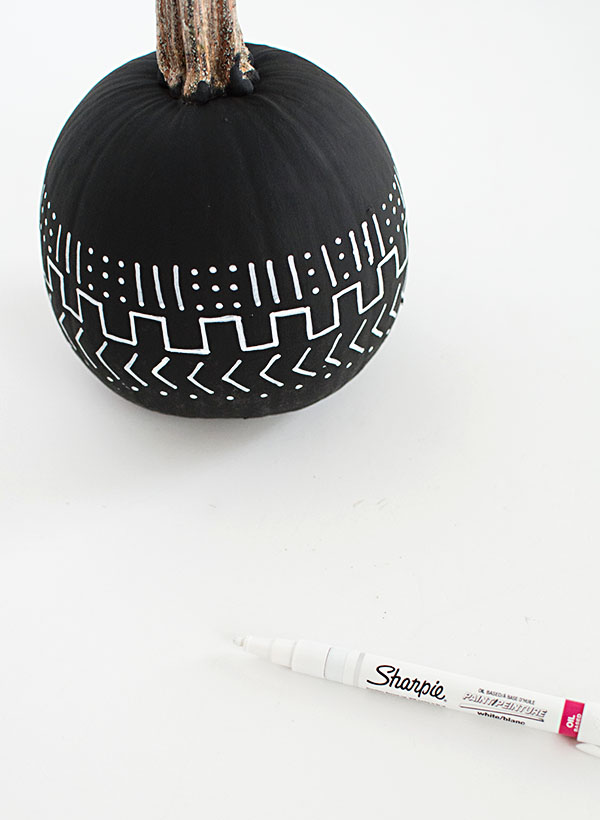 …then the row below…
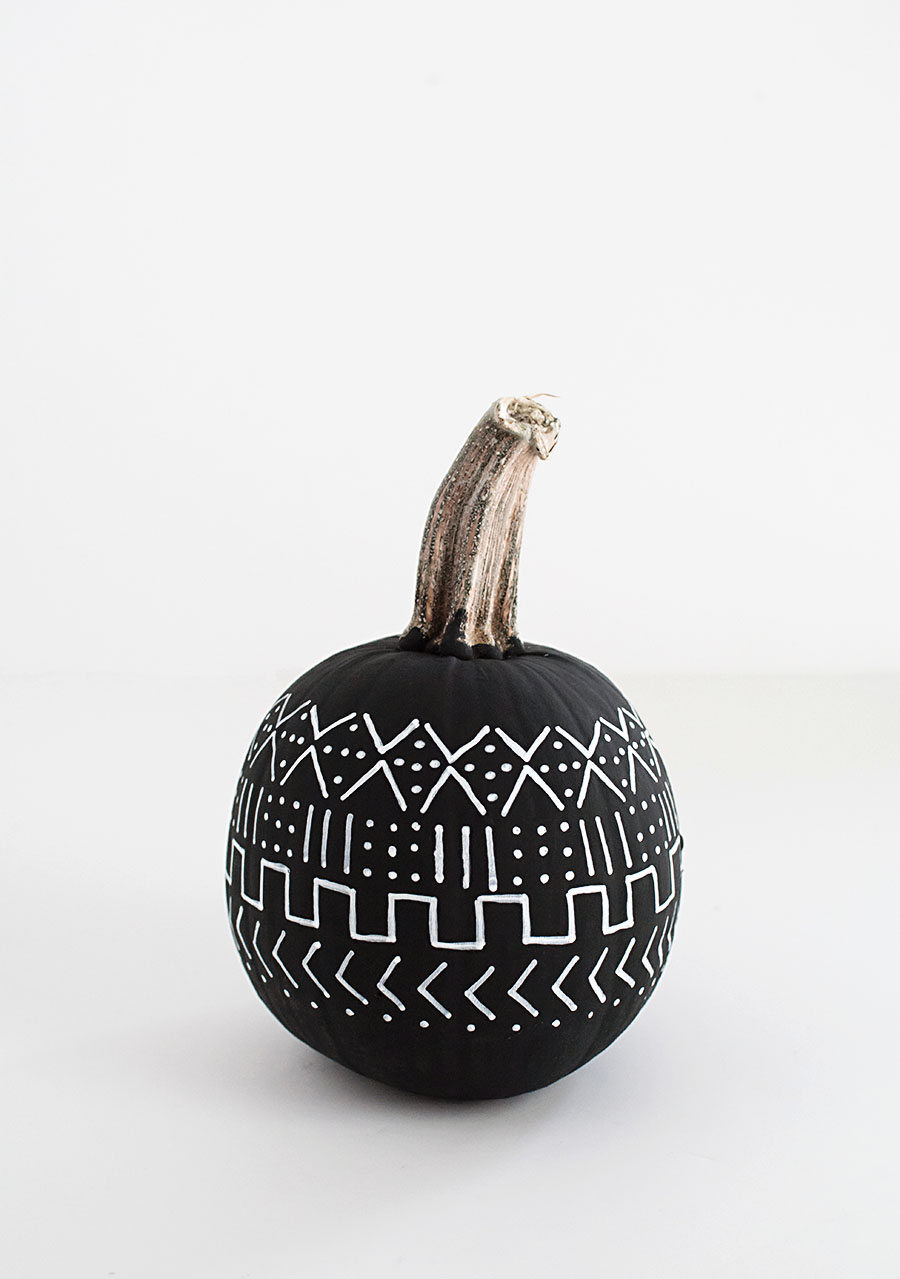
 I would’ve loved these pumpkins even without the mud cloth patterns because the chalk paint looks so good. The matte finish keeps it looking more organic and just generally more awesome. White chalk paint is also really good to use with those white pumpkins that look too yellow, which I already did with some of mine, which kinda feels like what’s the point of getting white pumpkins if you’re just going to paint them white, but I regret nothing.
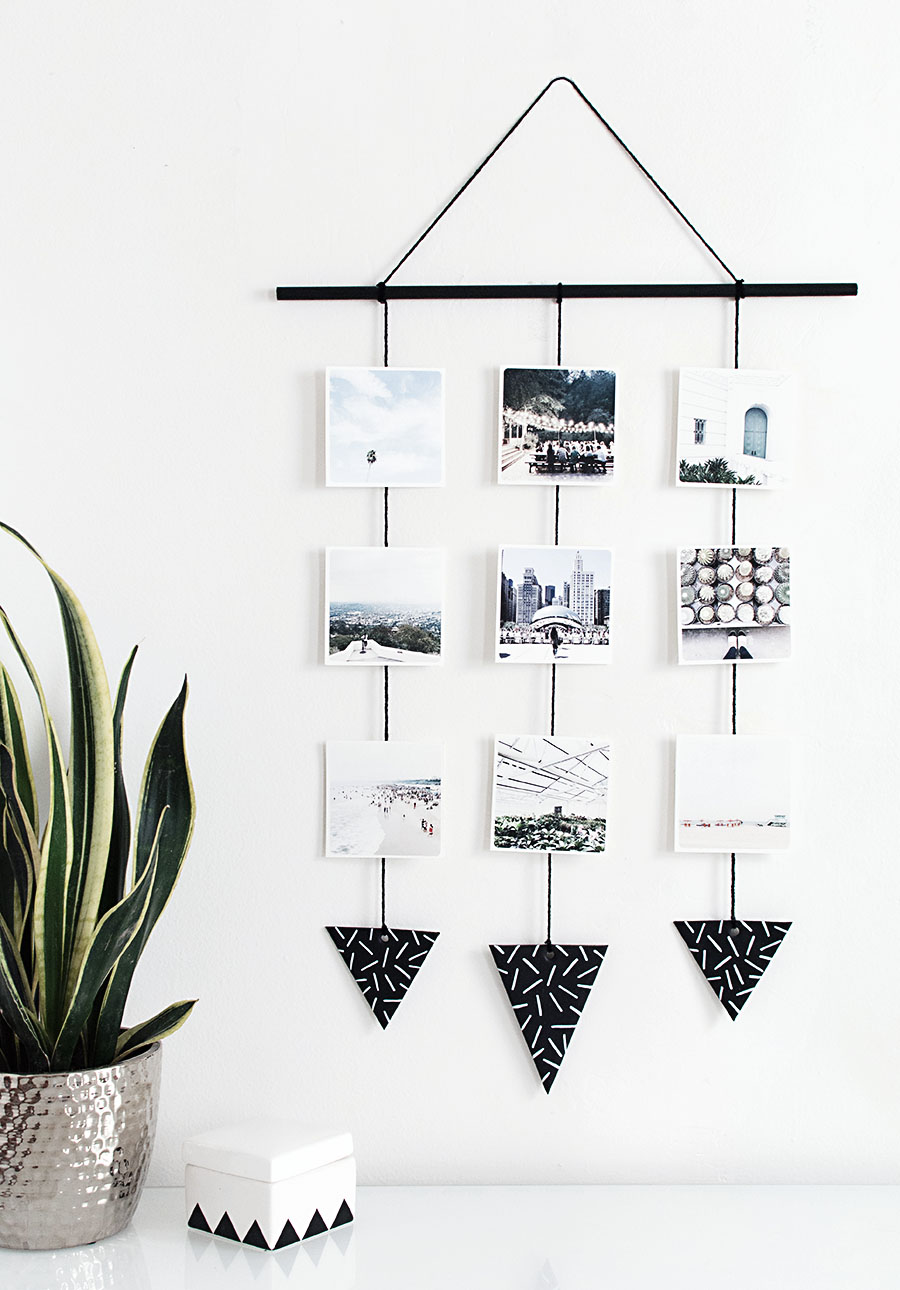
 I painted a round wood dowel with black acrylic paint using foam brush. Once dried, I tied each end of a piece of yarn to each end of the wood dowel, applying super glue to each double knot to secure in place before cutting off the excess yarn. From this point forward, every double knot of yarn is secured with a couple dabs of super glue.
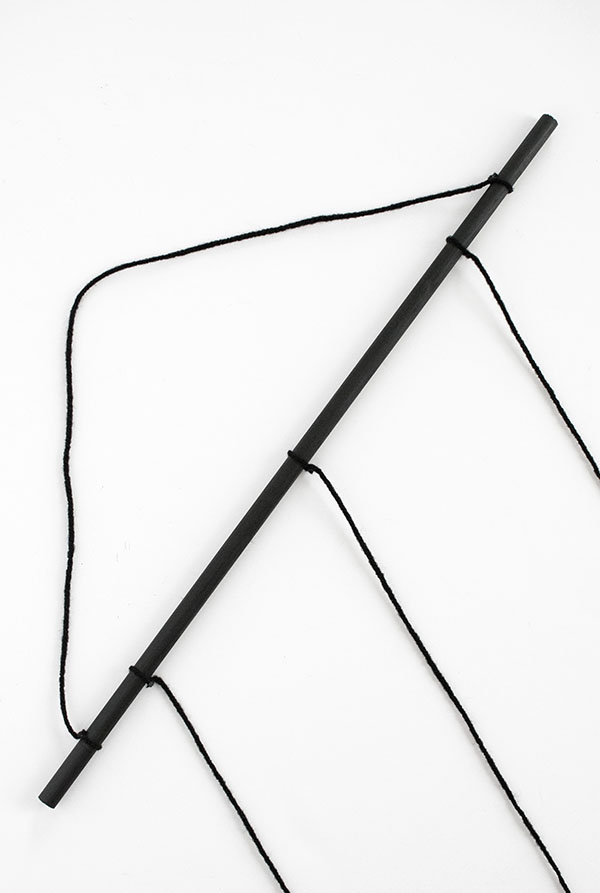
 Working on top of a cutting board lined with parchment paper, I rolled one block of black clay into a ball then flattened it out until it was just large enough for the triangle card stock.
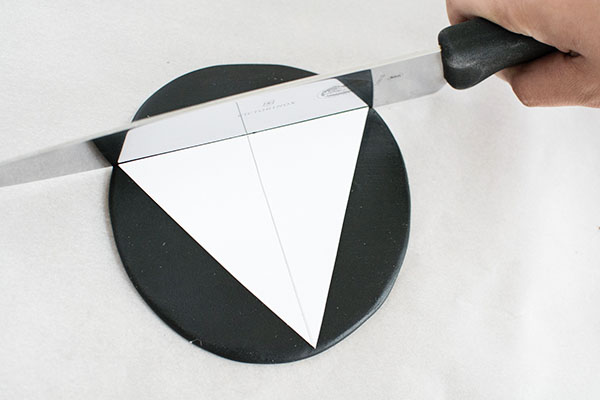 I cut along the triangle with a knife. The “proper” thing to do would be to use a clay blade, but a knife works perfectly fine heyyy. This also cut out the parchment paper backing with the triangle, which I left stuck on to the triangle.
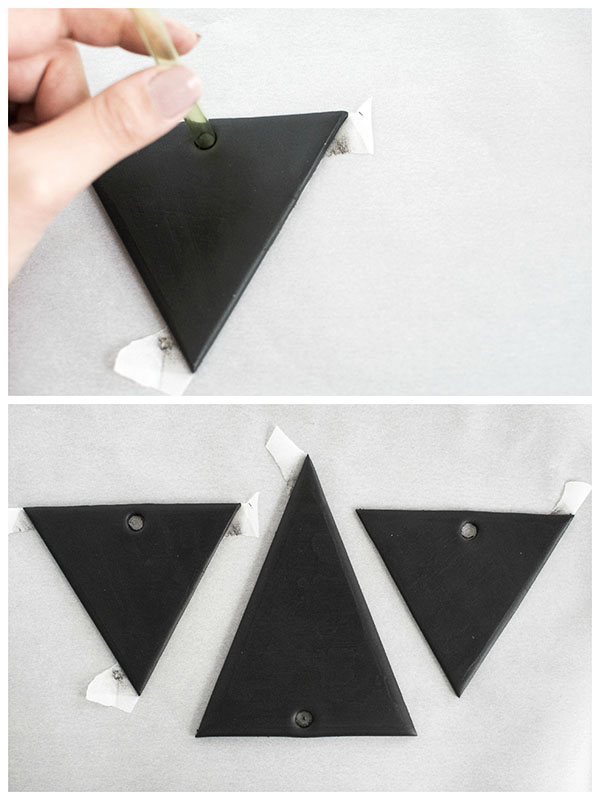 For each clay triangle, I used a straw to poke a hole out from the top. The key is to twist and wiggle the straw so that the clay from the hole pops out with the straw. I then transferred each triangle to a baking sheet lined with parchment paper. Baked them at 260F for about 30 minutes, and honestly, I don’t know the science to this and just played by ear. All that the instructions on the plastic packaging of the clay said was not to exceed 265F. Hopefully your clay has more to tell ya.
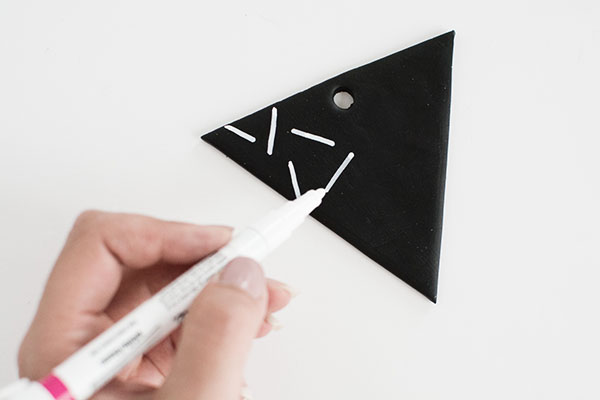
 Each triangle was double knotted at the end of each yarn that I previously tied to the dowel. I feel a strange urge to eat them.
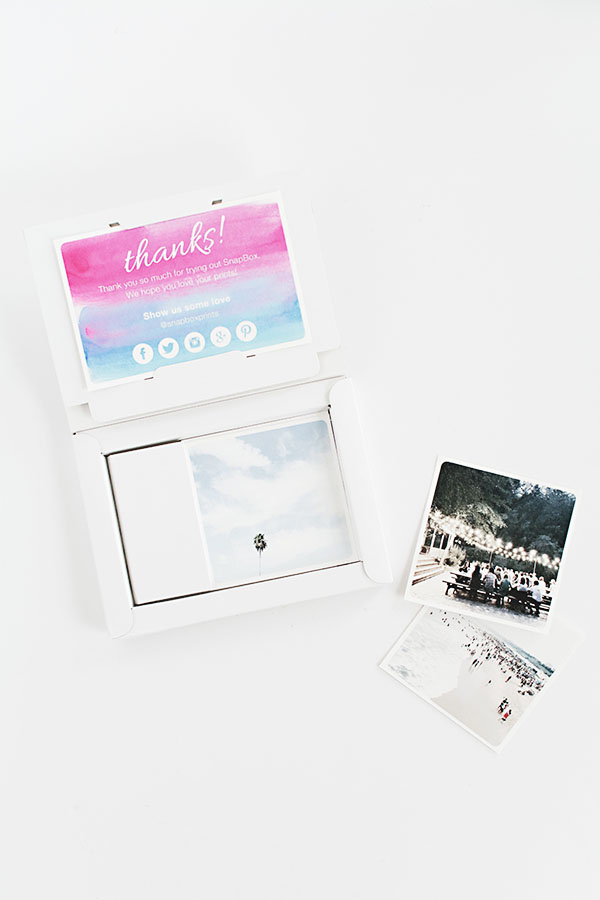 I ordered 4×4 prints of some of my Instagrams through
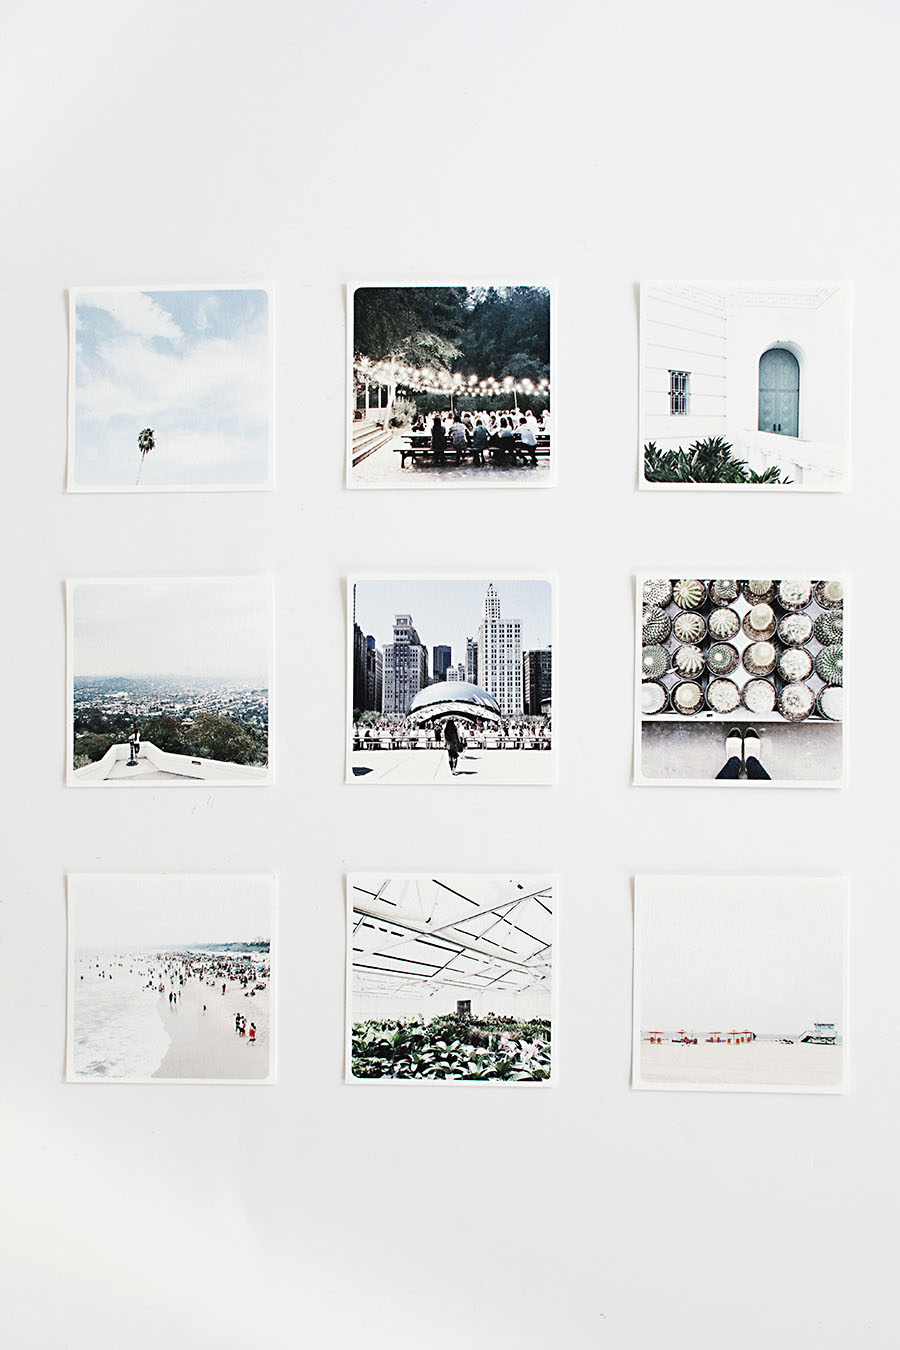
 I used Washi tape on the back side of each photo for three reasons: 1) it looks cleaner than other methods like paperclips or punching holes in the photos 2) it allows the photos to be easily swapped out with your mood and 3) it makes photo placements adjustable once stuck on by gently pulling the photo up and down the yarn.
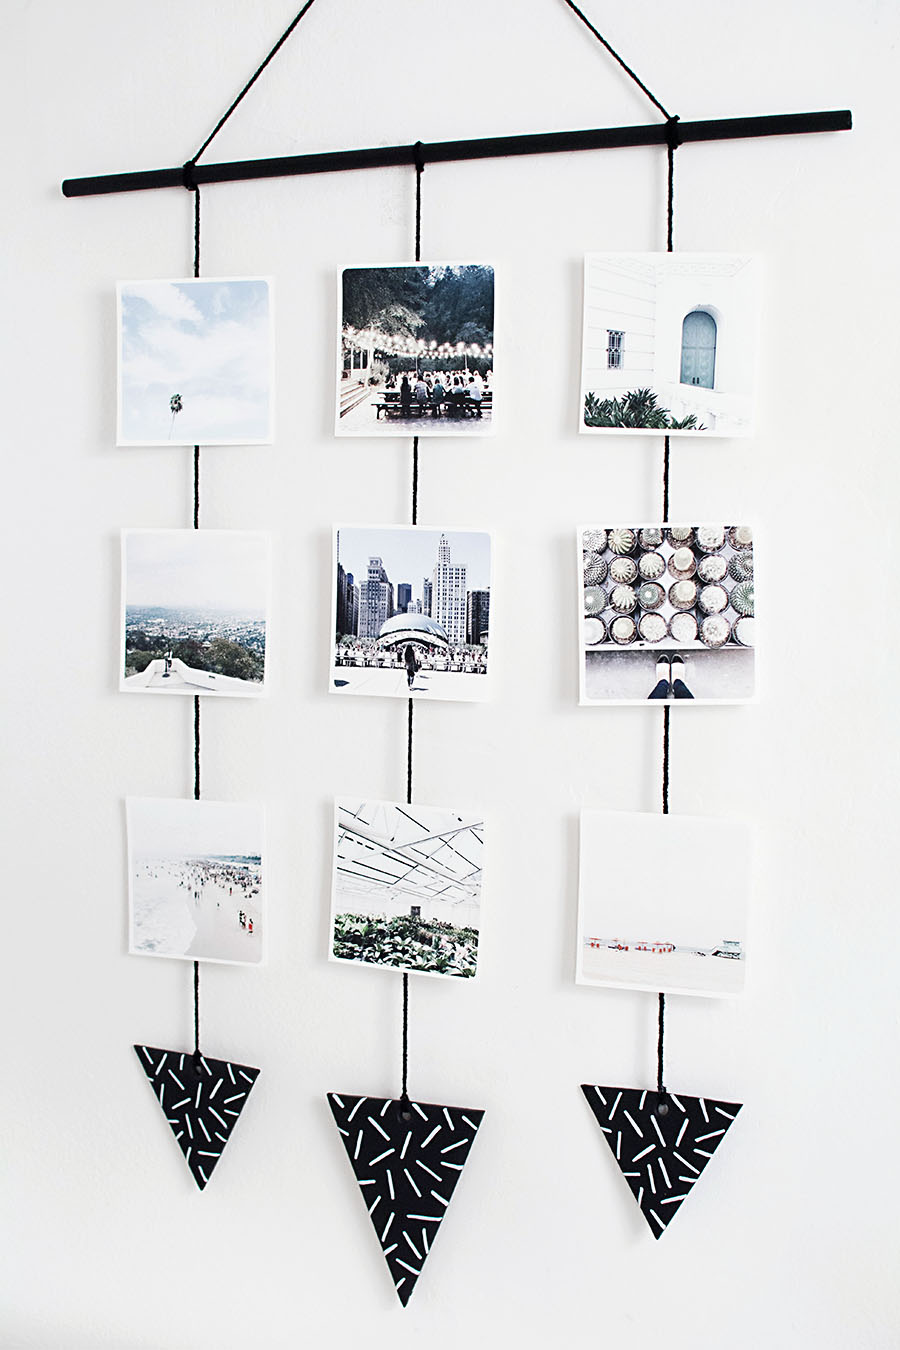 I’ve said multiple times how much I love wall hangings, and I dig this one for how it serves a function while still being decorative. It’s also the first time ever I’m displaying my grams. Do you print your photos? Am I super late to the game??
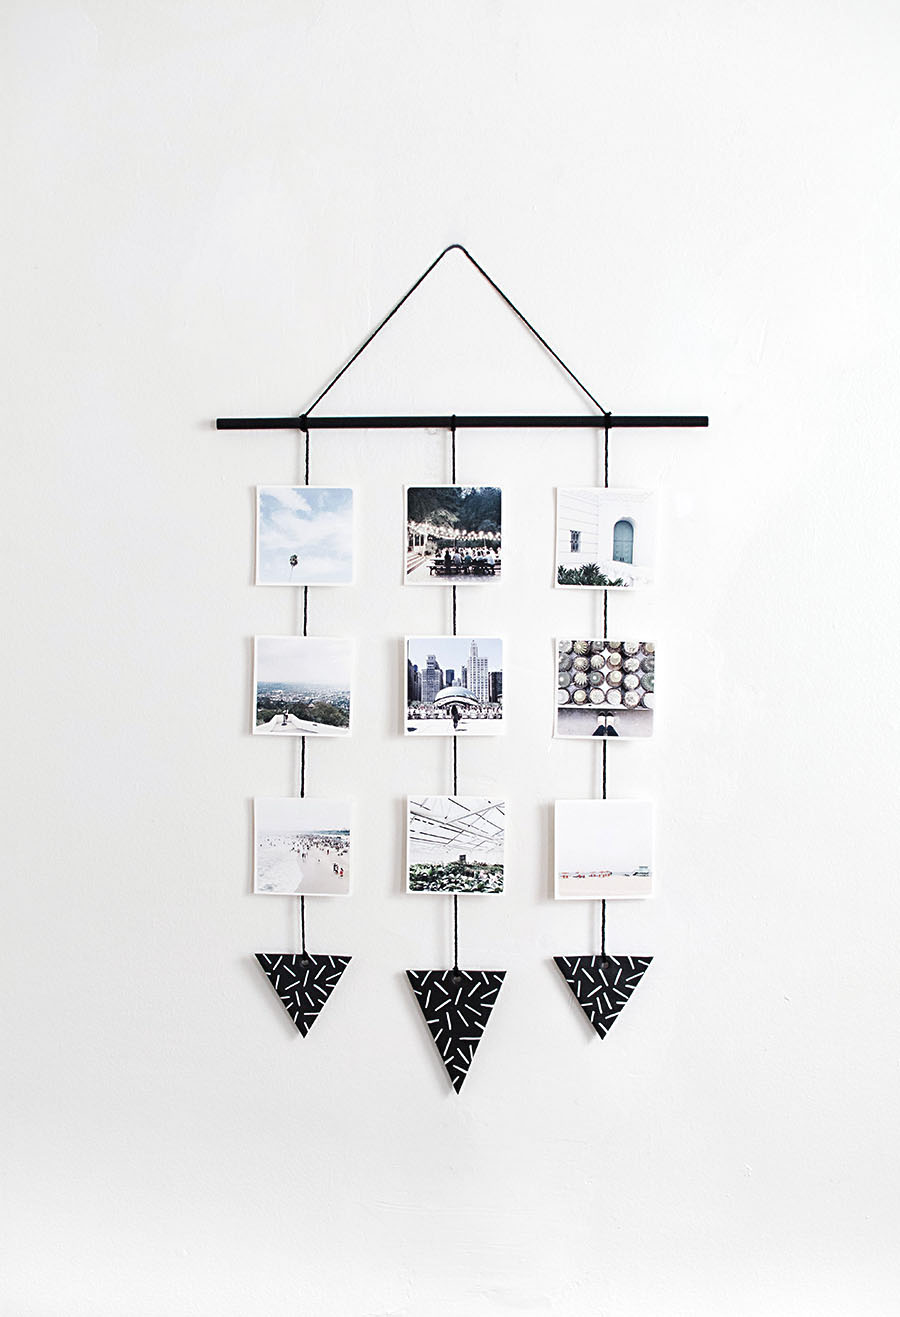
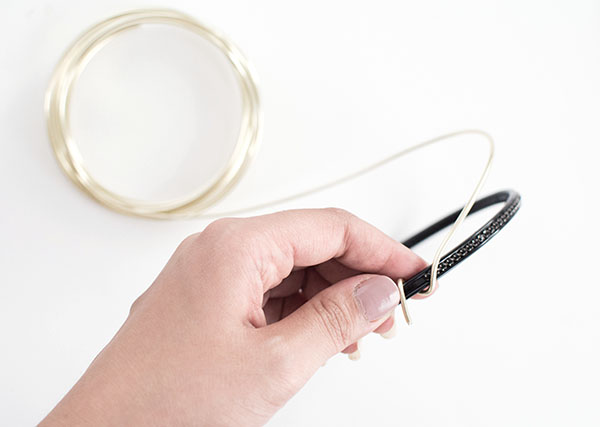 I started by wrapping the gold wire on one side of the headband. That little end part can be painful to push down (I tried. It hurt) so I used pliers to clamp it down and make sure no pointy sharp end was sticking out.
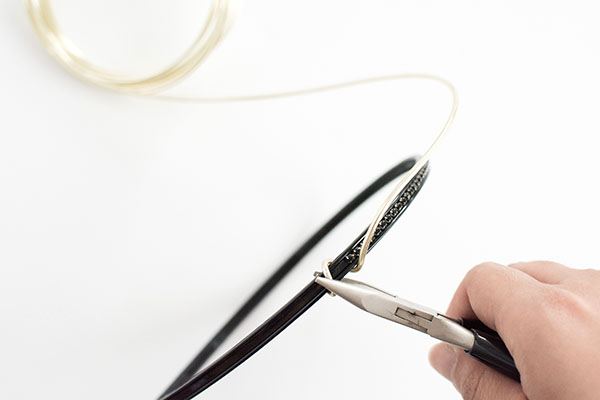
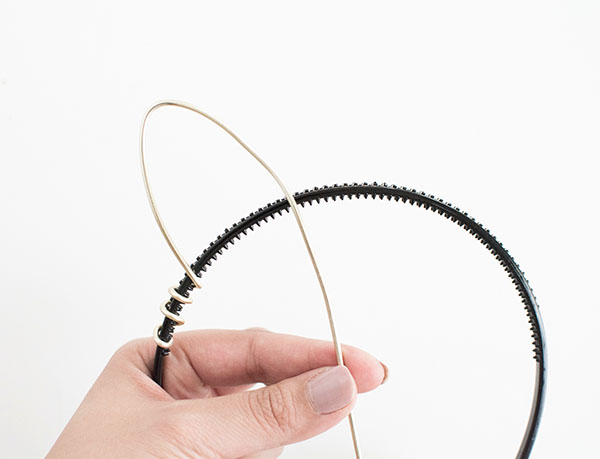 After looping the wire about three times around the headband, I created this cat ear shape, then looped the wire around the headband about three times again before creating the other cat ear.
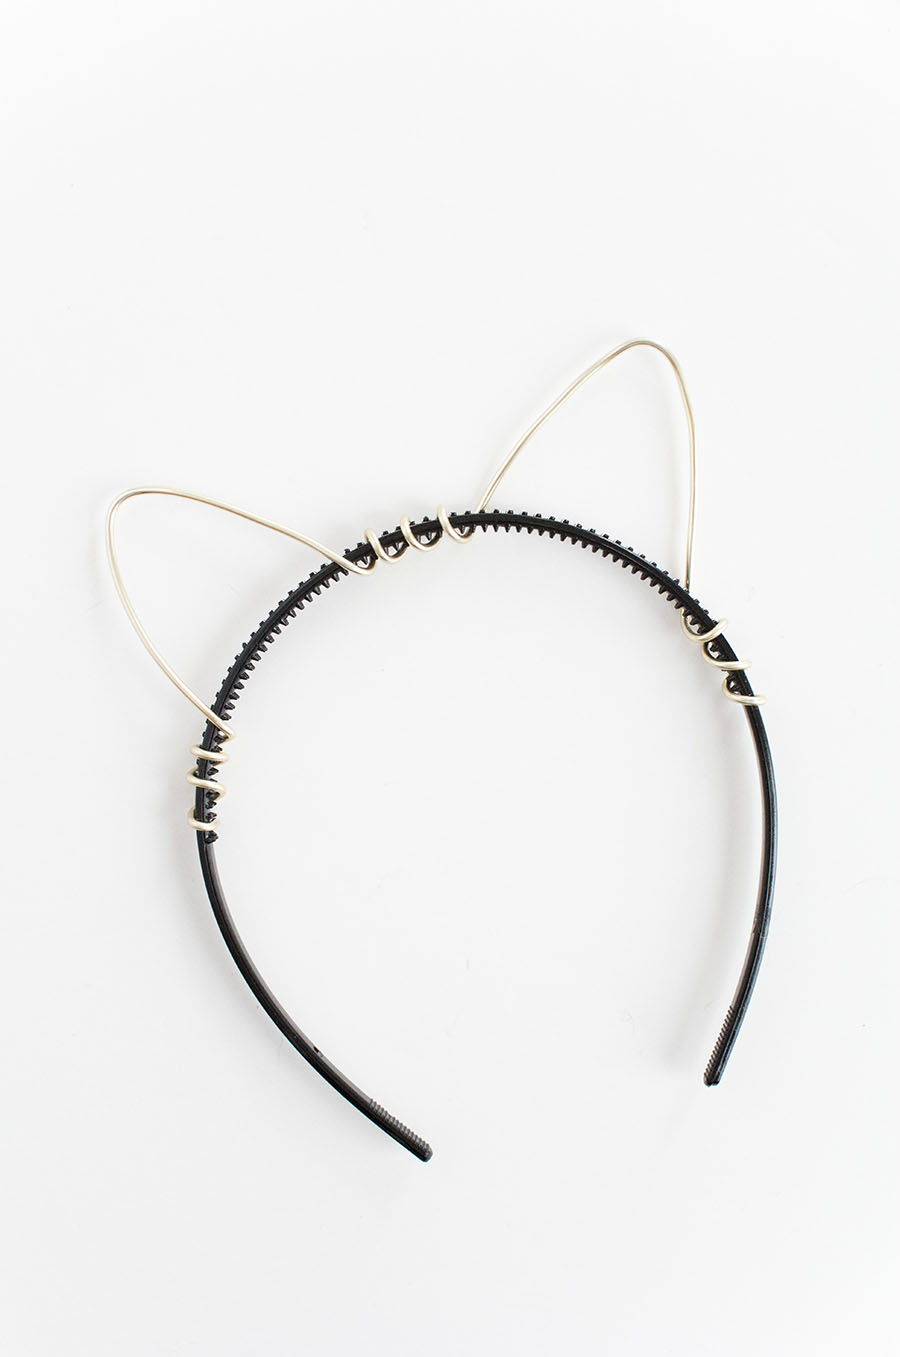 At the other end, I wrapped the wire around three times before cutting off the excess wire and clamping down the end of the wire with pliers. All done.