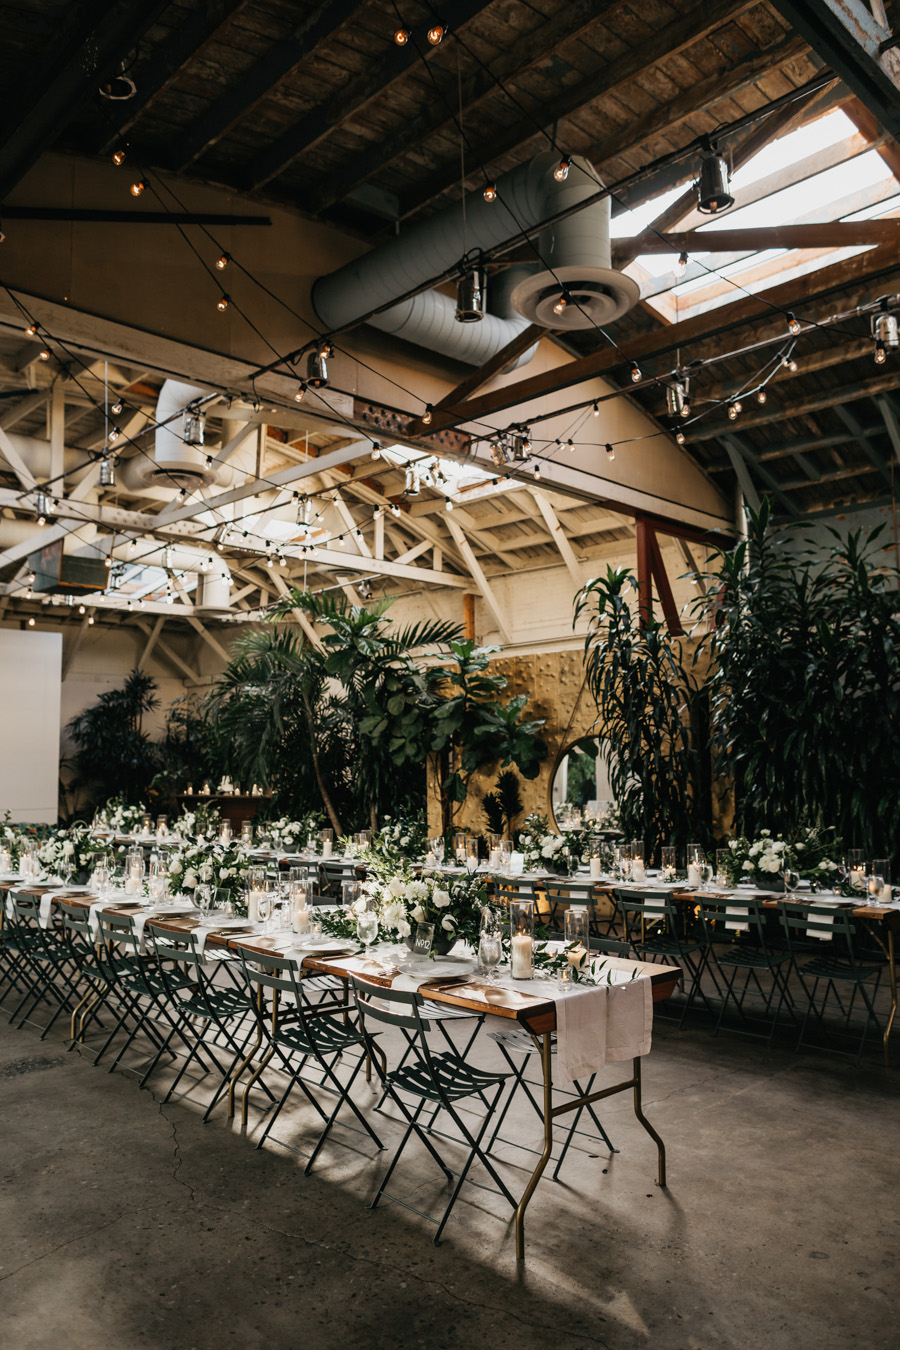
I hadn’t planned on putting this post together since I didn’t document the step by steps of our wedding DIYs at all, plus I got a lot of help from a friend who has skills and materials that I don’t have, but I figure I can at least talk about the stuff I did and answer your questions! As I mentioned in our wedding post, the welcome sign, seating chart, card box lettering, table numbers, place cards, and menus were DIYs. In addition to these how-to’s, I’ll share sources to the materials and other items you guys asked about, let’s go.
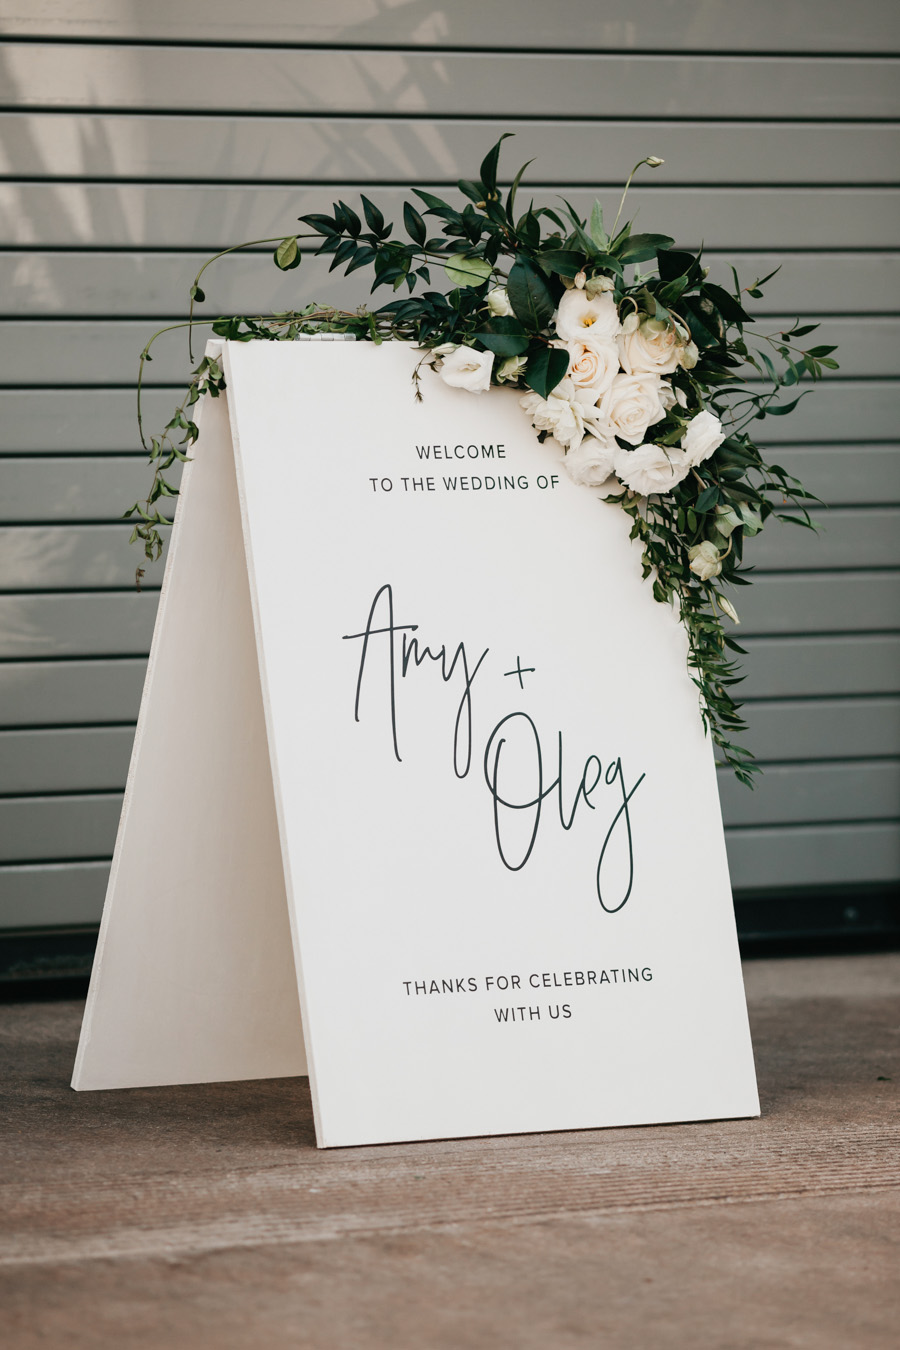
Starting with my favorite of the bunch, our welcome sign was probably the most satisfying project. It was made with two 20×30″ pieces of plywood (they will cut it for you at Home Depot) and two door hinges attaching the pieces of wood together at the top (they recommended the best ones to use for this at Home Depot, they’re so helpful). I painted on multiple coats of white acrylic paint until opaque before applying the lettering with black adhesive vinyl. This is the part I wish I could tell you didn’t involve using a Silhouette cutting machine, given that I don’t have one myself nor know how to use it, but I was lucky my friend Sarah does, who both designed the sign and applied the lettering for me.
The fonts! I used two fonts throughout our wedding. You can find the hand written font here and the other font is called Proxima Nova.
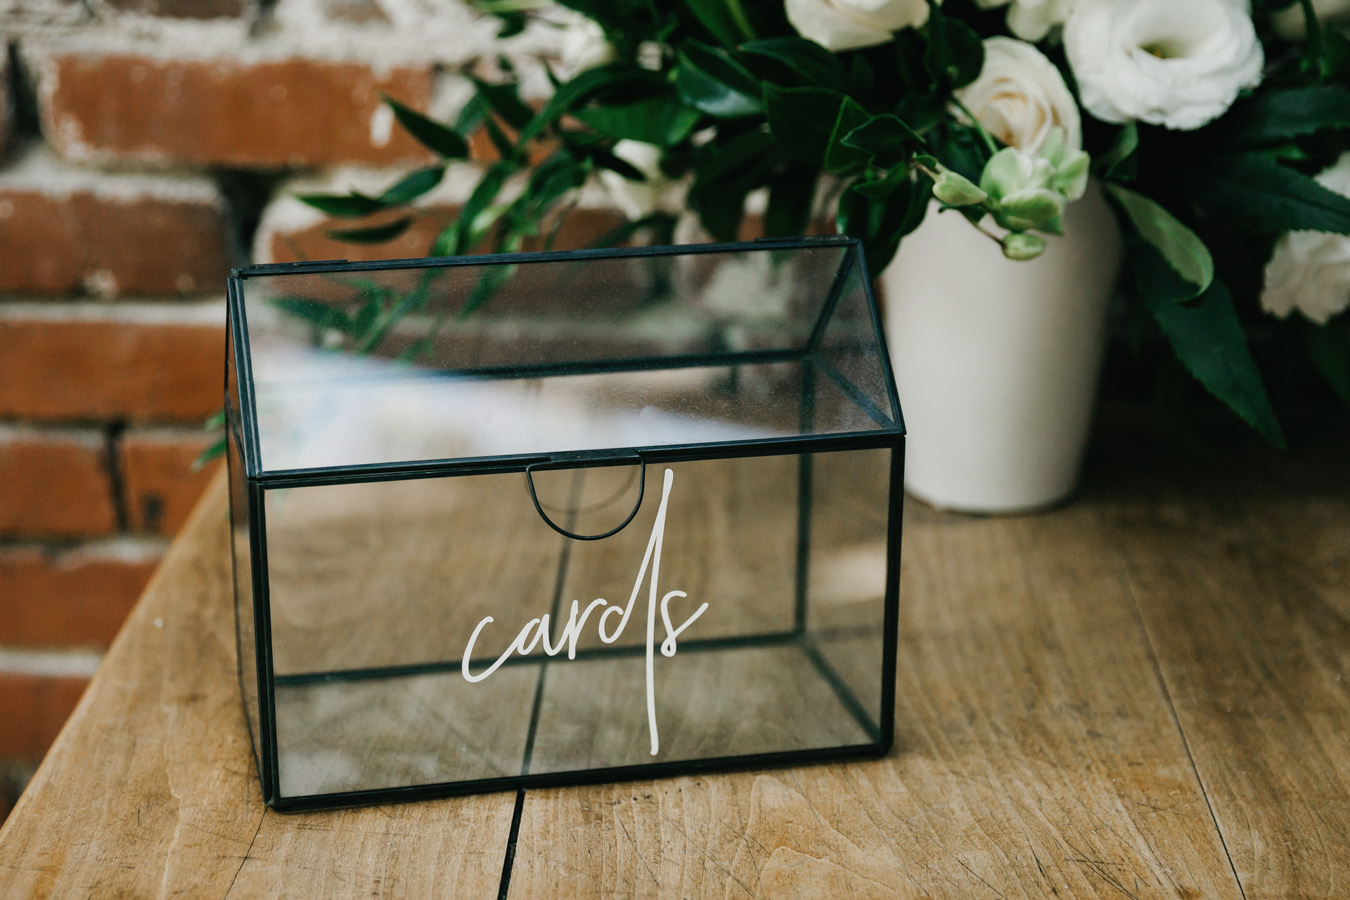
Our card box was also lettered with adhesive vinyl, this time in a white color. The card box is a house shaped terrarium that I got from Target which is unfortunately no longer available, but there’s a similar one here. The cards we received fit perfectly inside, and we now keep the box with all the cards displayed on a shelf in our living room and it’s the most perfect keepsake from our wedding. I’m a big fan of when wedding decor can become something to be treasured at home.
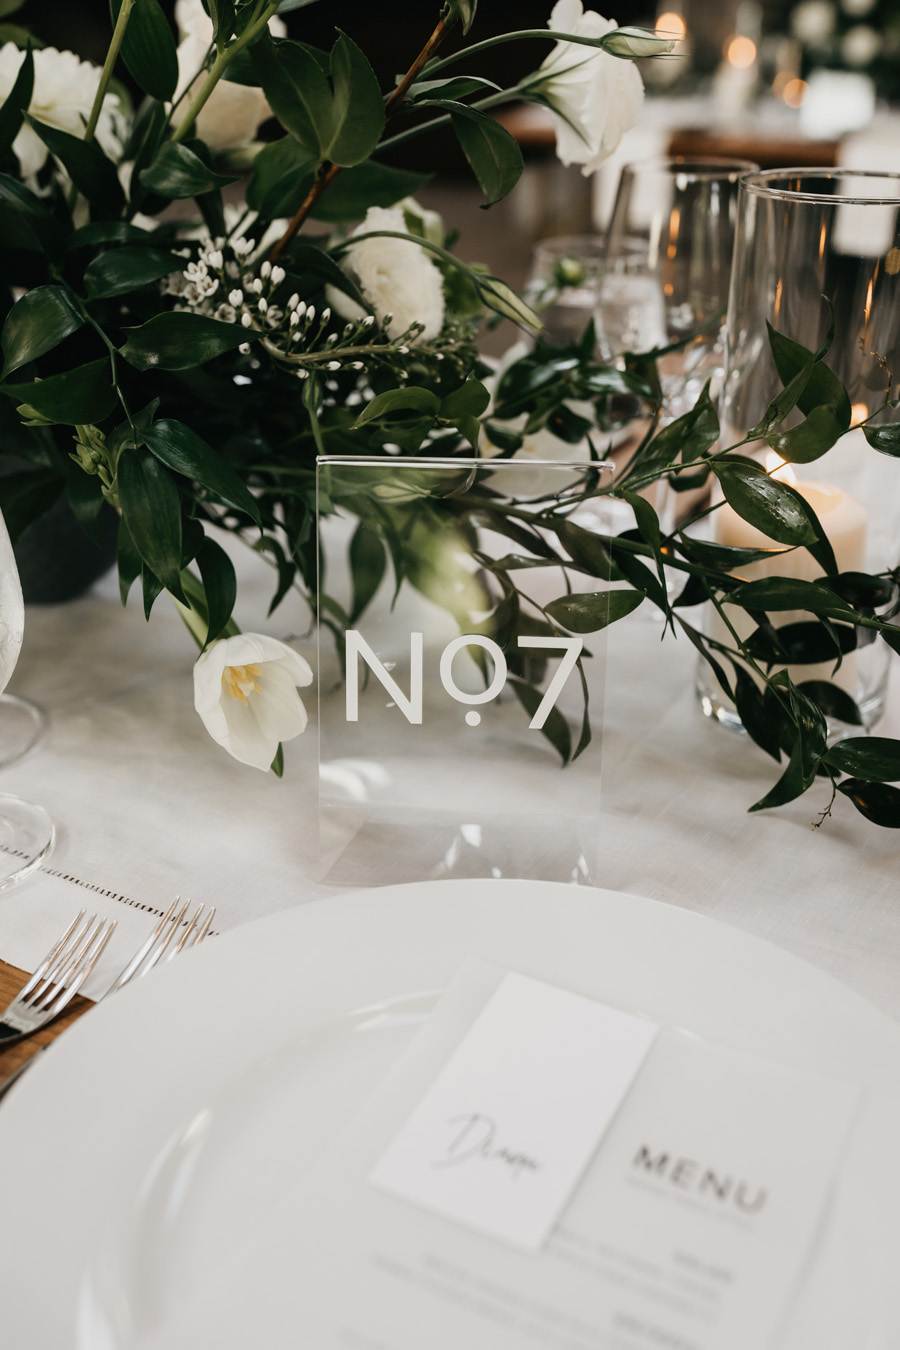
Same concept with the table numbers. I used white adhesive vinyl on these 4×6 acrylic photo frames that I got from Michaels, which is not on their site but should be available in stores and they were waaay more affordable than most other acrylic options I came across.
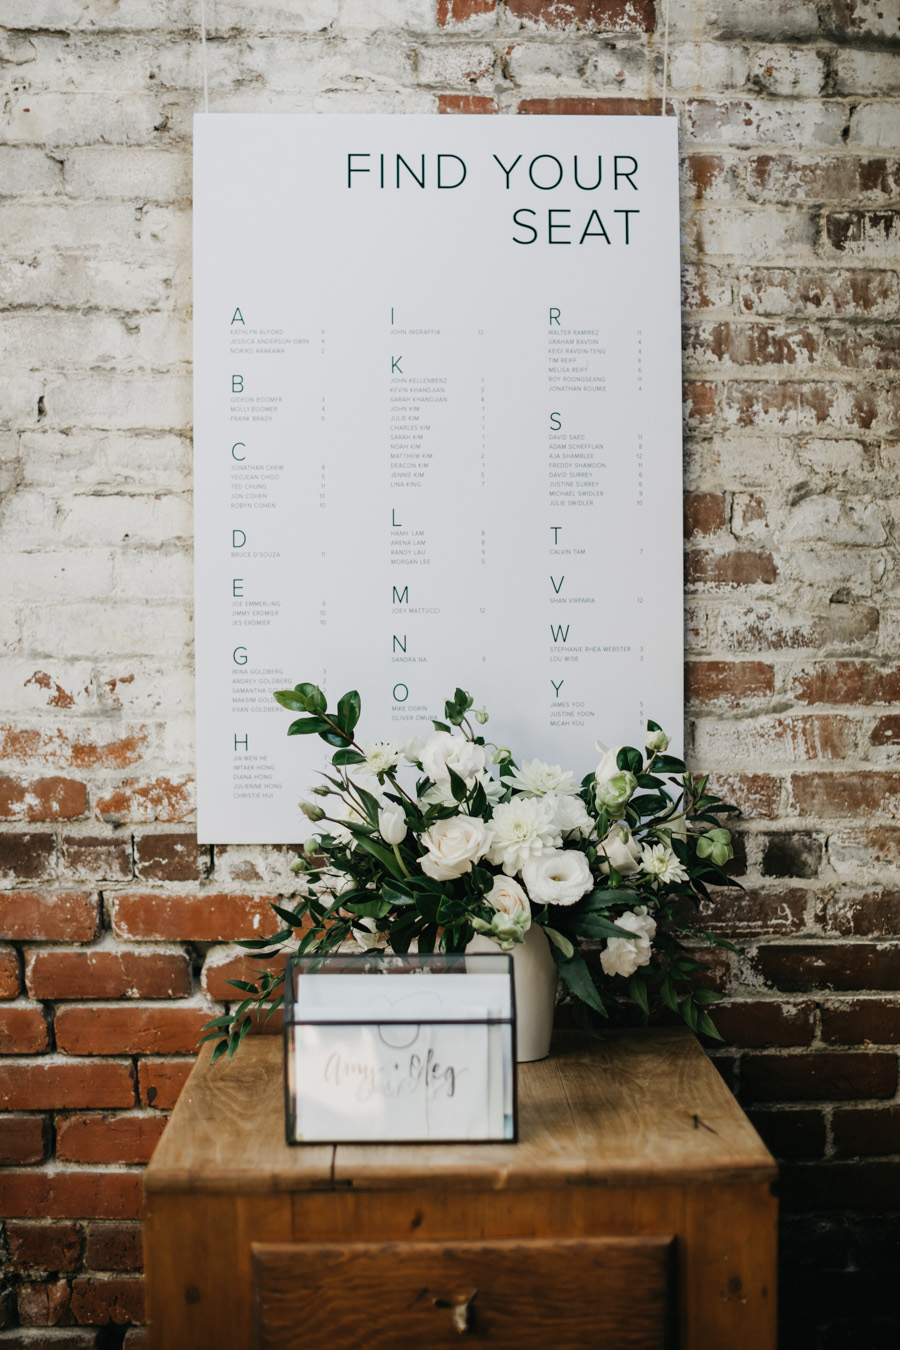
Our seating chart was mostly born out of the desire to not want to make escort cards. This felt like a much more efficient and less time-consuming option and I loved hearing from some of our guests that they found it fun to look through all the names listed. Again I had Sarah design the chart for me and then I got it printed at Staples as an engineering print with foam board backing. This was a lot pricier than expected, but I loved the result more than enough to say it was worth it.
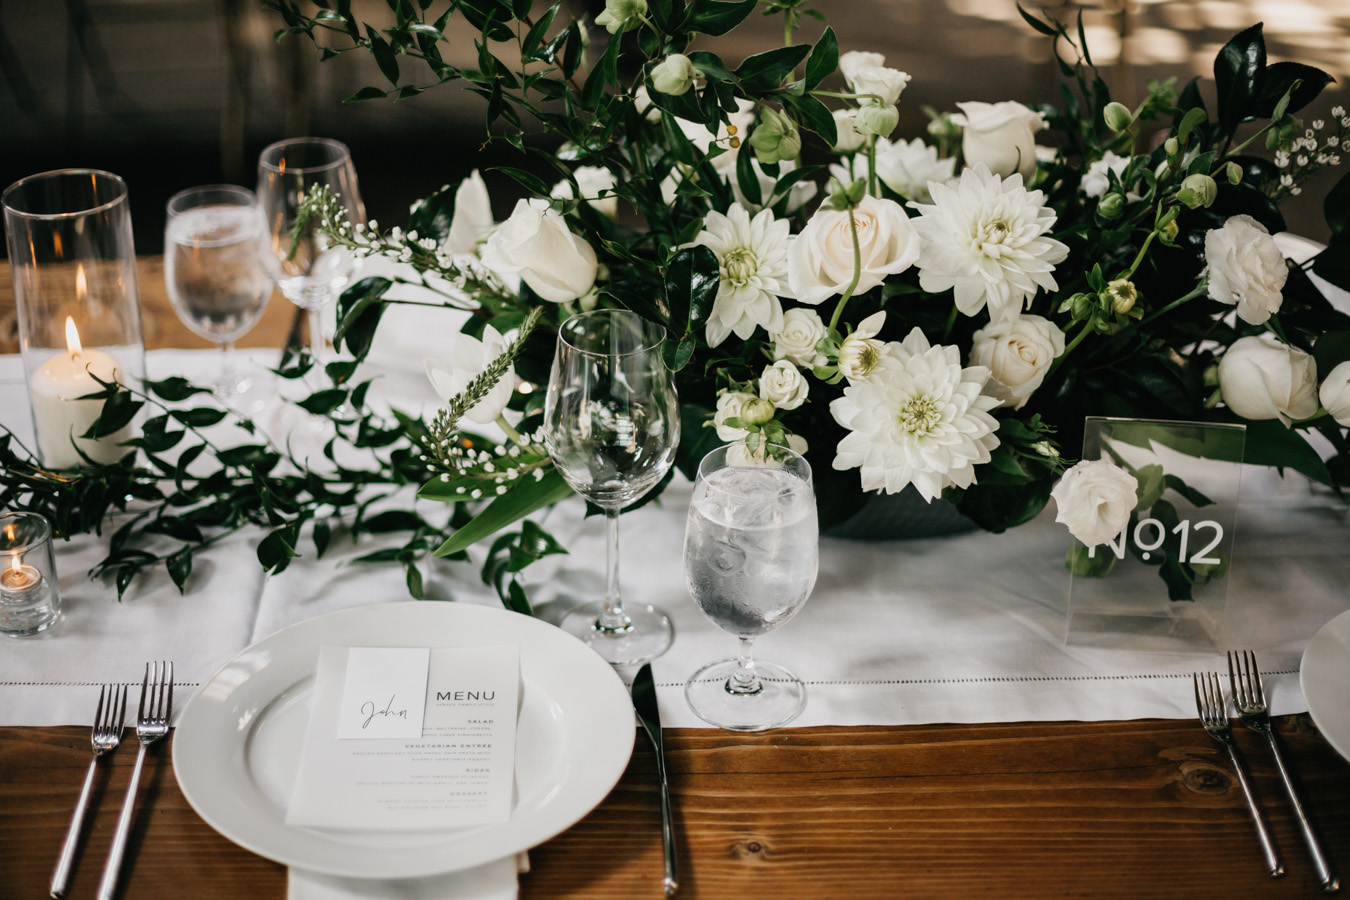
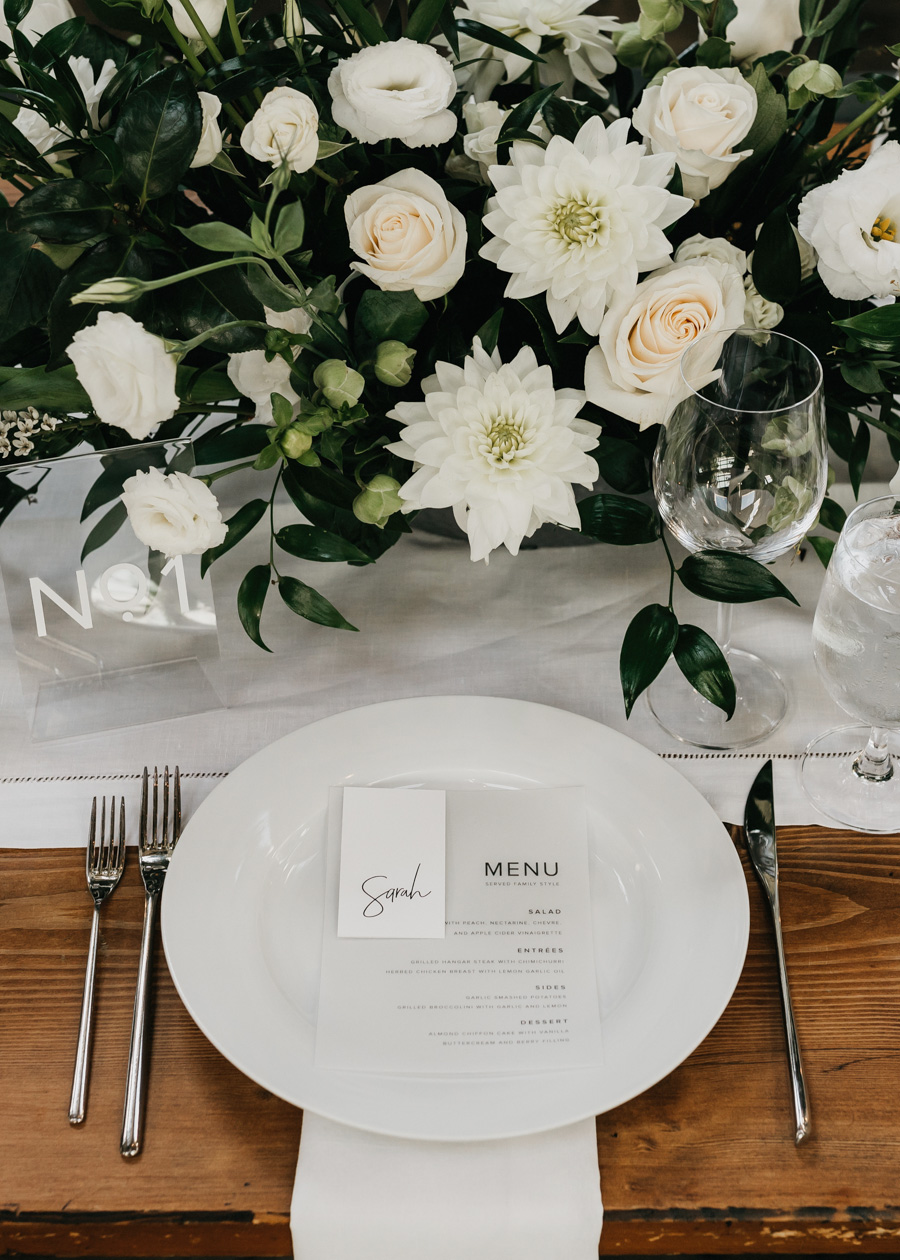
I printed the menus on this heavyweight vellum and the place cards on heavyweight white card stock that I got from Michaels, all with my Canon TS8020 printer I love that thing!!! I designed both in Photoshop and cut each one out with this paper trimmer and it took so much more time than I anticipated. I remember meeting a wedding planner at an event and asking her what she’d recommend NOT DIY’ing for your wedding and she said stationary because it’s a lot more work than people think it will be and it’s so worth hiring someone else to do it and I kind of agree. I only say kind of because this is the type of project I have experience with and it made sense for me to do it myself, but considering how long it took I also would’ve thoroughly enjoyed if someone else did it for me. Still, I’m so so happy with how these turned out and saved mine and Oleg’s for the scrapbook I haven’t started yet nor know when I ever will.

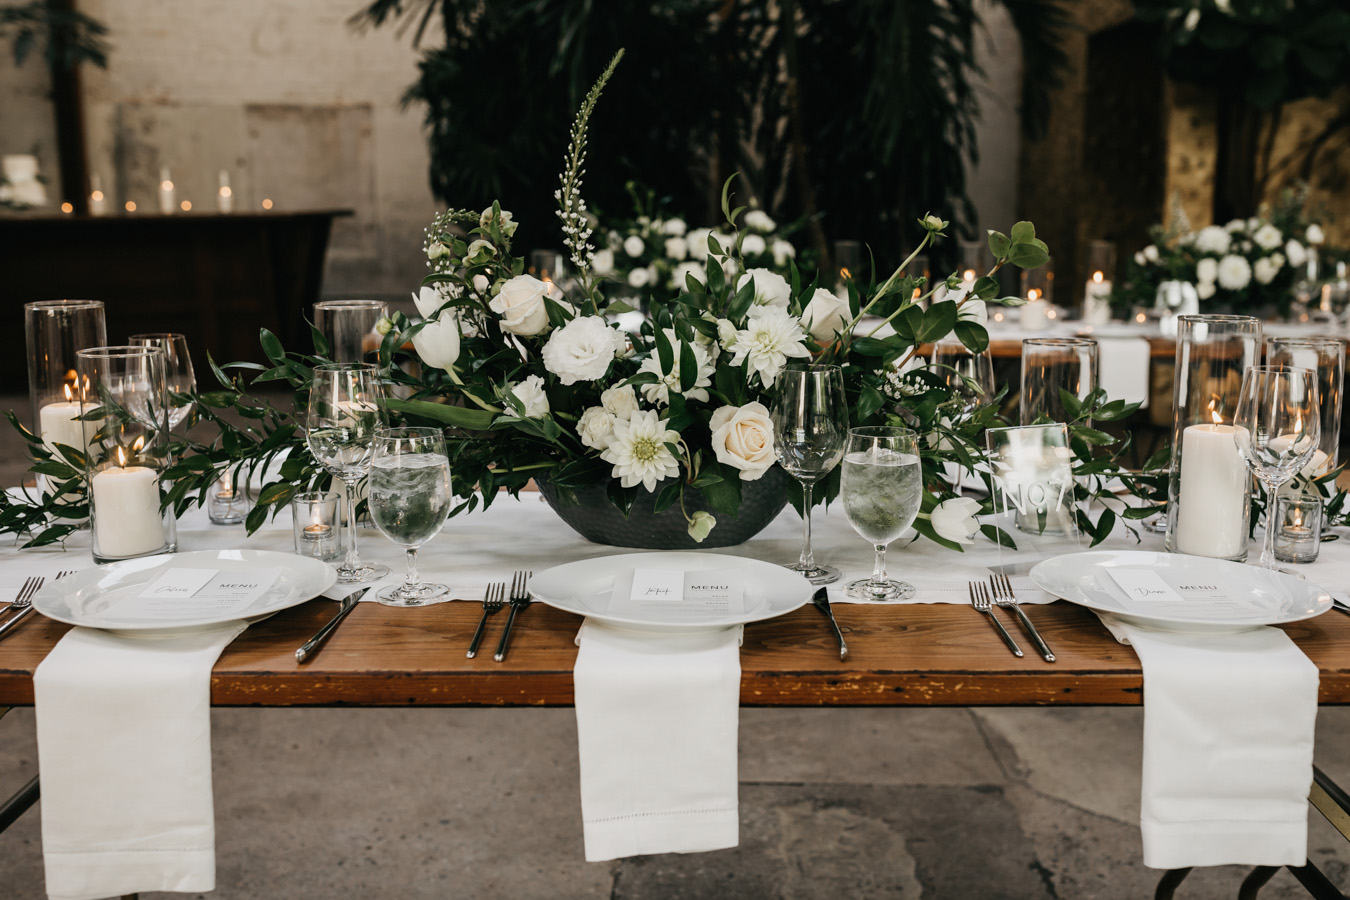
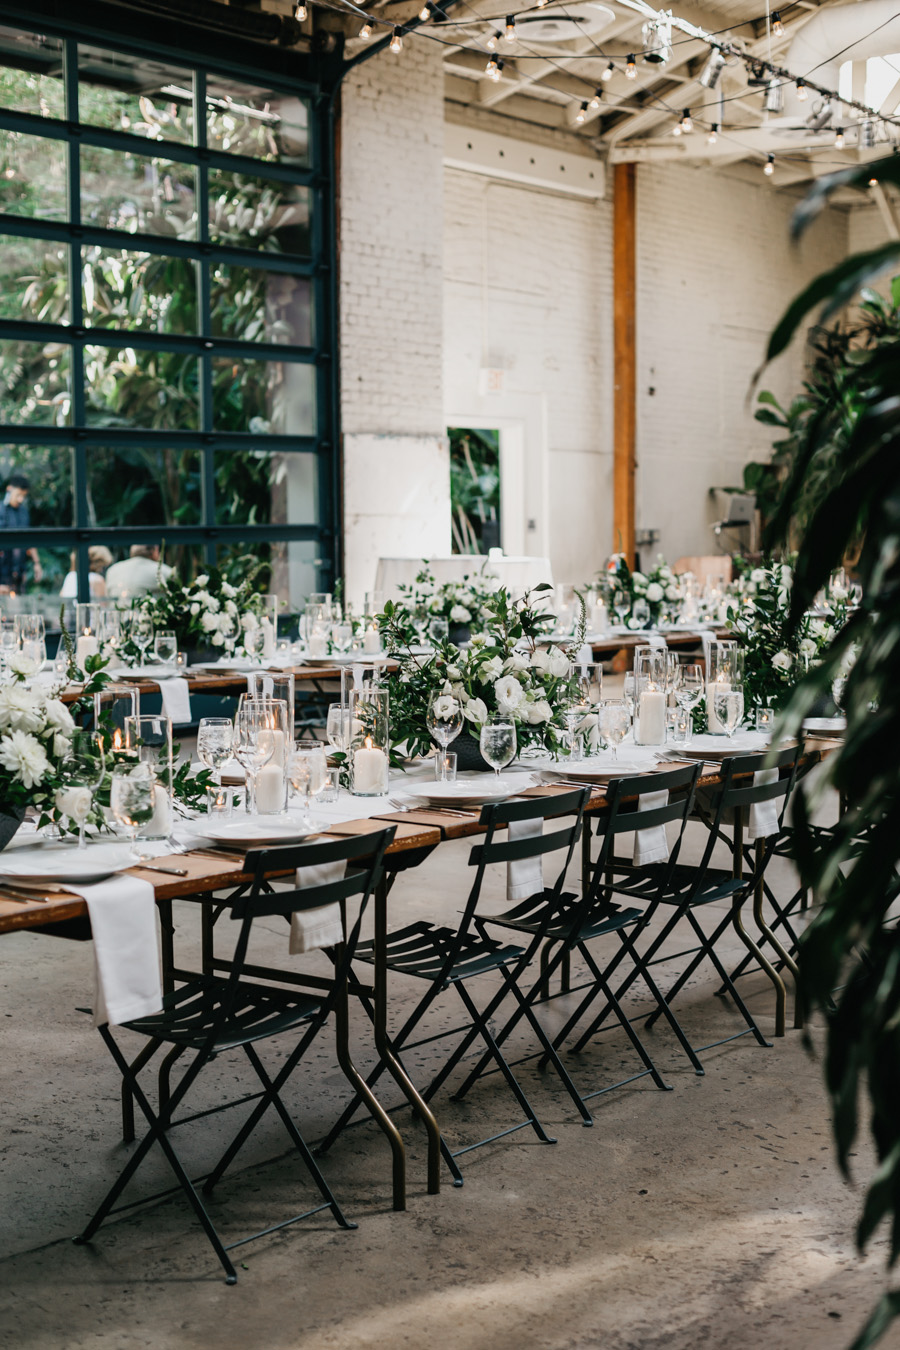
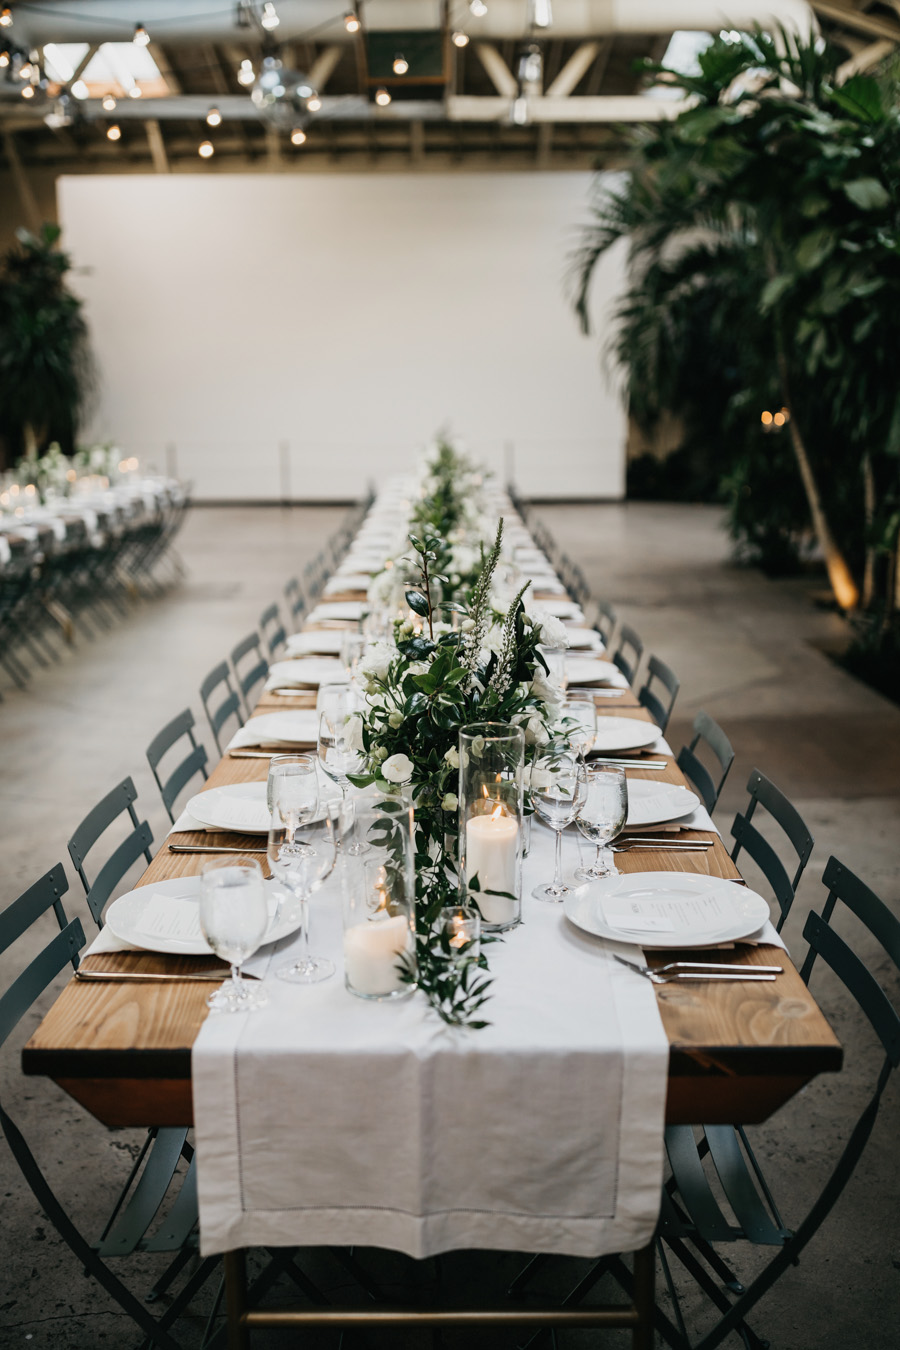
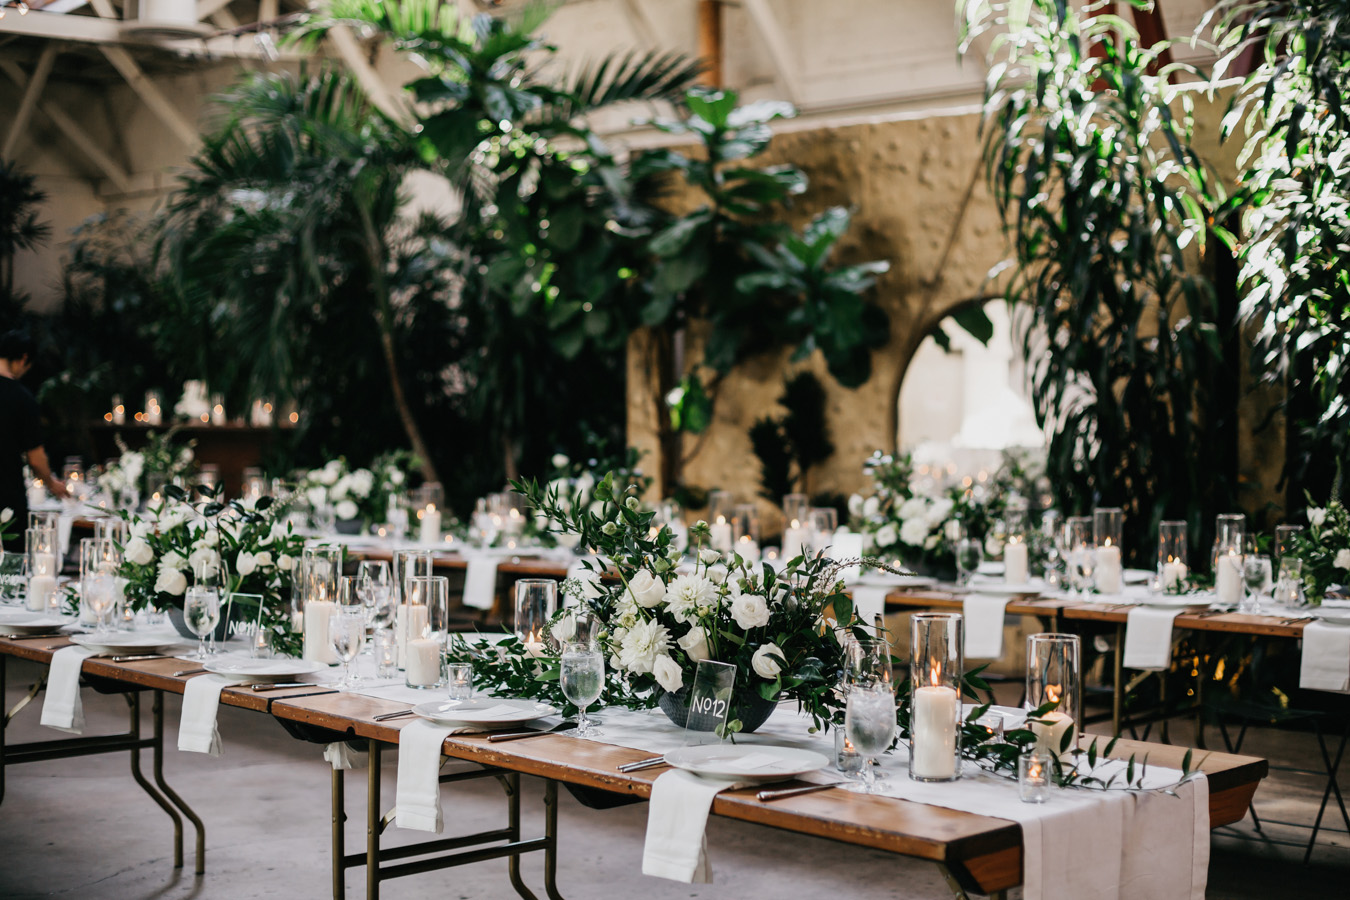
Fun fact, my mom is a retired florist and she did our flowers with the floral designer she used to work with. They knocked it out of the park and I’m incredibly grateful that she took care of that for me. All flowers were sourced from the LA Flower Mart, which I visited many many times to finalize flower selections and is also where I got the containers from. They were originally a peachy nude color but I spray painted them a dark gray with this spray paint.
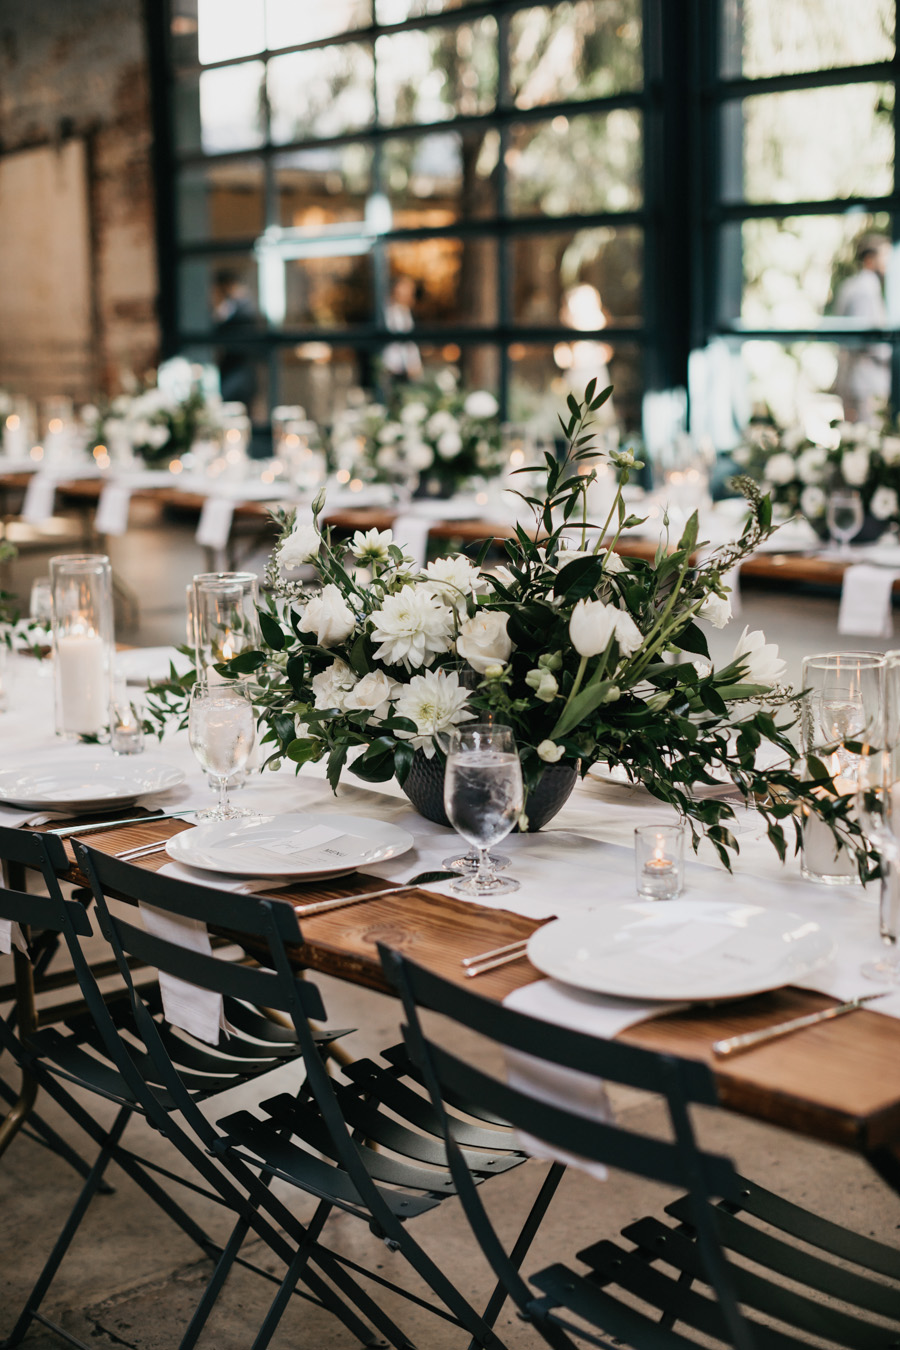
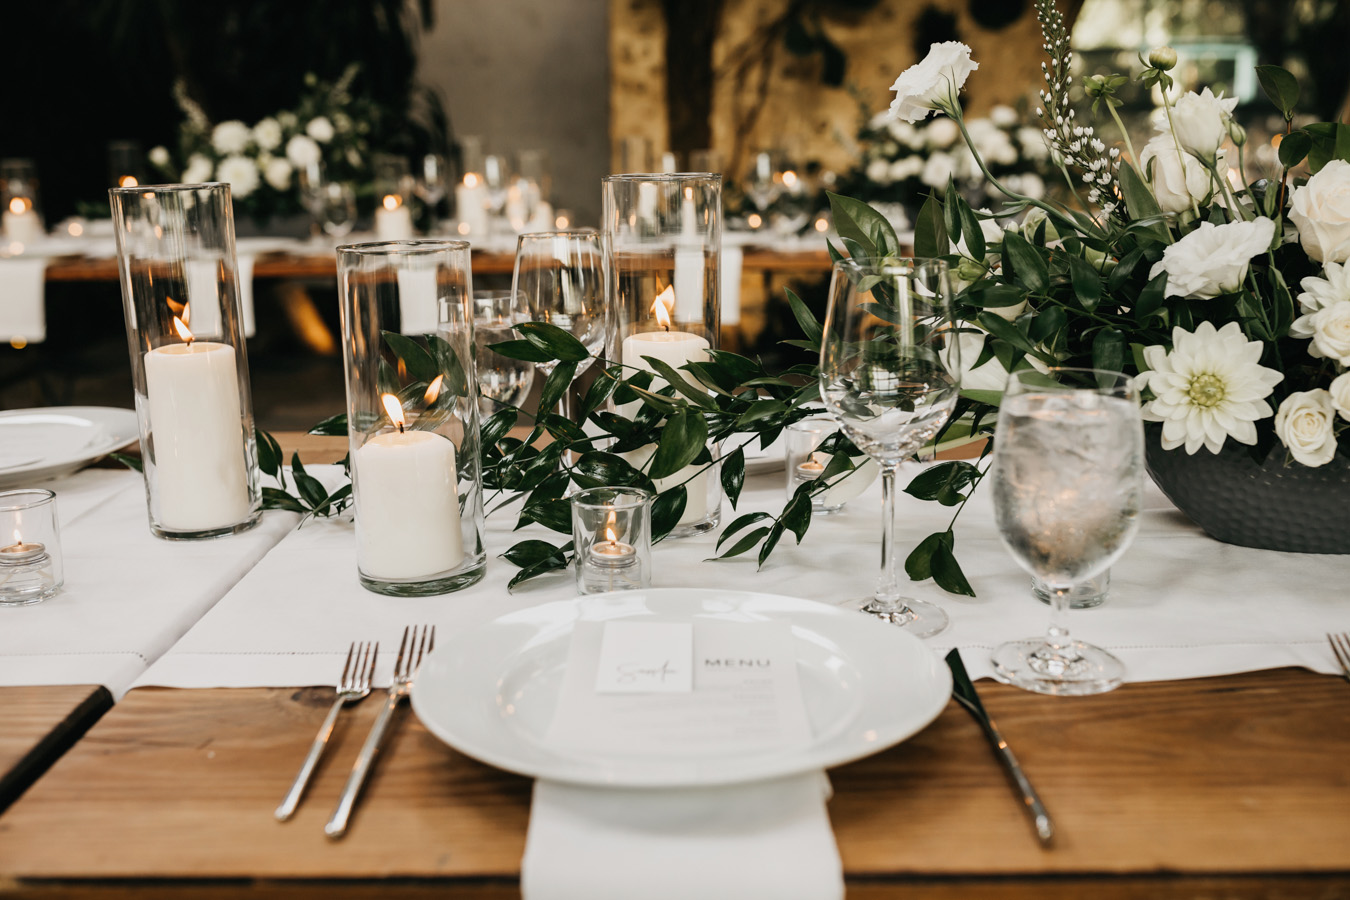
Our venue had strict candle rules specifying that candle holders needed to be a minimum of 5″ taller than the height of wax candles, and non-wax candles could be in any sized container. I got the wax candles from IKEA which seemed to be the best deal, and I got the the tall glass cylinders from the dollar store. In order to have tea light sized candles but still comply with the venue rules, I used these oil cartridge candles in tea light holders from Michaels that come in packs of 25 and are a pretty good deal when they have their 40% off coupons.
That should be everything! If you have more questions, let me know.
More on our wedding here and if you haven’t already entered, I’m hosting a giveaway for a photo album OR wedding guest book with Artifact Uprising. Enter that giveaway here!
Did you do any wedding programs?
Nope, no wedding programs.
There are so many beautiful ideas in this post, I’m definitely gonna save this for my big day! Thanks for sharing this!
https://www.makeandmess.com/
Thanks Michelle!
best post ever and thank you so much for taking the time to put this all together <3
So happy to hear that Julie, enjoy.
This is awesome, I needed some of these details for my big day very soon! What did you give for favors??
Congrats on your upcoming wedding Sarah! We didn’t do favors, as part of our goal to stick within budget and keep things simple :) Instead, we printed photos our photographer took of our guests and sent them with our thank you notes.
Your wedding looks beautiful! My fiance and I are getting married at the Millwick in November!
Just curious, did you buy your own table runners (if so, where?! They’re so cute!)? Or did you guys rent them from someone?
Congrats!!
Hi Kim! We rented the runners and everything else from A Rental Connection.
Oh my goodness – all these photos and details are stunning! Absolutely enviable! Congratulations!
Awesome!! Thank you so much :)
This is so beautiful! I love your wedding decor so much! Thank you for sharing stories and DIYs of its.
What did you invitations look like?
Hope it’s the ultimate form of flattery that I want to steal every single detail…..
Hello Amy ,
Your table numbers, I got the white vinyl but I was curious how you got the Chanel like lettering on their? Was it a stencil or freehand?
Thanks
Xoxo
Monique
Hi Monique! My friend created a template and printed/cut it out that way with her Silhouette machine.
Hi! I’m doing these table numbers for a friend on my Cricut. Do you know what font they used or would you be able to find out?
Thanks in advance
Hi Amy,
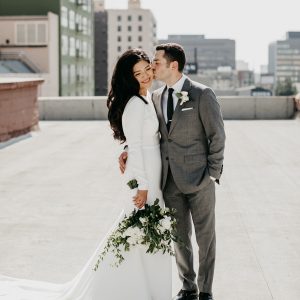
Your wedding was beautiful! I’m getting married next month, and I think I’m wearing the same Mikaella Bridal dress. I’ve been looking for alternative belts and came across your pictures on Pinterest. Can you share where you got your white belt? I’m having no luck.
Thank you!
Hi Katherine! It’s the belt that came with the dress but with all the embellishments removed. My tailor did it for me. Congrats on getting married!!
Can you tell me how you got the flowers to stay on top of the sign. I’ve made my own signs as well and will be doing the flowers for my daughter but still trying to think of ways to make that work.
Thanks
Kim
Thank you so much for this insanely helpful post.
I’m trying to figure out what to do if I don’t have a friend with a vinyl printer. Do you have any recommendations.
What did your wedding invites look like? Curious if they matched your overall look seen on the menu, seating chart and welcome sign.
Thanks!
For an acrylic/see-through surface, you can try printing the lettering on paper and placing it under the see-through surface to trace over with a sharpie paint pen. The results won’t be as clean but it’ll get the job done.
Our wedding invites were white paper with black writing, nothing else. They sort of matched the menus!
Love this post! I can’t open the link to the font. Can you repost where you found it?
Thanks!
Hi Caitlin! I just clicked the link and it’s working, try it again!
Hi Amy
How did your mom attach the flowers to the welcome sign that you had?
Just live the entire look, it’s so beautiful!!!
Kind regards
Abigail
Hi Abigail! I actually don’t even know if she’s the one that attached it… Sorry I don’t have any more info on that. My best guess is that a lot of floral wire was used to wrap around one of the hinges of the sign.
What font did you use for your table numbers? I love it!
Hi there! I just stumbled across your blog while looking for DIY flower arranging tips, and I LOVE the arrangements on your tables! Would you mind telling me what types of flowers + greenery your mom and designer ended up using? I’d love to use some of your photos for inspiration! Thanks!
Hi Cami, from what I can remember the flowers were dahlias, lisianthus, tulips, roses, and hellebore. The main greenery was Italian ruscus. Your florist should be able to tell everything that’s there just from the photos!
Hi there!
Wondering where you got your shoes? Thanks!
Hi Sarah, I got them on ASOS. I don’t think they’re available anymore.
Hi Amy!
Is this the foam board you printed your seating sign on? This link: https://www.staples.com/services/printing/foam-boards/
I wasn’t sure because you specified engineering foam.
And how did you put holes into the top sign to hang it?
Thanks!
Yes that’s the one. I taped rope to the back of the sign, no holes.
What is the hex color you used on your wedding sign? It looks like a deep green or deep teal.
All signage is black and white.
Hi Again!
My last question for you. :) What were the dimensions of your name cards?
2×3.5″
Hi Amy! Your wedding is absolutely stunning and a huge source of inspiration. Thanks for sharing!
You mentioned the acrylic bent frames from Michaels weren’t available online. I’m wondering if these were the frames and if they’ve recently become available? I don’t have a Michael’s nearby, so it would be great to order them online! https://www.michaels.com/acrylic-basics-bent-vertical-frame-by-studio-decor/10118158.html
Thanks so much for your time.
Yes those are exactly them! Glad I could help.
Are your vases 7.25″ and 9″? Also, what size candles did you use in your vases?
Thanks so much!!
Hi Hannah, if I remember correctly the vases were 7.5″ and 10″, candles were around 3″ and 6″.
Thank you!
I’m having my wedding at The Smog Shoppe…sister venue to The Milwick. That venue also has the same 5” space room when it comes to candles and vases. Just curious, how strict were they when it comes to that rule? Were they ok with you having 10” vases with 6” candles? Did they actually measure your candles and vases?
Thanks so much,
Hannah
They didn’t go around with a ruler and check, so I took it upon myself to not be so exact around it but close enough. My planner told me she’s only seen them remove candles when it’s super obvious that the candles aren’t shorter than the containers.
Thank you so much, that’s very helpful!
I’m highly interested in learning about your round, black planters for your floral arrangements! Do you mind sharing where you got them or what they’re called? Thank you!
Hi! I got them at the LA Flower Mart. They were originally a nude color and I spray painted them dark gray.
I’m literally in love with everything you did! May I ask what fonts you used for your wedding welcome sign, I love it! Thank you – and thanks for such a helpful post!
Hi Sarah, the fonts are linked in the post!
Hi Amy,
Love your wedding vibe. Where did you get those chairs? Having the hardest time finding those. Thanks!
Hi Garrett, the chairs were provided by the venue.
Hi Amy, I love your wedding style! Do you know where I can find a similar card box from a UK supplier? Thank you!
Hi Amy! Try looking on Etsy and hopefully the shop provides international shipping.
Wow All are so lovely and amazing. The card decoration with real flower is so good.Thanks for sharing…
OMG!! Very beautiful wedding style, can’t describe it in words, this is my favorite design style.
Hello! I am in love with your wedding! Are the tables foldable farmhouse tables or just adding the table tops?
They look beautiful!
Hi Briana, thank you! They were provided by the venue and were wood top folding tables.
Good Day
All the way from South Africa
Moment I saw this post on Pinterest I fell in love
Only thing I would like to know are the dimensions of the planters and their texture? Were they ceramic? And also see someone posted the dimensions but not sure if its in inches or centimeters? And what is hight and width?
Thanks so much
It’s so beautiful and simple. Definitely an inspiration. Just a quick question, how do you attach the floral to the signage? Was it just foam and strong glue? Would love to know! :)