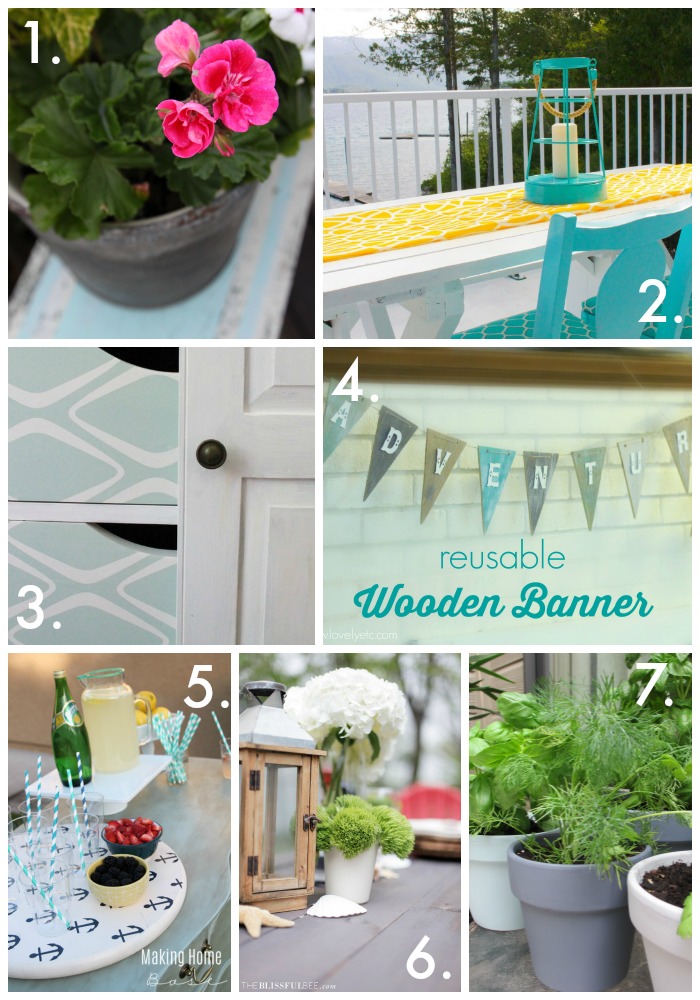
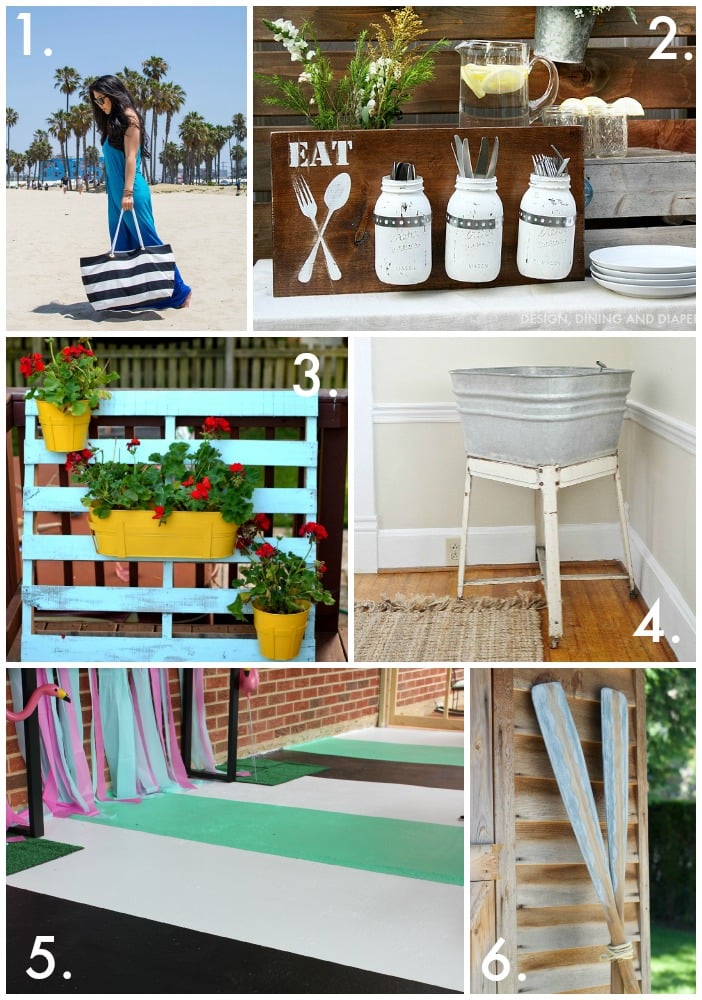
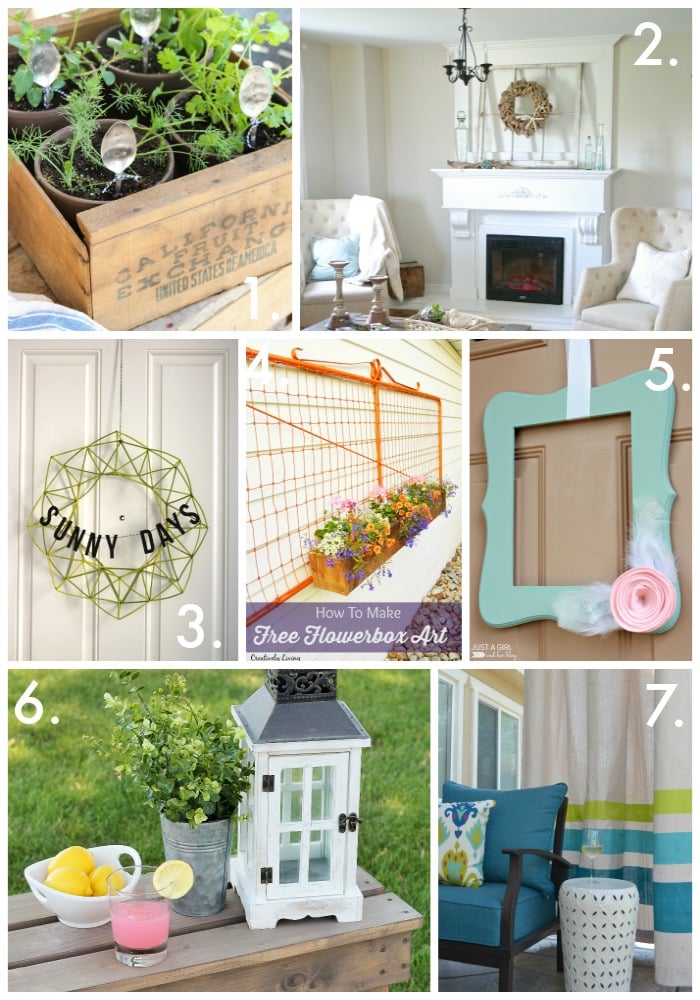
I have joined up with more than 30 AMAZING bloggers to tackle the challenge of creating a patriotic project or recipe without using the traditional red, white and blue color scheme! How fun is that?! Starting last week and running through July 4th, more than 30 projects will be shared on some of the most awesome blogs around. I can’t wait to see all of the inspirational projects and hope YOU will find some inspiration as well.
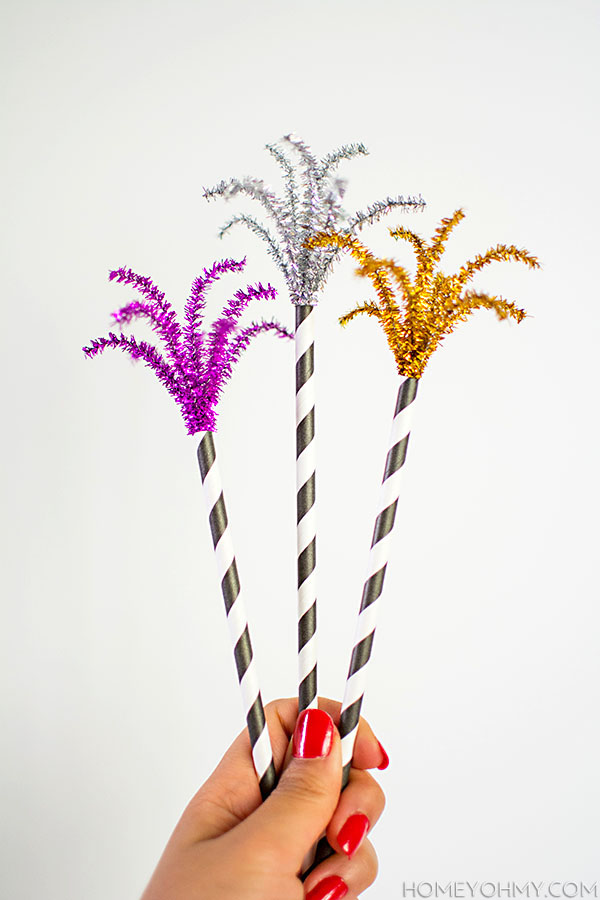
These drink stirrers, which mimic fireworks, would make fun little additions to any 4th of July celebration. Plus, they fulfill two crucial requirements I have for DIY stirrers- they’re 1) easy and 2) quick to make, which is especially ideal if a lot of them are needed.
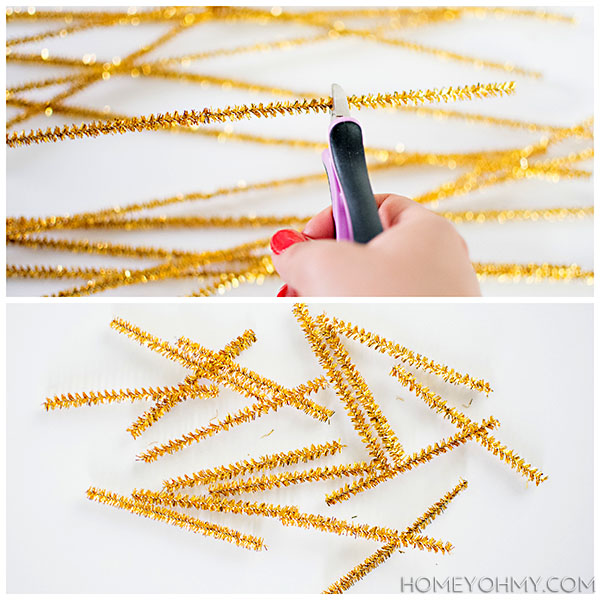
First, use wire cutters to cut each pipe cleaner into four, roughly even pieces. Shake off any excess tinsel that was cut.
Shove as many of these pipe cleaner pieces as you can into a straw (I was able to shove 9) and then bend each one into a downward curve.
That’s all there is to it. I swear. Makes me way too happy how such a simple craft can be so fun and festive. You too?!
I like how my first ever 4th of July project isn’t red, white and blue, which for me was an easy challenge since gold remains a viable option <3. I also LOVE the glint and gleam of the tinsel on the pipe cleaners. Really helps the imagination see them as fireworks ;)
Now, before you head out, be sure to check out the AMAZING projects that were shared last week!
Yo! I’ve been itching to make a marquee sign for a long time now, and this summer season is finally kicking me in the butt to do it since it makes a great summer decor piece. Now… there are a million and one marquee projects out there, and this one isn’t anything new, but I still had to do it, especially with how simple I knew it was going to be. I imagined it going above a bar cart, which I still don’t have (boo!), but for now I like it just hanging on the wall, and for potentially using it as party decor. Hey now!
Materials: -cardboard letters (I got mine from JoAnn Fabrics)
-pencil
-X-Acto knife
-screw driver
–string globe lights
I started by cutting out one side of each of the cardboard letters with an X-Acto knife. This was pretty easy to do and was a fairly neat process.
In the string lights packaging, the light bulbs were sitting in a cardboard tray, and I figured the holes in them would make the perfect tool to trace perfectly sized openings onto the cardboard letters. So, I cut one of them out to use as a tracing guide.
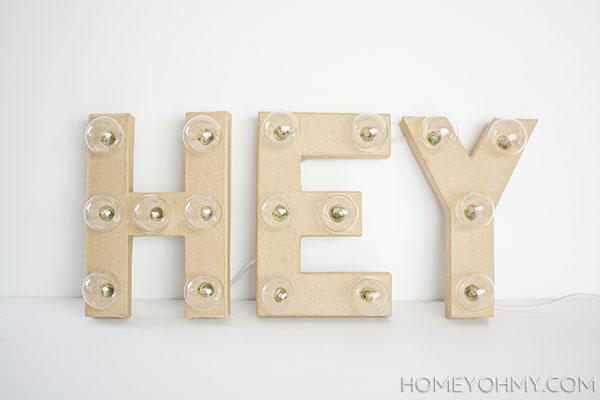
I traced circles on the inside of the cardboard letters where I wanted the lightbulbs to go. Then, I used an X-Acto knife to cut a cross in the center of each circle, making sure the cuts went all the way to the edges of each circle. Flipping over the cardboard letters to the front side, I used a screwdriver to poke through and enlarge each hole. Finally, I inserted the lightbulbs in each hole and screwed on the backings, shoving the wires in place within the cardboard edges.
I thought about painting them, but decided I was too lazy liked the way the cardboard looked original and bare. What do you think?
I did think about just doing one letter, or the widely beloved ampersand, but neither of those excited me more than this one. I don’t exactly remember how I thought of using this word, but it is one I use often, and I liked the playfulness of it. Seriously, it would work so well above a bar cart, right? In that case, I’d also add a “girl” marquee beneath it ;). That’s something I say a lot, too! And not just a Ryan Gosling tribute.
We’ve been celebrating summer all week by sharing brand new summer inspired projects. Now, it’s your turn! Link up your summer DIYs, home decor, food, and crafts. Any and all things SUMMER. Don’t have a blog? You can still party with us! Share photos of your summer projects on Facebook and Instagram using the hashtag #summercelebration
Before we get to the party, check out these 20 AWESOME Summer Projects!
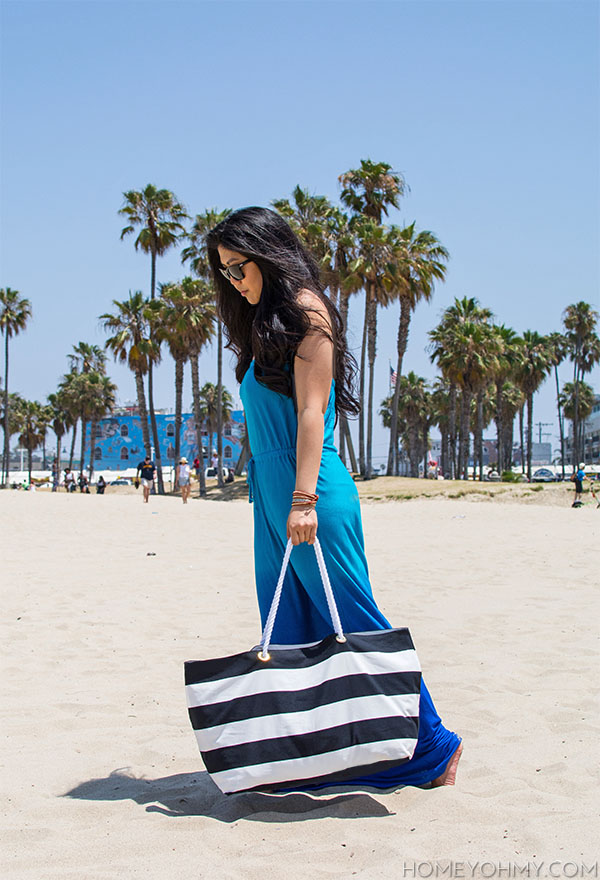
You guys. I love this tote. And the beach. Can I just quickly talk about this photo, which is one of my favorite photos ever for this blog? My beach day photographer (boyfriend) had me standing still here and told me to wait, which I reluctantly did, only to find out later that he was waiting for the surfer dudes to enter the shot in the back. Isn’t that neat?? Good job, boyfriend <3.
This tote is simple, chic, and DOES NOT REQUIRE SEWING. I’ve been getting by without a sewing machine (though it is a goal of mine to get one and tame the beast) and have happily found that you guys really enjoy my no sew tutorials, so I’ll keep them coming :). This tote was made pretty much exactly the same way as my no sew tote bag, only this one is bigger and roomier for all those beach day supplies. Plus, these handles are made with nautical rope and I used a new technique for attaching them to the bag, which I’m really excited to share!
Materials: –fabric (2 pieces that are 21×27″ each)
-ruler
–Unique Stitch (The magic maker. This is my weapon of choice for no sew DIYs)
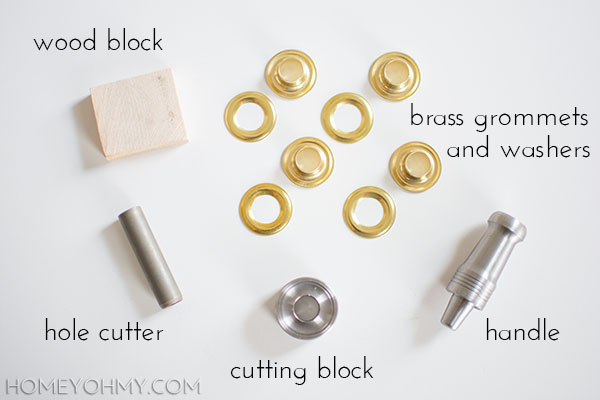
–grommet kit (1/2″ opening)
-hammer
–rope (6ft total, cut into 3ft pieces for each handle, 7/16″ in width)
–super glue
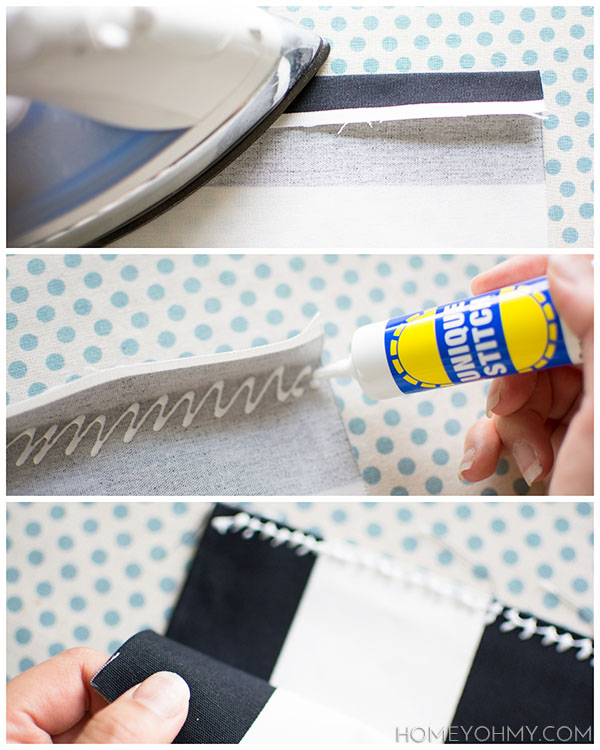
First, iron out the pieces of fabric. The rest of the steps will be done to each of these pieces. Fold back about one inch of the fabric on one of the sides that’s 27 inches long and iron it down. Apply the Unique Stitch underneath the fold and glue it down, then glue the fabric pieces together face to face, making sure the edges that were previously folded and glued are matched up (this is the opening of the bag). All three of the other edges should be glued together.
*Tip- be generous enough with the glue so that you can feel it lightly seep through the layers of fabric. Make sure to work on a protected surface.
After letting the glue dry a bit, pinch each side of the fabric at the bottom corners of the fabric and pull them apart to create a triangle. Measuring 9 inches at the base of the triangle, fold the triangle over to the bottom of the bag and apply glue only under the point of the triangle just to keep it in place. After doing this to both corners, flip the bag inside out while the glue is still wet, then reinforce the triangle folds by pressing them down. This creates a flat base for the tote bag.
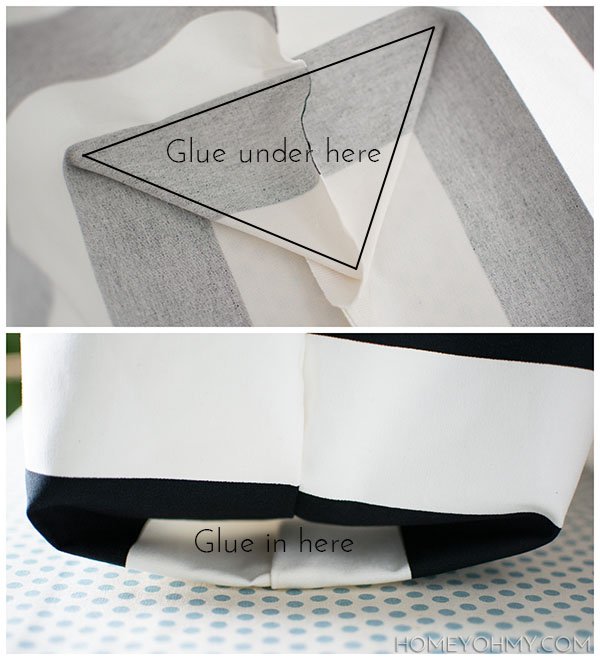
Once here, lift up each triangle (the glue should still be wet) and apply glue all underneath it before pressing it down again to the bottom of the bag. On the outside of the bag, shown in the bottom of the photo above, the base of the triangle is unattached from the bottom of the bag. Apply glue in between here, press the fabric down from the inside of the bag, and let the glue dry. Do this on both sides.
Now for the grommeting! Above are all the materials that come in the grommet kit, and like I had said a while ago about how I want to rivet all the things, I now want to grommet all the things.
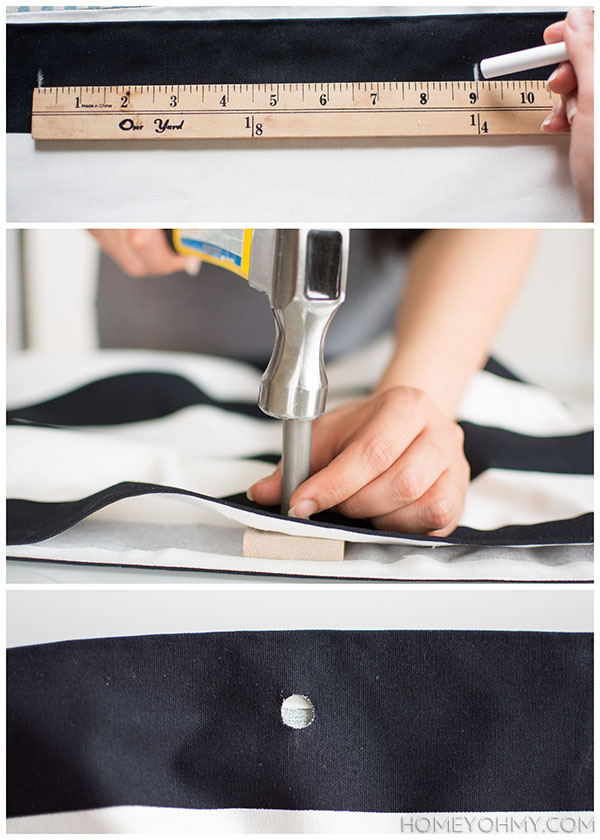
Make two chalk marks about 9 inches apart and centered at the top of each side of the bag. These marks are where you’ll be cutting holes into the fabric by hammering the cutter on top of the wood block.
Next, all you do is hammer a grommet shut through each hole. NOTE: The way I’m doing it in the photo is incorrect. The side you hammer will be the back of the grommet, so you should set it up so that you’re hammering from the back side of the fabric, not the front like I’m doing in the photo. The layers from bottom to top are the cutting block, grommet, fabric, washer, handle, and hammer.
Finally (finally!) pull both ends of a 3 foot piece of rope through the grommets on one side of the bag and tie them into knots. Repeat on the other side. Apply super glue into all the crevices of each knot to secure them in place.
Next, take that baby with you to the beach.
Yes, I did actually take it with me to the beach and it was perfect. So much room and it fit everything I needed and more (snacks, snacks, and more snacks). Here was my little set-up, just for fun.
Guys, this is the first time I’ve ever owned a beach umbrella and it is a game changer. My intolerance for the sun and turning into a lobster is no longer a concern and now I can comfortably stay on the beach all day. How did I not know that the solution was so easy? Thank you, last minute Walgreens umbrella impulse buy!
I had also shared a little peek at this scenery on Instagram:
I hardly ever have moments like these where I can just kick back and relax with a magazine. This was Memorial Day weekend and I forced myself to take a break from the blog and just sit on the beach and do nothing, which is the highest of luxuries for me these days. It was fantastic, and really, this is my idea of a perfect summer celebration. Well ok, yea, I also love bbq’s and beers, but moments like these are far more rare!
Speaking of which!!! This project is part of the Summer Celebration Series, where 20 bloggers (including myself) have teamed up this week to bring you summer treats and DIYs for whatever your summer creativity entails :). Check out the rest of the projects that are being shared today!
Here are even more ideas to kick off your summer in style
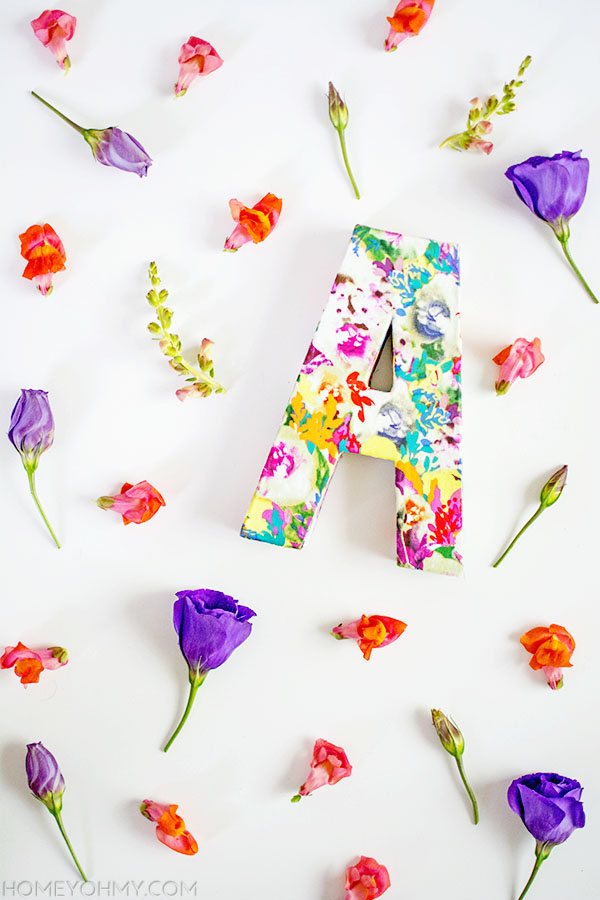
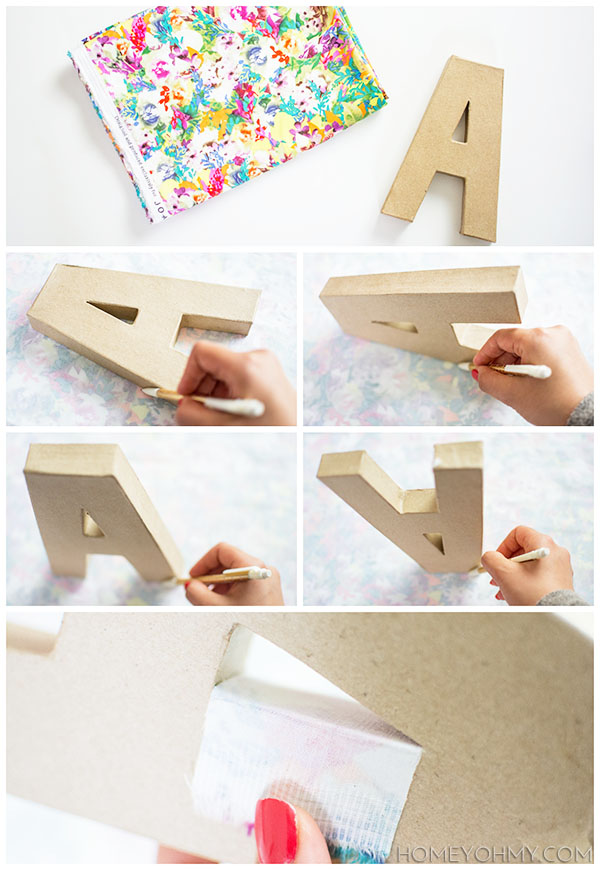
If you follow me on Instagram, you might have seen that I recently got this *gorgeous* floral fabric that I wasn’t sure about how to use. I mentioned I’d probably be making a pillow cover with it, and I will (because how can my pillow-cover-obsessed-self not) but I also wanted to do something with it in a way where I could just look at it. Seriously, I think I would have been ok with just hanging it up on the wall, but I’ve had monograms on my mind lately and found this the perfect opportunity to create a decorative one.
I got the fabric and cardboard “A” from Joann Fabrics, and all I did was trace every side of the monogram onto the fabric with a pencil and cut each piece out. For the inner edges and hole in the A, I measured the needed length and cut out a piece of fabric first, then marked in pencil where I’d need to cut the width. After all the pieces were cut, I used a foam brush and Mod Podge to glue them all on to the monogram, then applied Mod Podge over all the fabric as a final protective coat.
Per my usual, preferred crafting style, I kept it really simple and easy, which I think was best for this floral fabric to be the star of the show. I freaking love it. Floral is a pattern I will always love, and the bright colors on this one are spreading some much welcomed summery vibes. I can’t stop looking at it, which is all I wanted to do in the first place- success!
What do you think of floral patterns? I’m hoping to incorporate more of them into my home, and for sure will be making that pillow case and sharing how that turns out on Instagram, possibly along with how it looks hanging up on the wall haha! Seriously, I think this fabric would look good in a frame or as a photo mat, no? Too far?
June already!! I know, I say that about every month (and I say THAT after I say that about every month), but it’s seriously insane how we’re already fast approaching the half-way point of this year. Thinking about it that way really puts into focus how fast time is flying, right?
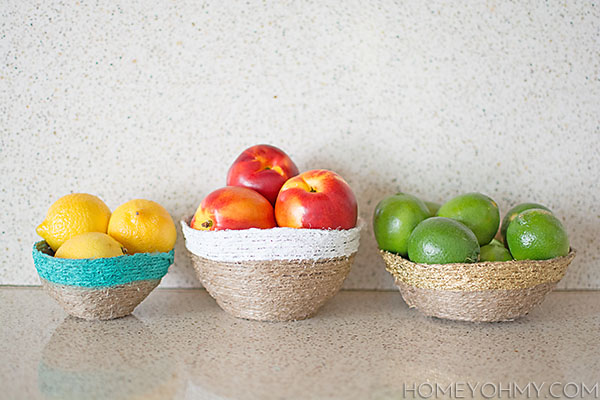
So with summer here (according to the solstice it isn’t officially summer, but to me, my first day back at the beach for the year marks the beginning of summer) I’ve got a bunch of fun, summer DIYs lined up, starting with this one. I came across this tutorial for making string bowls at Laughing Kids Learn and while it’s aimed at kids, I think this is a lot of fun for anyone to do. Plus, it’s super easy and doesn’t require a lot of materials. Win win win.
Materials:
Plastic wrap
Bowl Jute twine Mod Podge
Foam brush or bristle brush
Spray paint
I recommend wearing gloves if you want to get hands-in with the string and possibly adjust it after you’ve slathered it in glue. First, wrap three layers of plastic wrap around a bowl. I saw later that the extra layers really help with the removal process of the layer that comes in contact with the string. Next, slather on Mod Podge over the plastic wrap. This will help the string stick on to the bowl.
Coil the string until you make a small disc, then stick it on to the center of the bottom of the bowl. Glob on Mod Podge over the disk, then continue wrapping the string around the bowl while globbing on more Mod Podge all over the string. By globbing, I mean apply the Mod Podge generously! Make sure not to wrap the string all the way to the edge of the bowl. You’ll need this edge to grab onto in order to remove the bowl.
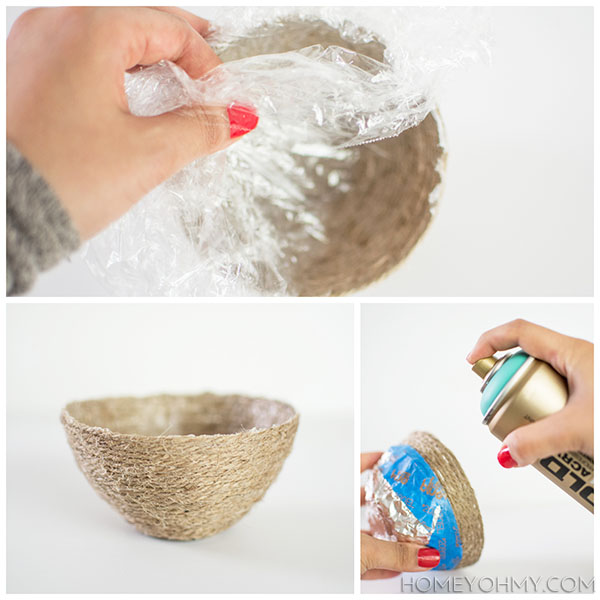
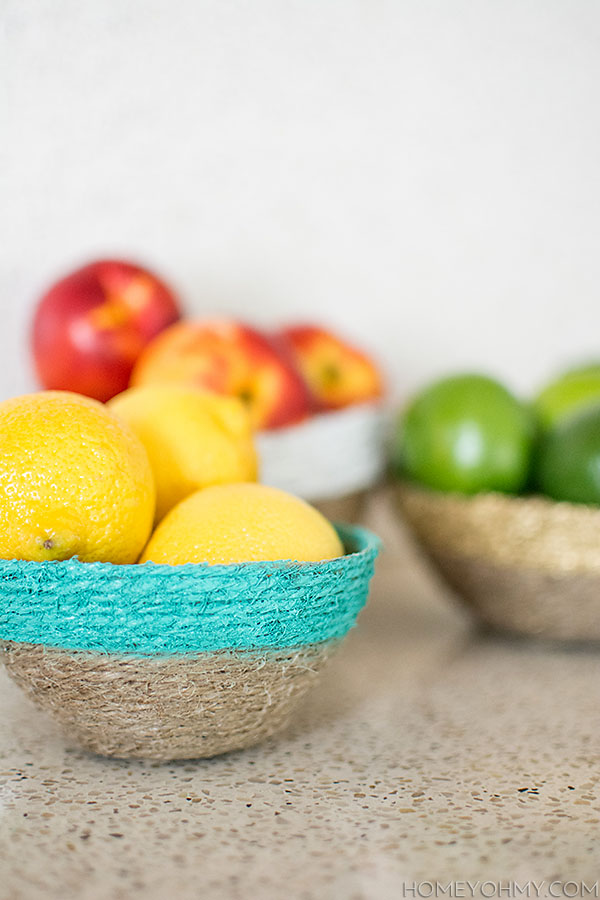
Let the bowl dry completely, then pull down at the plastic wrap while holding the edge of the bowl to remove the string bowl, rotating it so that you pull at every edge and angle. If I were to do this again, I’d probably spray a light coat of cooking spray on the bowl for easier removal, but you can do without it with just a little bit of patience. Remove the plastic wrap, then tape on a design of your choice. I kept it really simple and just spray painted the rims of the bowls, using painters tape and foil to cover the bottom of the bowl.
String and glue. Isn’t that neat? The bowls are pretty flexible and warp under weight, but they’re still pretty sturdy and hold well.
Aside from being functional, they make a cute, summery display when filled with fruit. I can see myself also using the smallest one as a catch-all, though I already have a bunch around the apartment. Having a container everywhere to throw random knick knacks into is my favorite way of “organizing”.
What do you think of these bowls? What would you use them for?

 First, use wire cutters to cut each pipe cleaner into four, roughly even pieces. Shake off any excess tinsel that was cut.
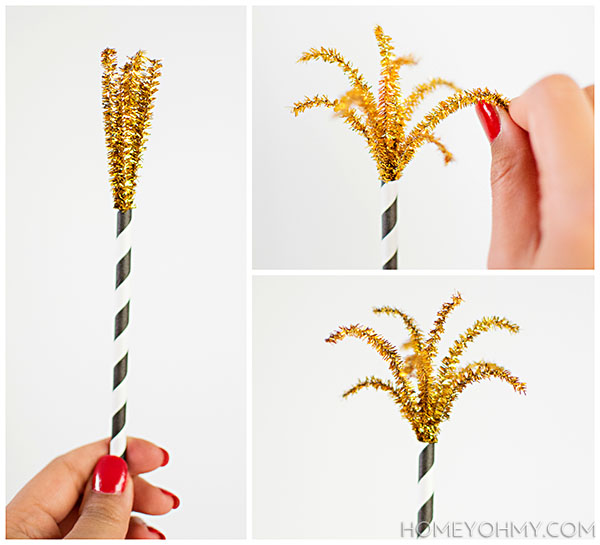
 That’s all there is to it. I swear. Makes me way too happy how such a simple craft can be so fun and festive. You too?!
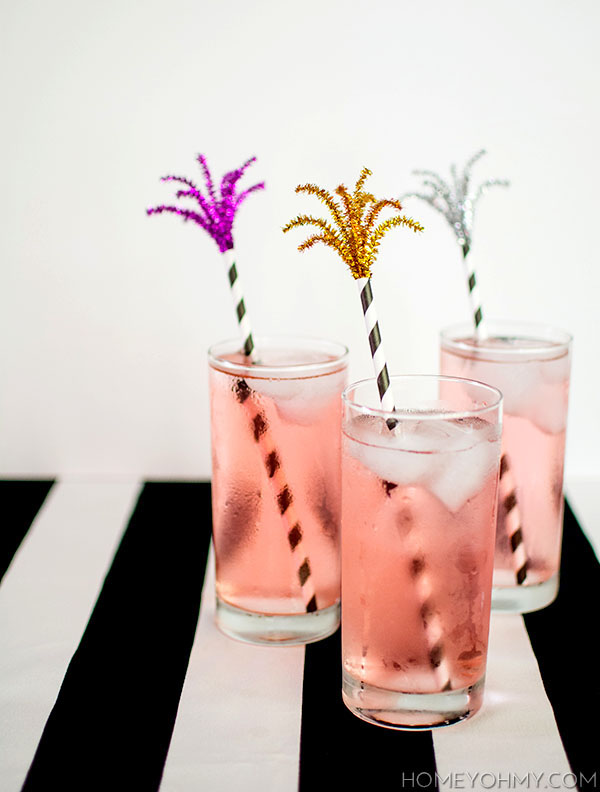 I like how my first ever 4th of July project isn’t red, white and blue, which for me was an easy challenge since gold remains a viable option <3. I also LOVE the glint and gleam of the tinsel on the pipe cleaners. Really helps the imagination see them as fireworks ;)
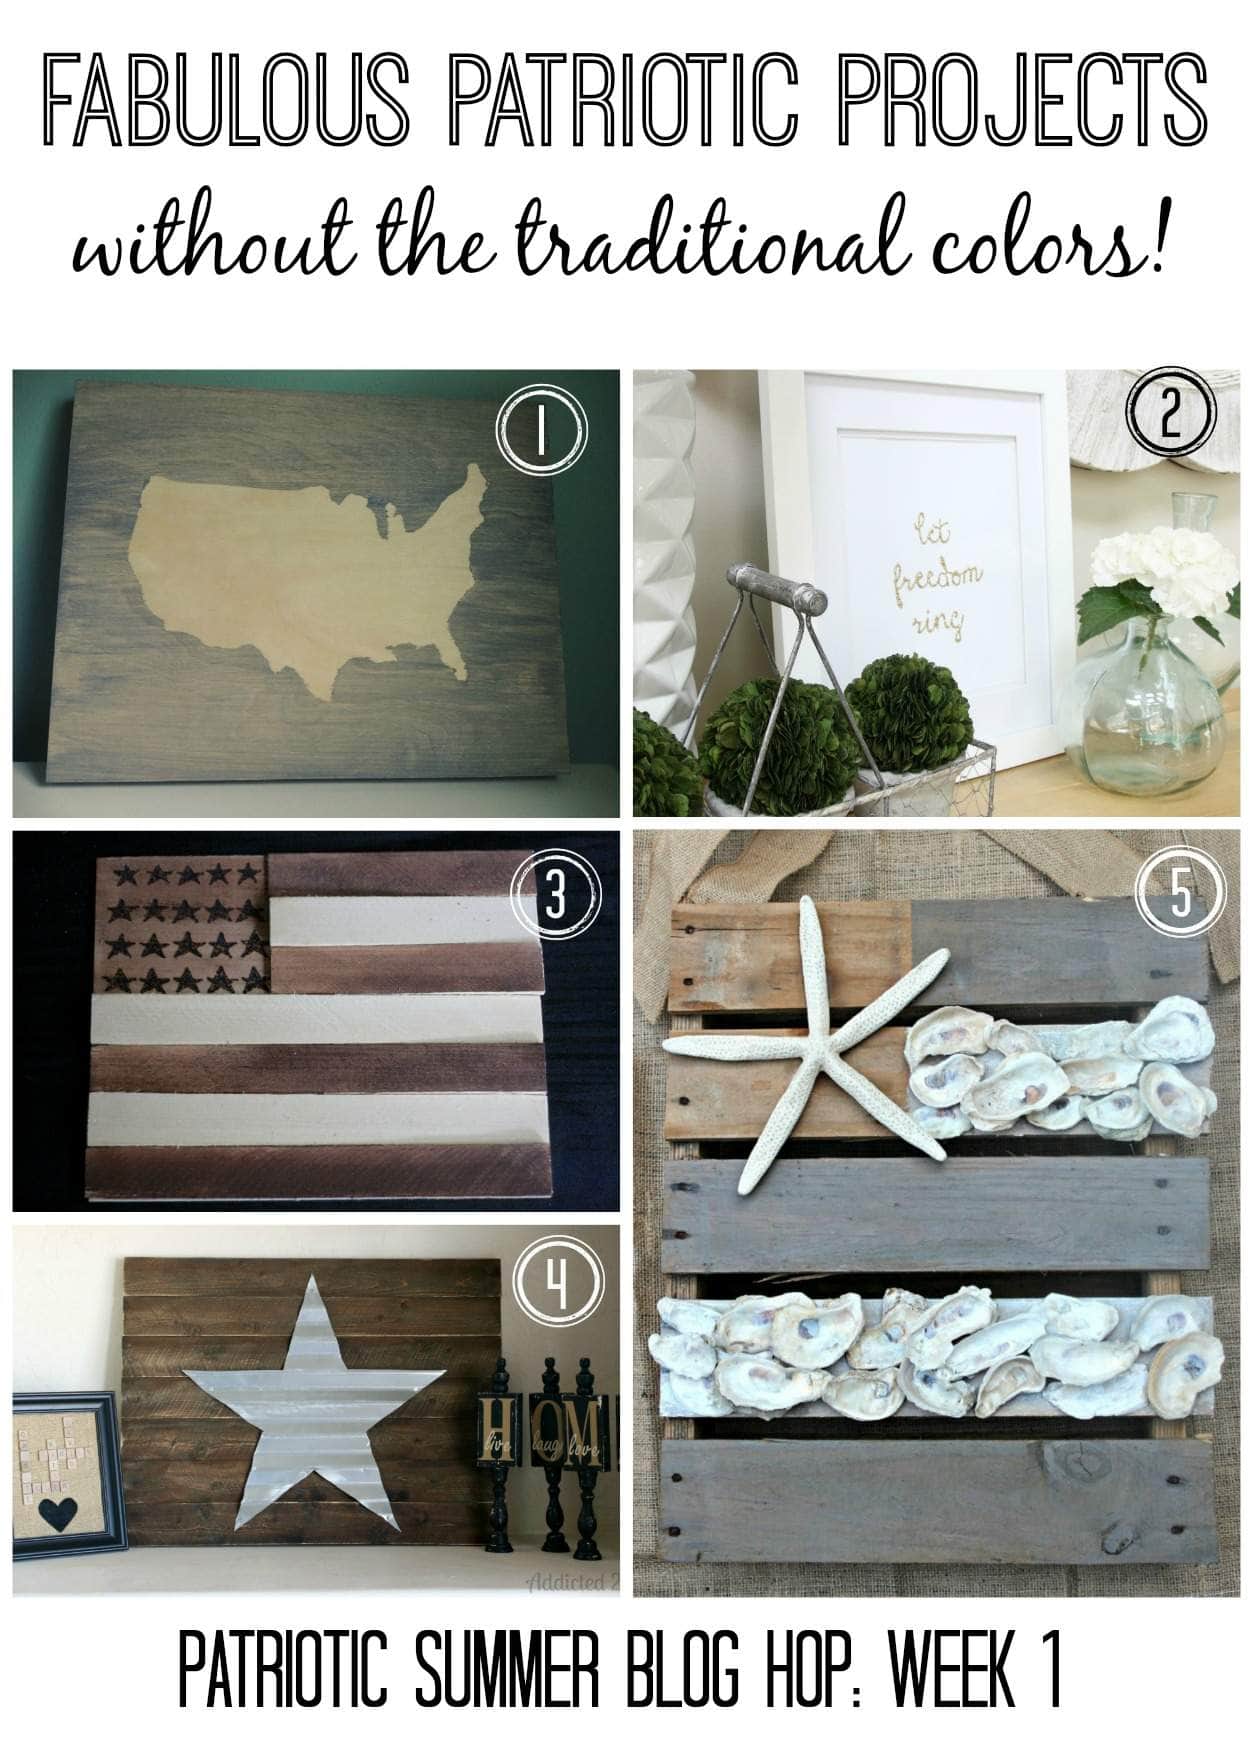 1. USA Map by Paper & Fox
 Yo! I’ve been itching to make a marquee sign for a long time now, and this summer season is finally kicking me in the butt to do it since it makes a great summer decor piece. Now… there are a million and one marquee projects out there, and this one isn’t anything new, but I still had to do it, especially with how simple I knew it was going to be. I imagined it going above a bar cart, which I still don’t have (boo!), but for now I like it just hanging on the wall, and for potentially using it as party decor. Hey now!
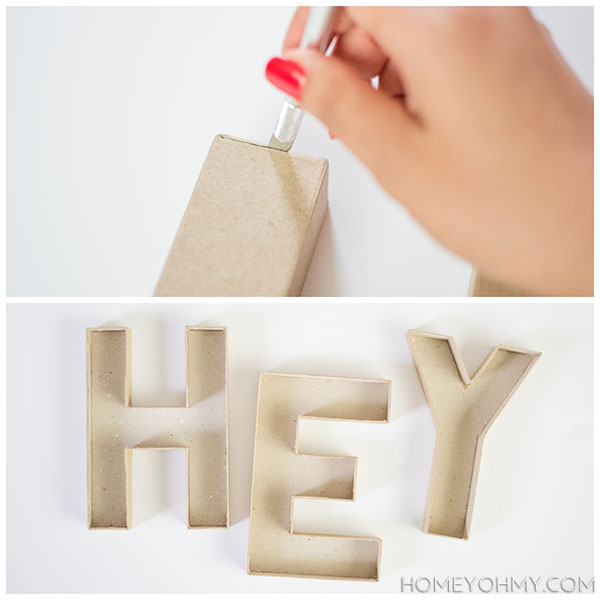 I started by cutting out one side of each of the cardboard letters with an X-Acto knife. This was pretty easy to do and was a fairly neat process.
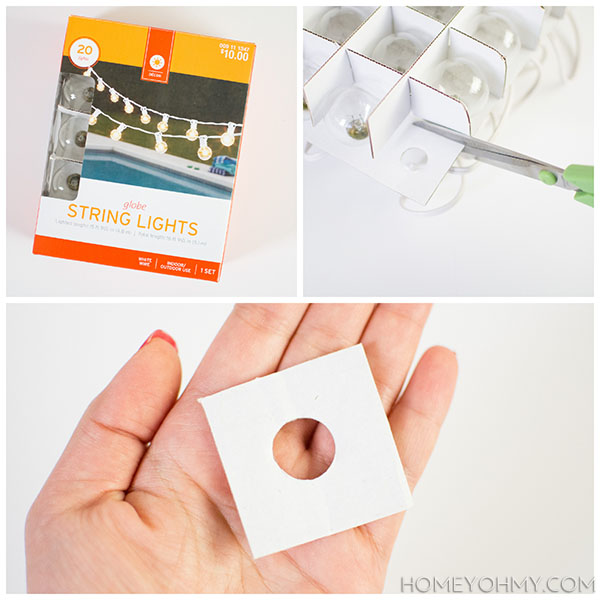 In the string lights packaging, the light bulbs were sitting in a cardboard tray, and I figured the holes in them would make the perfect tool to trace perfectly sized openings onto the cardboard letters. So, I cut one of them out to use as a tracing guide.
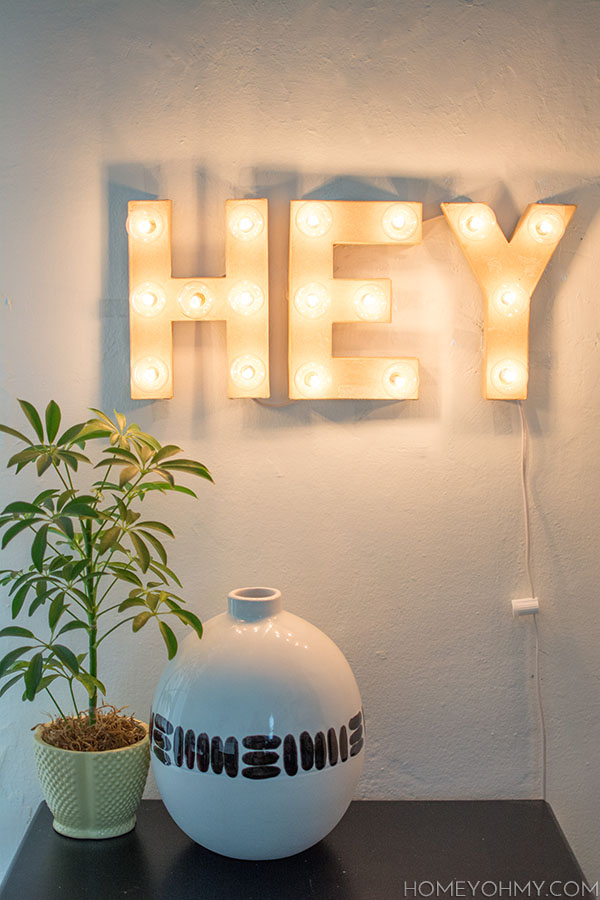 I did think about just doing one letter, or the widely beloved ampersand, but neither of those excited me more than this one. I don’t exactly remember how I thought of using this word, but it is one I use often, and I liked the playfulness of it. Seriously, it would work so well above a bar cart, right? In that case, I’d also add a “girl” marquee beneath it ;). That’s something I say a lot, too! And not just a Ryan Gosling tribute.
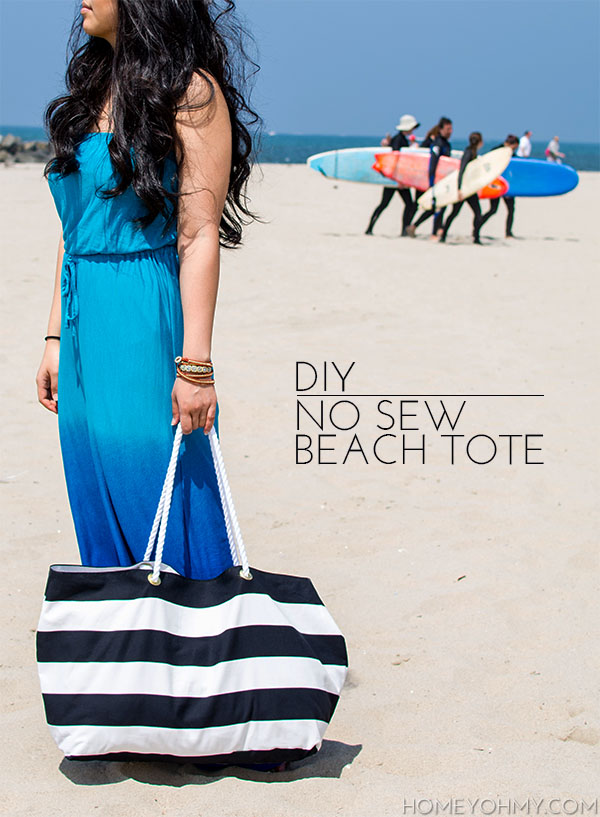 You guys. I love this tote. And the beach. Can I just quickly talk about this photo, which is one of my favorite photos ever for this blog? My beach day photographer (boyfriend) had me standing still here and told me to wait, which I reluctantly did, only to find out later that he was waiting for the surfer dudes to enter the shot in the back. Isn’t that neat?? Good job, boyfriend <3.
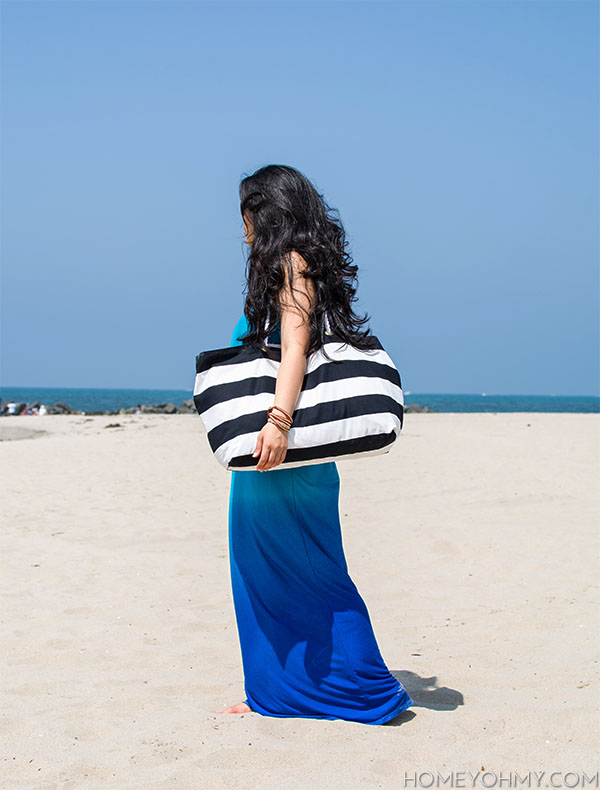
 First, iron out the pieces of fabric. The rest of the steps will be done to each of these pieces. Fold back about one inch of the fabric on one of the sides that’s 27 inches long and iron it down. Apply the Unique Stitch underneath the fold and glue it down, then glue the fabric pieces together face to face, making sure the edges that were previously folded and glued are matched up (this is the opening of the bag). All three of the other edges should be glued together.
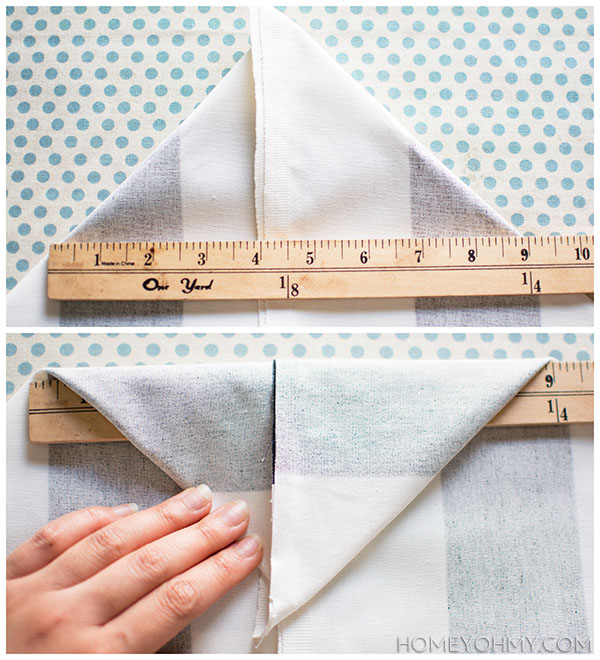
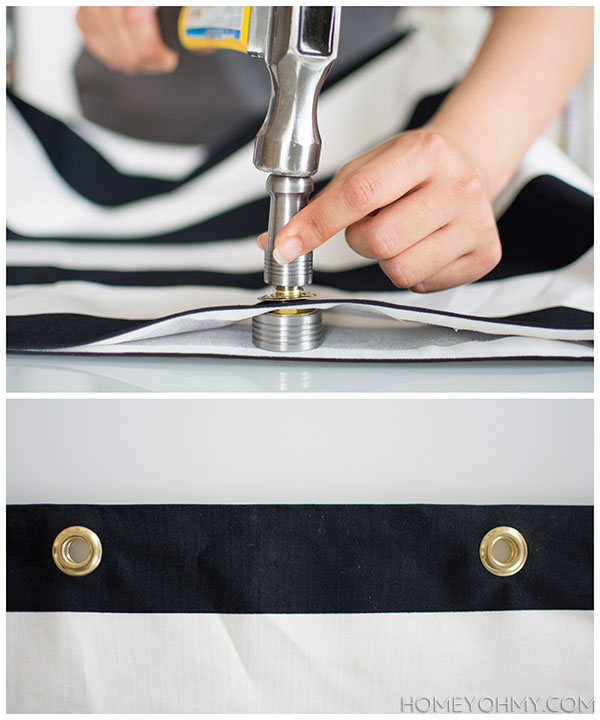 Next, all you do is hammer a grommet shut through each hole. NOTE: The way I’m doing it in the photo is incorrect. The side you hammer will be the back of the grommet, so you should set it up so that you’re hammering from the back side of the fabric, not the front like I’m doing in the photo. The layers from bottom to top are the cutting block, grommet, fabric, washer, handle, and hammer.
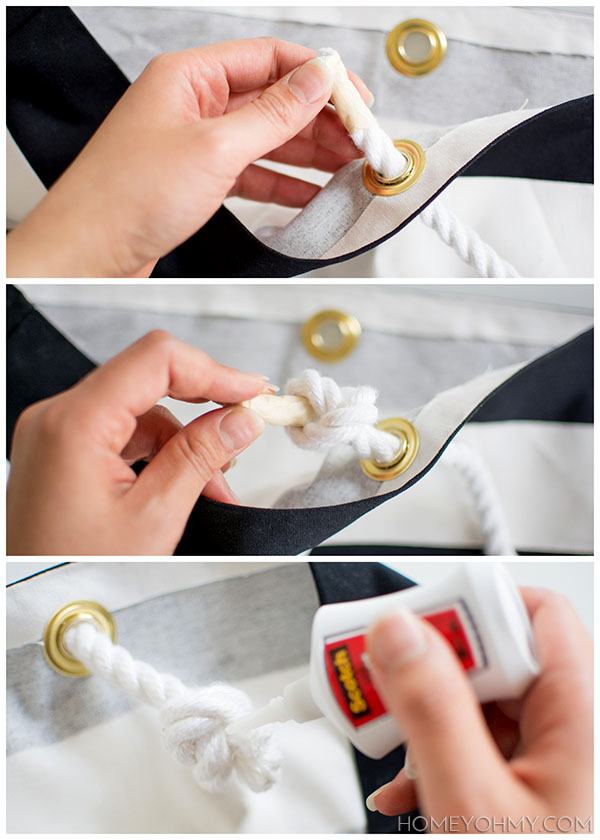 Finally (finally!) pull both ends of a 3 foot piece of rope through the grommets on one side of the bag and tie them into knots. Repeat on the other side. Apply super glue into all the crevices of each knot to secure them in place.
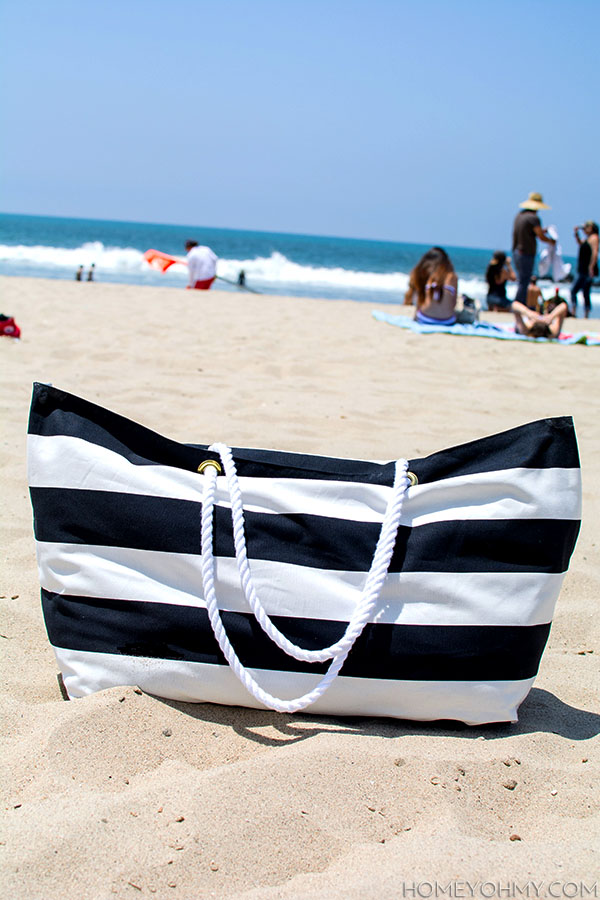
 Yes, I did actually take it with me to the beach and it was perfect. So much room and it fit everything I needed and more (snacks, snacks, and more snacks). Here was my little set-up, just for fun.
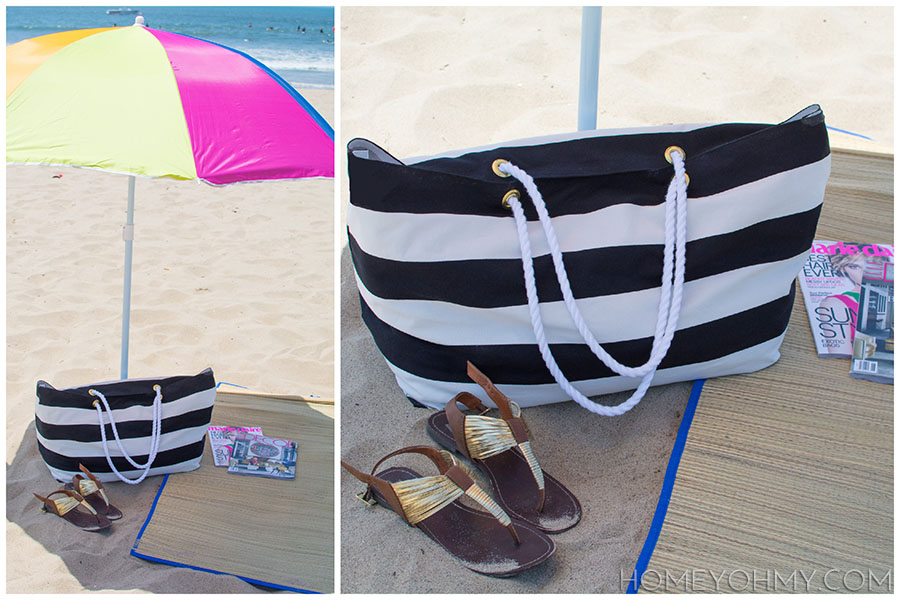 Guys, this is the first time I’ve ever owned a beach umbrella and it is a game changer. My intolerance for the sun and turning into a lobster is no longer a concern and now I can comfortably stay on the beach all day. How did I not know that the solution was so easy? Thank you, last minute Walgreens umbrella impulse buy!
 I got the fabric and cardboard “A” from Joann Fabrics, and all I did was trace every side of the monogram onto the fabric with a pencil and cut each piece out. For the inner edges and hole in the A, I measured the needed length and cut out a piece of fabric first, then marked in pencil where I’d need to cut the width. After all the pieces were cut, I used a foam brush and Mod Podge to glue them all on to the monogram, then applied Mod Podge over all the fabric as a final protective coat.
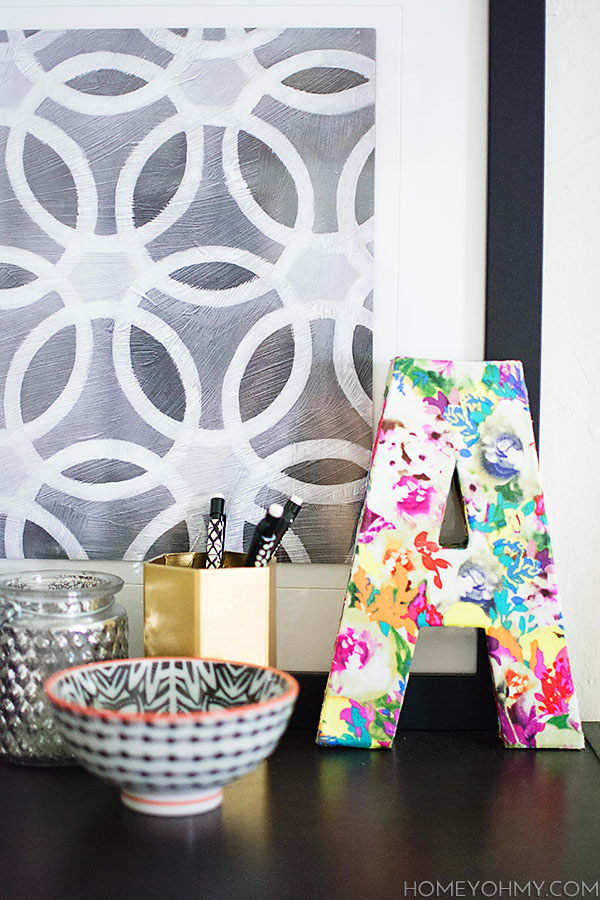 Per my usual, preferred crafting style, I kept it really simple and easy, which I think was best for this floral fabric to be the star of the show. I freaking love it. Floral is a pattern I will always love, and the bright colors on this one are spreading some much welcomed summery vibes. I can’t stop looking at it, which is all I wanted to do in the first place- success!
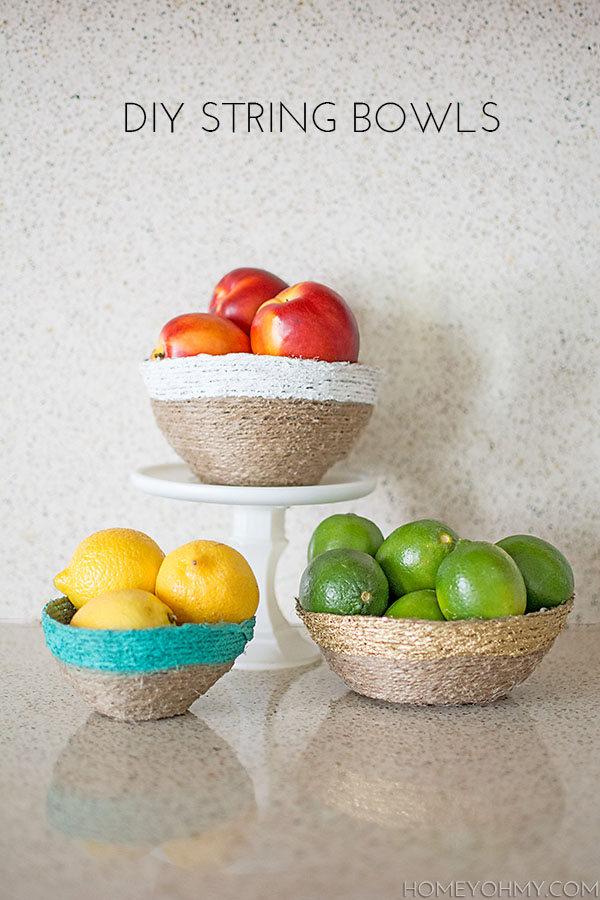 June already!! I know, I say that about every month (and I say THAT after I say that about every month), but it’s seriously insane how we’re already fast approaching the half-way point of this year. Thinking about it that way really puts into focus how fast time is flying, right?
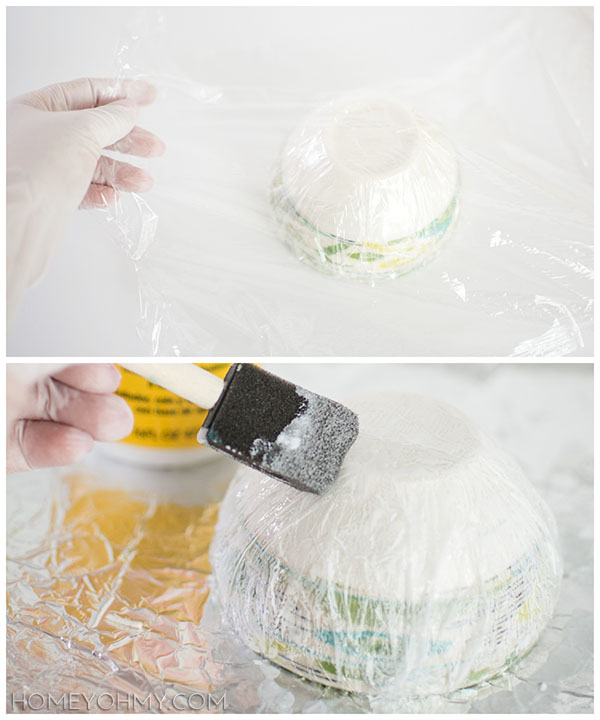 I recommend wearing gloves if you want to get hands-in with the string and possibly adjust it after you’ve slathered it in glue. First, wrap three layers of plastic wrap around a bowl. I saw later that the extra layers really help with the removal process of the layer that comes in contact with the string. Next, slather on Mod Podge over the plastic wrap. This will help the string stick on to the bowl.
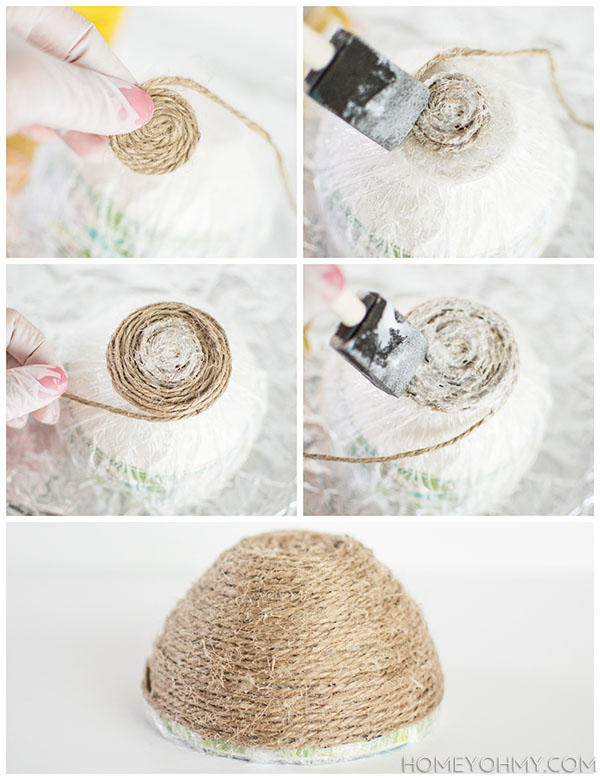
 Let the bowl dry completely, then pull down at the plastic wrap while holding the edge of the bowl to remove the string bowl, rotating it so that you pull at every edge and angle. If I were to do this again, I’d probably spray a light coat of cooking spray on the bowl for easier removal, but you can do without it with just a little bit of patience. Remove the plastic wrap, then tape on a design of your choice. I kept it really simple and just spray painted the rims of the bowls, using painters tape and foil to cover the bottom of the bowl.
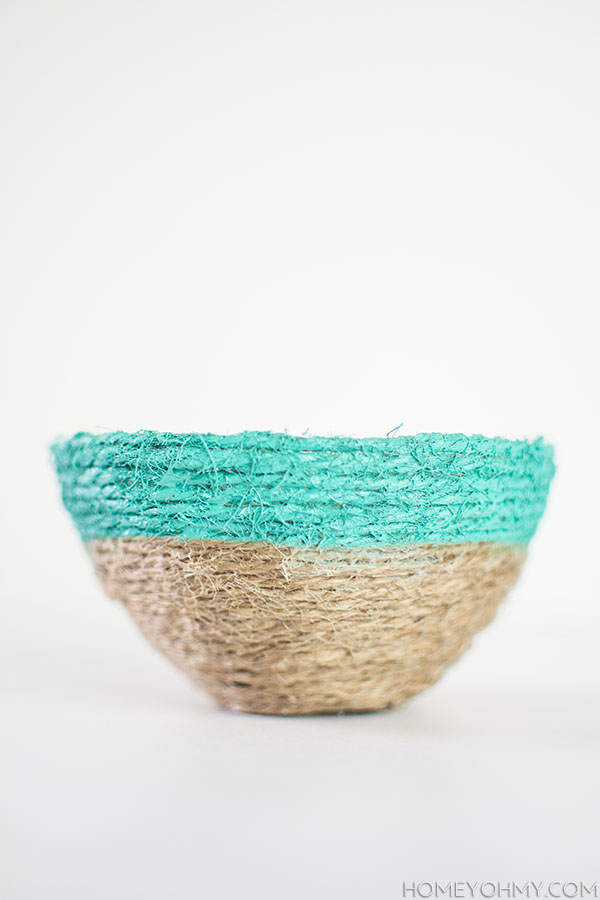
 Aside from being functional, they make a cute, summery display when filled with fruit. I can see myself also using the smallest one as a catch-all, though I already have a bunch around the apartment. Having a container everywhere to throw random knick knacks into is my favorite way of “organizing”.