Another weird week gone! Weird for me since boyfriend has been out of town and somehow that resulted in me reverting back to the college dorm lifestyle and diet. Mac and cheese, anyone? Other than that, I’ve just been feeling really off about blogging lately. I’d best describe it as a mix of being in a funk, a case of the blahs, and craving change. I might talk more about that later, but I sense a shift coming, or I dunno, maybe I just need to get a drastic hair cut (ladies, I know you know that feeling.)
Anywho, always happy for the weekend, which everyone around here in LA has been talking about how hot it’s going to be- up in the 90s. I foresee ice cream in my near future. Hope your weekend plans involve ice cream, too <3 .
Here are today’s finds:
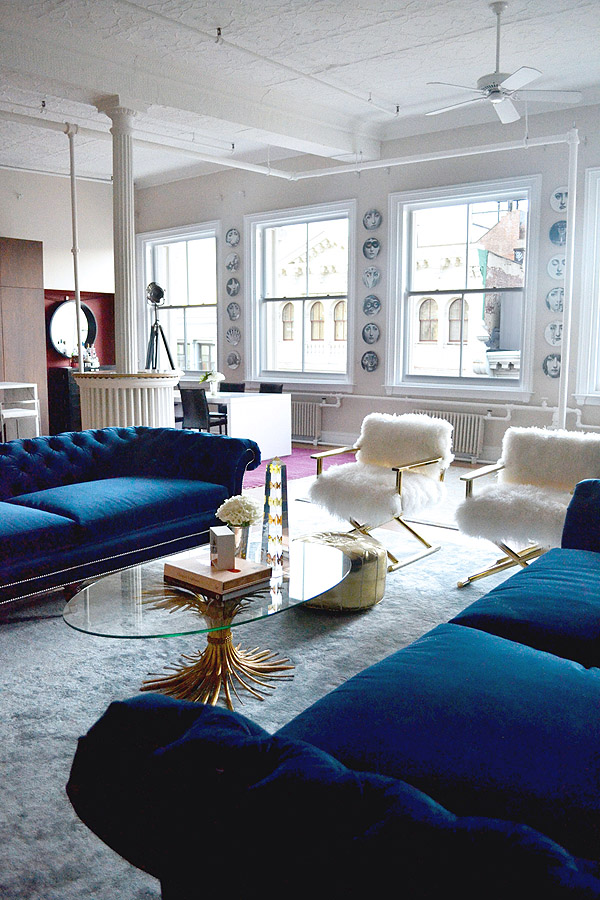
Currently on a sofa hunt and I gotta find something blue and velvet. This space (photo above) is added to the list of reasons why, but yes, this is going to be a long and patient hunt for something that won’t cost a million dollars.
It recently occurred to me that I don’t have a single ring dish in the apartment, and that crazy realization happened after I spent forever looking for a ring I couldn’t remember where I last placed. Will making a bunch of small clay dishes to sprinkle around the apartment 100% prevent me from putting my rings on random surfaces? Maybe, maybe not, but I gotta at least try. These dishes are cute anyway to keep around, and while they’re intended for rings, they can be catchalls for anything tiny that would be annoying to lose!
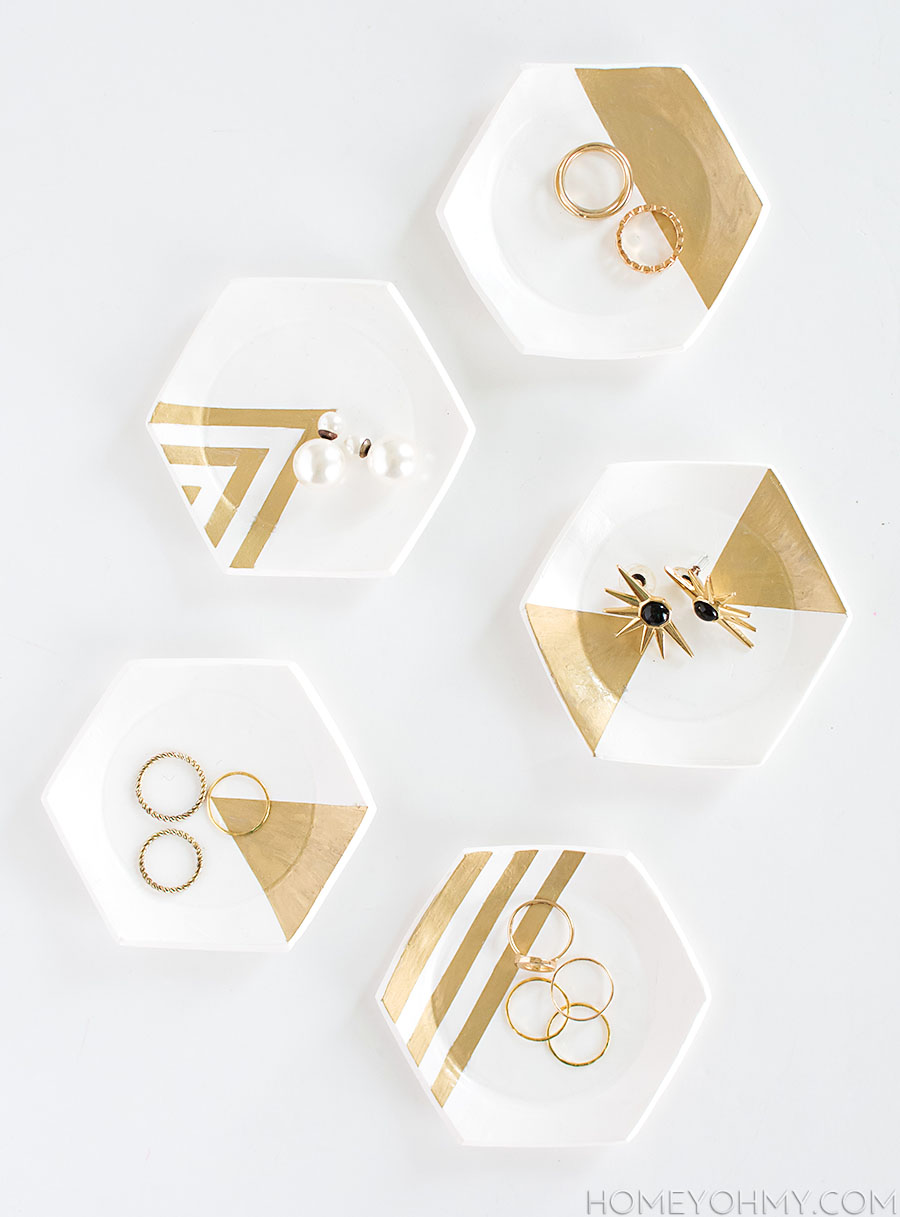
Also, five might be overkill for one household, but I actually ended up making 10 total, reason being because I messed up the first five, then made five more hoping at least three would turn out alright, then I liked how all five turned out, so this turned into a real ring dish party. Point is, I’ve shared a couple tips and “don’t do what I first did” stories in the how-to below!
First thing, I recommend rolling the clay out on parchment paper on top of a cutting mat. The parchment paper will keep the clay from sticking to whatever surface you’re working on and will peel right off of the clay.
I traced the lid of a papier mache hexagon box (found at JoAnn fabrics) with an X-Acto knife into the clay, which I rolled out to about 4mm in thickness. At first I tried using one of those plastic clay cutting tools, and it didn’t work nearly as good as the X-Acto, so definitely, definitely, use an X-Acto.
The clay lifts off with the lid, so after carefully peeling it off and removing the parchment paper, I draped the hexagon clay on top of the bottom of a bowl and baked in the oven according to the clay packaging instructions (230F for 30 minutes). I used the bottom of the bowl so that it would create a flat base for the ring dish.
After baking, I spray painted the dishes white, only because every dust bunny and fuzzball in the world somehow ended up in the clay and it looked dirty (anyone know if it’s possible to completely prevent this? I think I already know that the answer is no.)
After letting the white paint fully dry, I taped a different design on to each dish using 1/4″ tape. Really, really, really, really make sure to go over the edges of the tape with a finger nail to make sure the seal is tight.
I colored in the designs with a gold leaf pen, which does leave a more textured appearance. If you want that airbrushed flawless finish, spray paint is definitely the way to go, but will require extra steps to cover the parts of the dish you want to keep white. It’s definitely possible that I was too lazy to do this and thus used a gold leaf pen instead.
After peeling off the tape, I let the gold leaf fully dry before dumping stuff on to the dishes.
Also, anyone notice there hasn’t been a lot of gold around here on the blog lately? What happened there?? It’s like I’m going back to my roots with this one HA. I like it. I like it a lot.
We’re two for two on a jewelry themed DIY here, which wasn’t intentional, but accessorizing is a pretty huge part of my life so it’s not surprising that happened. Which reminds me, I completely forgot to share this video with you guys at the end of my multi-strand bracelet DIY. It was stuck in my head the entire time I was making those bracelets, and then again when I was making these dishes, even though these dishes aren’t jewelry… Any Portlandia fans??
Something reeeally different around here today. It was originally unplanned, which means there’s a story behind why it even happened. Oh ok, I’ll tell it to you!
It started somewhere completely unrelated. I had this elaborate idea to spray paint a bunch of stuff in a layered design. I spent an entire Saturday, 9-5, failing at it twice (a lot of that time was waiting for paint to dry and what not, so I kind of made that sound dramatic but still, the whole day was lost). I made one final attempt to adjust techniques and try it again the following day, and it just wasn’t working. During that final attempt, I managed to ruin one of my favorite bracelets because I was wearing it while spray painting. Apparently I needed to learn this lesson: THIS is why we don’t bedazzle ourselves when we spray paint, mmk?
So I was already on the verge of a meltdown because of how big of a failure that weekend was, then I go and ruin my bracelet and start to question the purpose of life. It took a minute, but I came to and remembered that it’s just a bracelet, it can be replaced, or hell, maybe even made. It’s not all that complicated of a bracelet. Hm.
Materials –round leather lace
-scissors
-clipboard
-two needle nose pliers
-round metal beads (4mm)
–Mod Podge
-Q-tip
-curved tube metal beads (2mm x 25mm)
-end caps (10mm)
-lobster clasps (14mm)
I found everything at JoAnn, and at first I was positive I’d go gold, but then I walked past the rose gold beads and immediately changed the plan. The end caps I used are yellow gold because there weren’t any in rose gold, so I rolled with it. Also, please ignore the crimp tubes. I thought I’d be using them like beads, but ended up not, so #bloggerfail. I made two bracelets with three strands each, but we’ll just talk about one bracelet from here on out. I cut three, eight inch strands of leather cord. My wrist is six inches around, so I roughly measured eight to give some room to work with it.
I bunched the leather cord strands together at one end and crimped on the end cap, squeezing super super super tightly with needle nose pliers. The cap had these flaps on each side that needed to be bent over one on top of the other. After doing that, I cut off any excess leather cord (as seen above, sticking out beyond the top of the cap).
For the next part, I used the clip of a clipboard to help keep the bracelet in place. Now this next step is a little weird, but I had to do it. On the middle strand, I applied Mod Podge with a Q-tip along the center of the strand before sliding the round beads over it. A couple beads at the end needed more reinforcement so I slid them off, applied more Mod Podge, then slid them back on, wiping off any excess that oozed out.
I did this because I wanted the beads to stay in place instead of always sliding down to the clasp. On the outside strands, I slid on one curved tube bead each, but skipped on the Mod Podge part since those beads don’t slide around as much and I was cool with that.
I clamped on another end cap at the end and cut off the excess leather, just like I did in the first few steps, and then was left with this.
For that lobster clasp, it’s very simple. This is where the second pair of needle nose pliers comes in handy. I didn’t show it in the photo, but I clamped each plier at opposite sides of the jump ring opening and bent it open. Once upon a time I thought it was a pulling apart motion, but no, it’s a sideways bend. Once hooked through the loop of an end cap, I bent the ring back shut in the same way. Then all was good in the world.
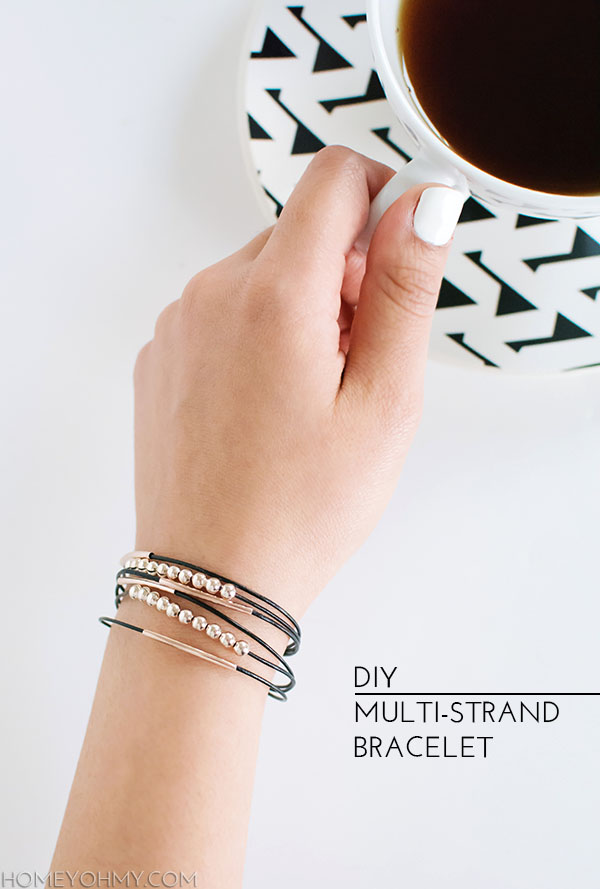
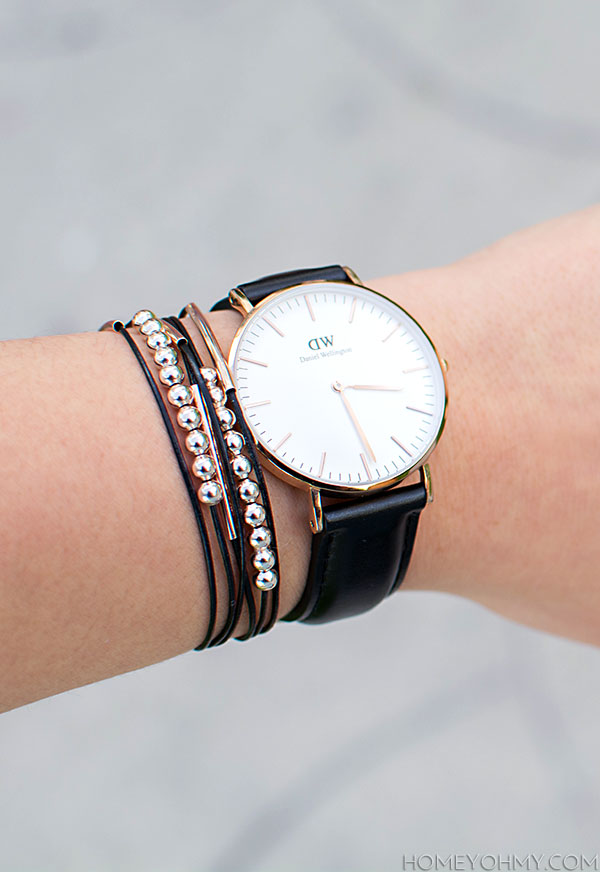
At any given moment these days, you’ll find me wearing this combo. I love the way the bracelets look with my favorite watch ever and how they keep to the simple and minimal feel. With everything lately, I find myself gravitating towards simpler things, “less is more”, all that jazz.
So that was the first jewelry DIY on this here blog. ! I’m not planning on making it a super regular thing, and this one was definitely more about something spontaneous for me, but I’m still interested to know how you feel about it. Yay or meh on jewelry/fashion DIYs?
**ALSO, if you missed my previous post about the BHG Blogger Awards, the voting round this week is focused on DIY blogs, and yours truly is nominated (nope, haven’t stopped freaking out about it). If you’ve enjoyed any of your time here on the blog at all, I’d so appreciate your vote :) and of course, vote for all your favorites since you can vote more than once. If you have a few seconds, you can vote HERE. Thanks guys <3
Well! I’m still in shock. I never thought I’d get nominated for an award like this, then after seeing all the other amazingly talented nominees in the final ten, it seriously, honestly, truly, no joke, feels like I’ve already won. Having my blog selected by Better Homes and Gardens and being put alongside bloggers that I insanely admire is so much already. It’s just CrAzY, that’s all I’m trying to say.
SO. I’m giving a little shoutout to each of the blogs nominated in the DIY category for the 2015 Better Homes and Gardens Blogger Awards because I need you guys to know how amazing these ladies are, even if you’re already familiar with them, and to maybe help you discover some awesome blogs to follow if you aren’t following them already.
It begins now.
Alice & Lois
I came across Sara and Melissa’s blog when I discovered their DIY Shibori indigo dish towels and have been following ever since. They cover a variety of topics, and what I love most is that they always come back to the celebration of family. Very lovely blog with tons of creative ideas.
Almost Makes Perfect
I first met Molly over dinner with a couple of other blogger buddies, and she’s just as down-to-earth in person as you’d think she is. I adore her simple, modern style and I’m always blown away by how she constantly comes up with fresh ideas that look effortless.
Chris Loves Julia
I hadn’t discovered this blog before, but am following now. Chris and Julia share all about their home renovations, and what I appreciate most is that their DIYs are thorough and easy to understand. Their tips would be so helpful for any future homeowner (always the topic of my daydreams).
I Heart Organizing I once referred to Jen as the juggernaut of organizing, and I still stand by that statement. What’s more is that I can feel her sincerity through her writing and how much she truly wants to help. She doesn’t cut corners, and I really dig that. One of my favorite posts of hers is the one she did on blogging photography tips.
Lovely Indeed It wasn’t hard to find Chelsea’s beautiful blog. I’d re-pin one gorgeous DIY after another from my Pinterest home feed and would continuously discover they were done by her. All her ideas really are lovely, so she seriously nailed it with her blog name.
Sarah M. Dorsey Designs Sarah is a supernatural DIY genius with amazing interior style, no biggie. So many times I’ve seen a photo of one of her projects and thought no way that was DIY’d, then I’d go to her blog to check it out and be like oh my God she DIY’d that.
Studio DIY I don’t think I knew there was a world of balloons and donuts and how versatile they could be before Kelly’s blog. She’s the master of everything trendy, bold, and fun, and has come up with some of the most creative ideas I’ve ever seen.
Sugar and Cloth It might’ve been a macaron DIY that first brought me to Ashley’s blog, but everything she does is amazing and just plain pretty. I love the mix of decor and entertaining ideas she’s constantly putting out. Still haven’t gotten over her hanging flower installation.
Vintage Revivals This is hardly my first time giving Mandi praise. It wouldn’t take anyone longer than a few seconds after visiting her blog to see how talented and hilarious she is. I’m always inspired by how she goes big with stunning room makeovers and unique decor projects.
Can you see why this is so crazy? I have so much love for the blogger/DIY community because they’re the ones that inspired me to start this little corner of mine, so to even stand next to them is pretty damn cool. !!! I’m a giant bag of emotions over it.
This week is designated to feature the DIY category for the BHG Blogger Awards, so vote here for your favorites. You can vote more than once in case you can’t pick just one and voting is open till March 27th. Happy voting!
In conclusion, I love you guys and thank you. This blog wouldn’t mean so much to me if it weren’t for you, and it keeps me trucking through the long hours and tears knowing that you’re patiently by my side as I figure out this blog thing one inch at a time. I truly appreciate you for that, and for making it through this post and all my blabber. <3
Were any of these nominees some of your favorite blogs already? Also let me know in the comments below about any other favorite blogs you love following- I’m always down to check ’em out.
Today’s finds are all over the place, just how I like it. You, too? So much good stuff out there and maybe just enough time to check them out, which I’m hopefully helping you discover some fun and interesting stuff. I’m dying over the edible one, which sounds like a weird attempt at being vague in order to build suspense without overhyping. You’ll have to get there by scrolling through this post.
Another dust collector added to my collection with this faceted glass vanity box, shared earlier this week on Instagram. Baubles, trinkets, pretty storage, it’s my jam, and I won’t quit. So far I’ve collected two out of what seems to be a three part collection. I’m holding off on the third… for a bit…. maybe.
Currently on the hunt for new dining chairs and considering going with color. Really inspired by these blue chairs (blue in general lately has been my fancy) which look pretty identical to the ones I have now only mine are beige, not tufted, and sink like craaaaazy when you sit in them. They are so uncomfortable it drives me nuts!
Once upon a time, I attempted a nail polish marbling DIY and it went horribly bad. I never shared it because it was hideous, and if I had to point my finger, I’d say it was both using some really old nail polishes and trying to do a million colors at once. I love the way Lidy kept it simple with just black nail polish. The marbling looks so elegant this way.
So this donut craze, right. I don’t think I’ve ever felt so strongly about them as I do with these Disney donuts. Maybe it’s because I went to Disneyland for the first time not too long ago and it was the best day of my life, but also, these are just so darn cute and creative. I’m crazy about them.
Other Stuff:
Everything 40% off at Kate Spade Saturday with code EXTRA40!! I’ve been eyeing the Mini A Satchel forever.
THIS DRESS COLOR DEBATE. Have you argued with everyone you know about this yet? I’m on team white and gold, and so was boyfriend, until we were about an hour into staring at the photo and all of a sudden he said all he could see was black and blue, which is what it actually is. NOPE, don’t see it. Please feel free to weigh in on this and tell me what colors you see.
Have an excellent weekend, friends! Picking things up right back here on Monday.
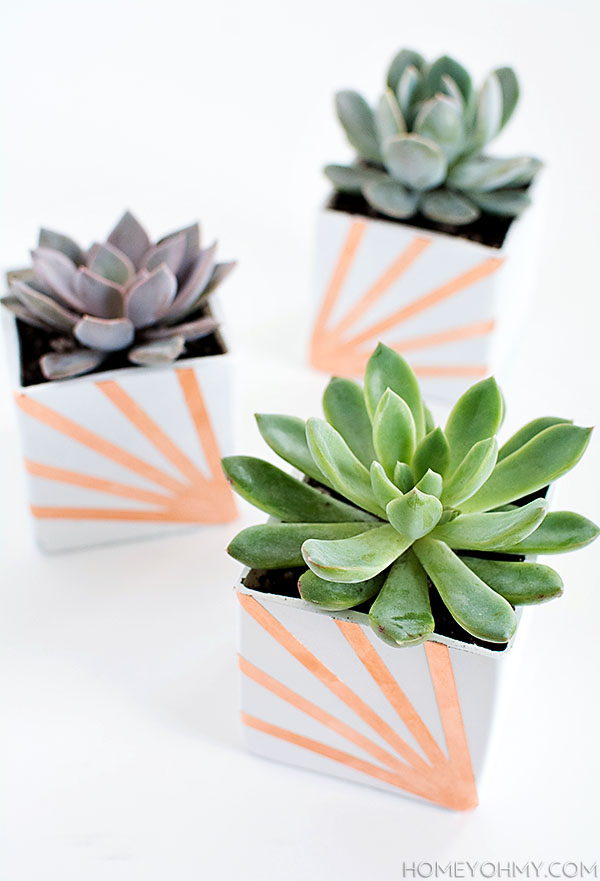
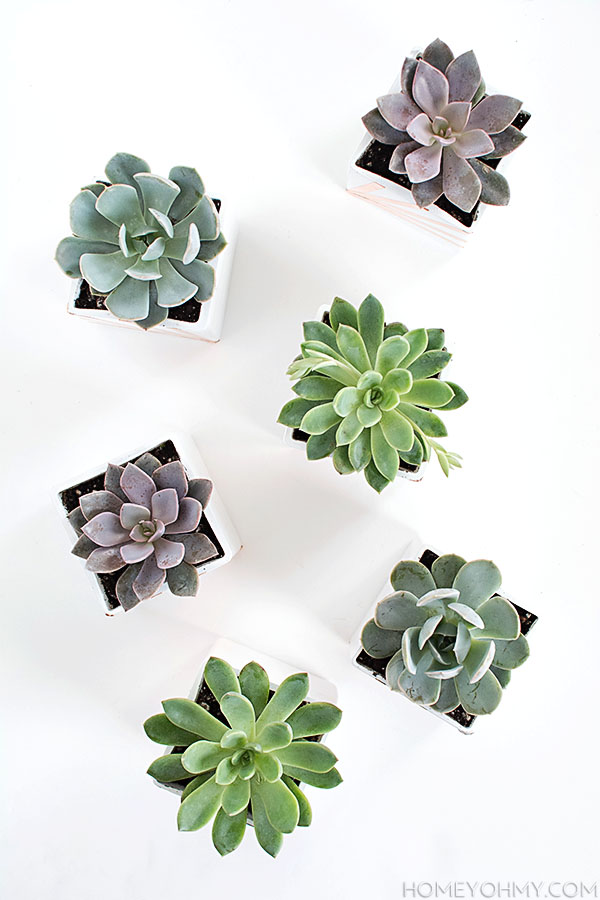
Y’all. Succulents. They’re back. I know, they never went anywhere, but it’s been a while since they’ve dominated the blog. Also thought this would be a good time to replace the ones that didn’t make it through winter (RIP) and to bring just a teeny tiny bit more color into my life. The latter wasn’t a part of the original plan, but like what happens every time I visit a local nursery, I wanted to bring everything home, and this time I was most captivated by these blue and purple ones (let me know how gorgeous they are.)
So initially I thought I’d be adding color to the planters, but since the succulents already have that locked down, I kept the planters simple and uniform with a little somethin’ somethin’ to make them interesting. It’s pretty easy!
I believe these are meant to be candle holders, but they are just 3″ glass cubes that I wiped down with rubbing alcohol and spray painted white.
I applied three light coats of spray paint on all outside edges of each cube, waiting one minute between each coat, then finished off each surface with a few light coats of clear acrylic spray for protection. Since the surface is going to be handled in the next step, it’s best to wait 24 hours to let the paint fully dry before moving on (ugh, I know, so boring, but hang in there.)
Next, I applied copper foil in this radial design, starting first with the strip in the middle, then the strips on the outside, then the strips in between, smoothing my finger over every piece. After each application, I cut off any foil extending beyond the edges.
I switched the direction of the design on half the planters thinking it would be cute to pair them up like this. Wouldn’t this set make a pretty sweet gift?
Here’s a thought. Plants are a great way to bring in color without making drastic design commitments. Flowers are even less of a commitment. I’m thinking this is more of the way I’d want to do color as opposed to going super colorful with decor, especially if I’m experimenting. Whatever the case, Spring is hitting me early this year and has me thinking about color all of a sudden. Check out this post if you’re craving color, and to see what image from there inspired the design for these planters ;) .
Also, this is definitely not the first time copper foil has made an appearance on the blog. It’s one of my favorite discoveries ever, so if you want to see what else you can do with it, take a look at these candle holders, this wall art, or these pumpkins (I’m learning it’s never too soon to think ahead, but seriously, this is too soon, right? Craft stores bring out fall stuff before July 4th, guys. I unintentionally learned that last year and was freaked out.)
 Another weird week gone! Weird for me since boyfriend has been out of town and somehow that resulted in me reverting back to the college dorm lifestyle and diet. Mac and cheese, anyone? Other than that, I’ve just been feeling really off about blogging lately. I’d best describe it as a mix of being in a funk, a case of the blahs, and craving change. I might talk more about that later, but I sense a shift coming, or I dunno, maybe I just need to get a drastic hair cut (ladies, I know you know that feeling.)
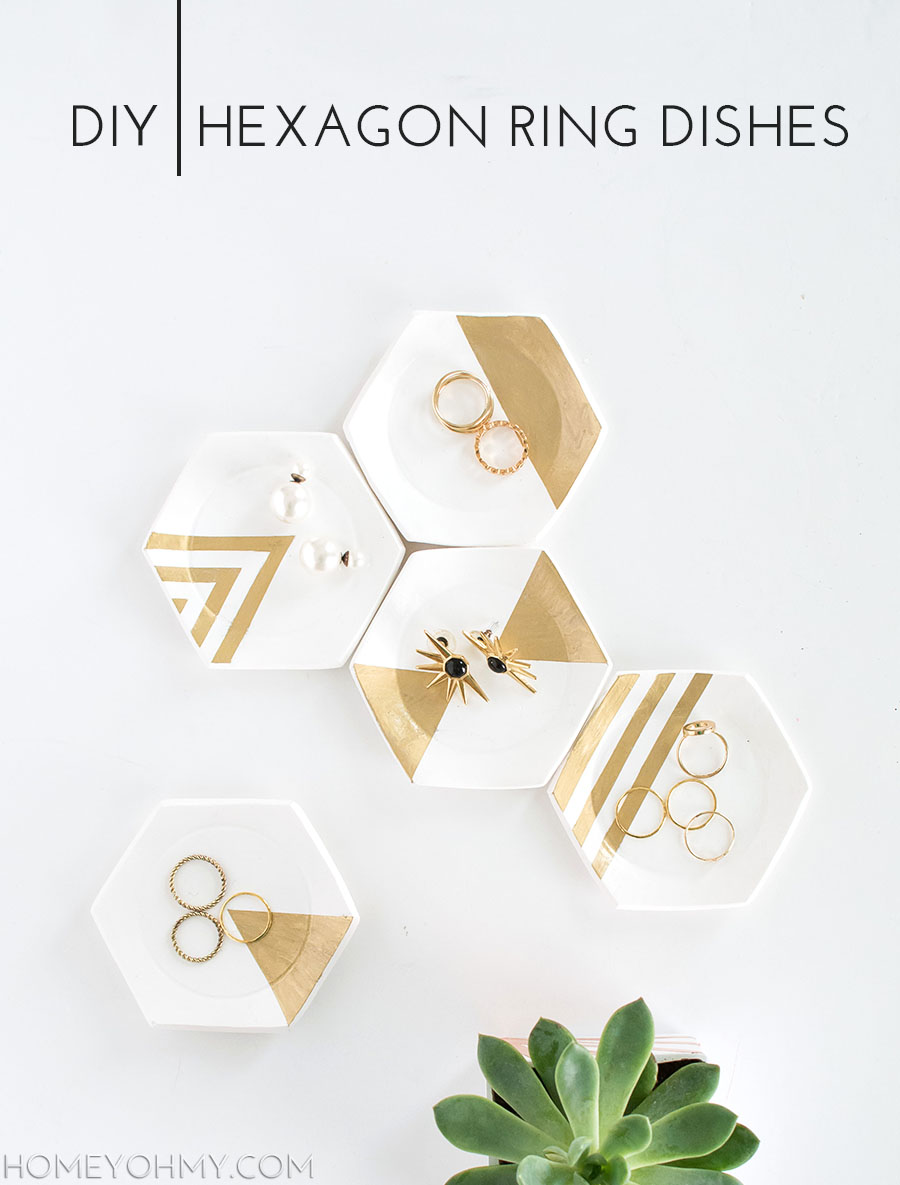 It recently occurred to me that I don’t have a single ring dish in the apartment, and that crazy realization happened after I spent forever looking for a ring I couldn’t remember where I last placed. Will making a bunch of small clay dishes to sprinkle around the apartment 100% prevent me from putting my rings on random surfaces? Maybe, maybe not, but I gotta at least try. These dishes are cute anyway to keep around, and while they’re intended for rings, they can be catchalls for anything tiny that would be annoying to lose!
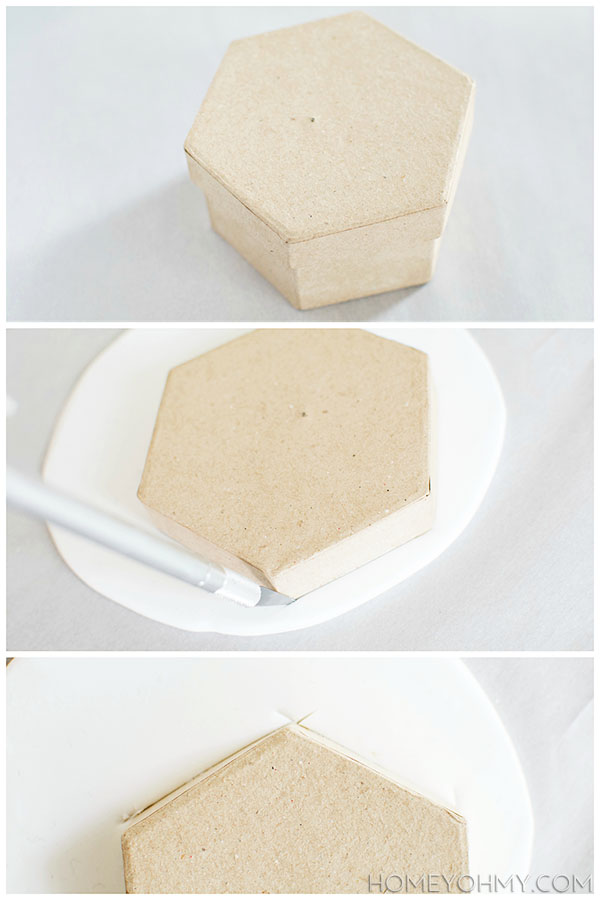 I traced the lid of a papier mache hexagon box (found at JoAnn fabrics) with an X-Acto knife into the clay, which I rolled out to about 4mm in thickness. At first I tried using one of those plastic clay cutting tools, and it didn’t work nearly as good as the X-Acto, so definitely, definitely, use an X-Acto.
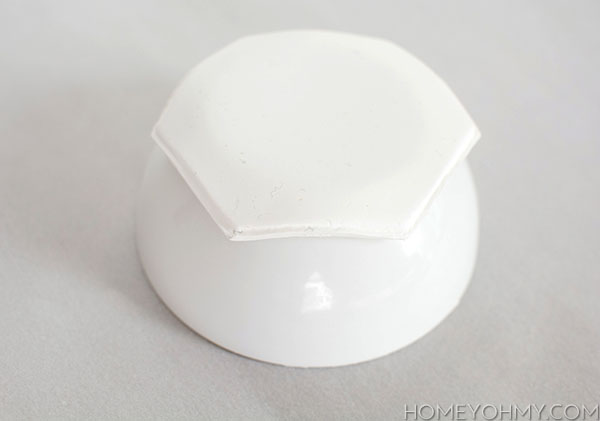 The clay lifts off with the lid, so after carefully peeling it off and removing the parchment paper, I draped the hexagon clay on top of the bottom of a bowl and baked in the oven according to the clay packaging instructions (230F for 30 minutes). I used the bottom of the bowl so that it would create a flat base for the ring dish.
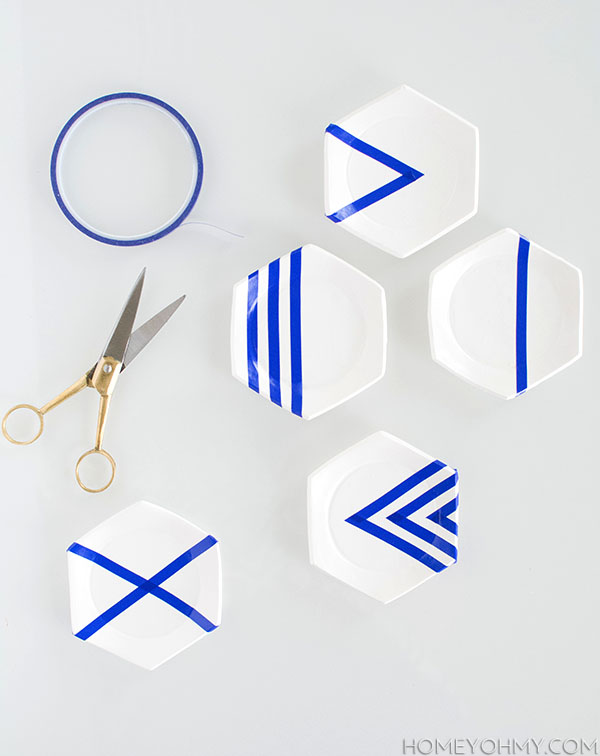 After letting the white paint fully dry, I taped a different design on to each dish using 1/4″ tape. Really, really, really, really make sure to go over the edges of the tape with a finger nail to make sure the seal is tight.
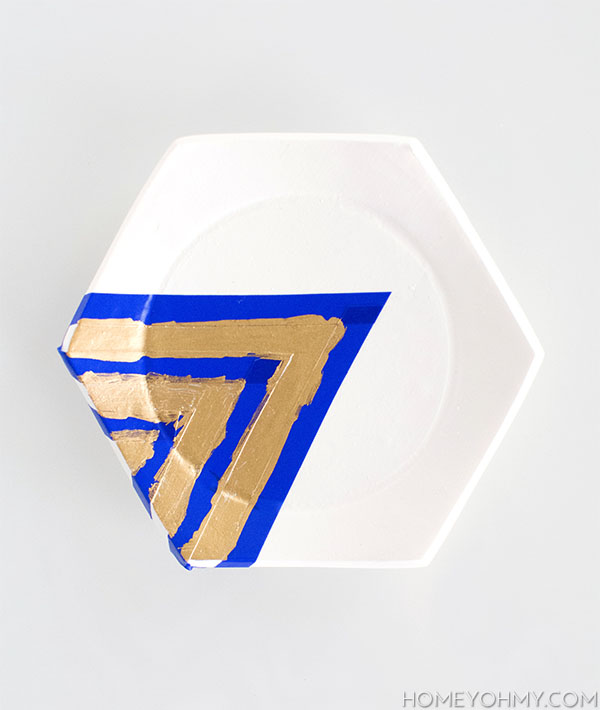 I colored in the designs with a gold leaf pen, which does leave a more textured appearance. If you want that airbrushed flawless finish, spray paint is definitely the way to go, but will require extra steps to cover the parts of the dish you want to keep white. It’s definitely possible that I was too lazy to do this and thus used a gold leaf pen instead.
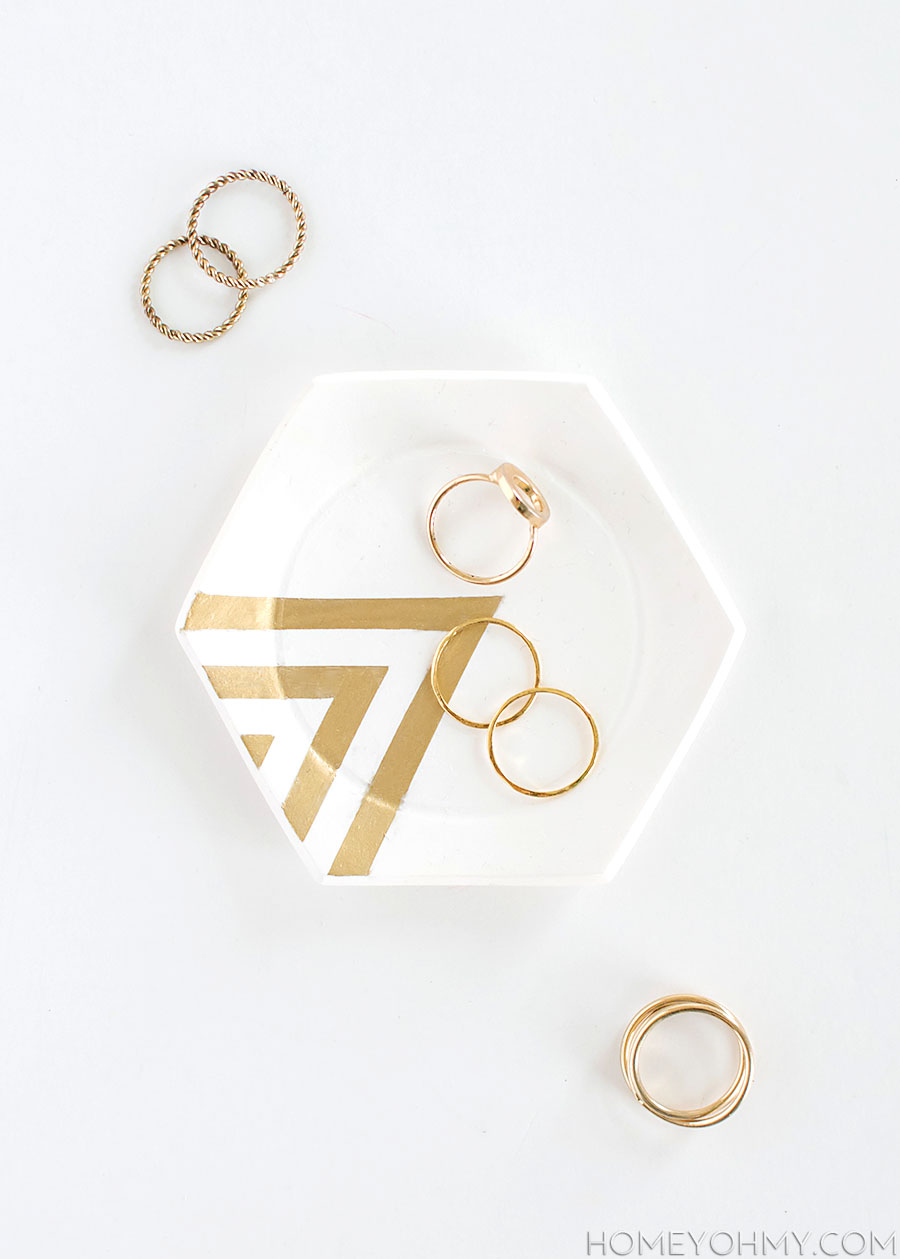
 Something reeeally different around here today. It was originally unplanned, which means there’s a story behind why it even happened. Oh ok, I’ll tell it to you!
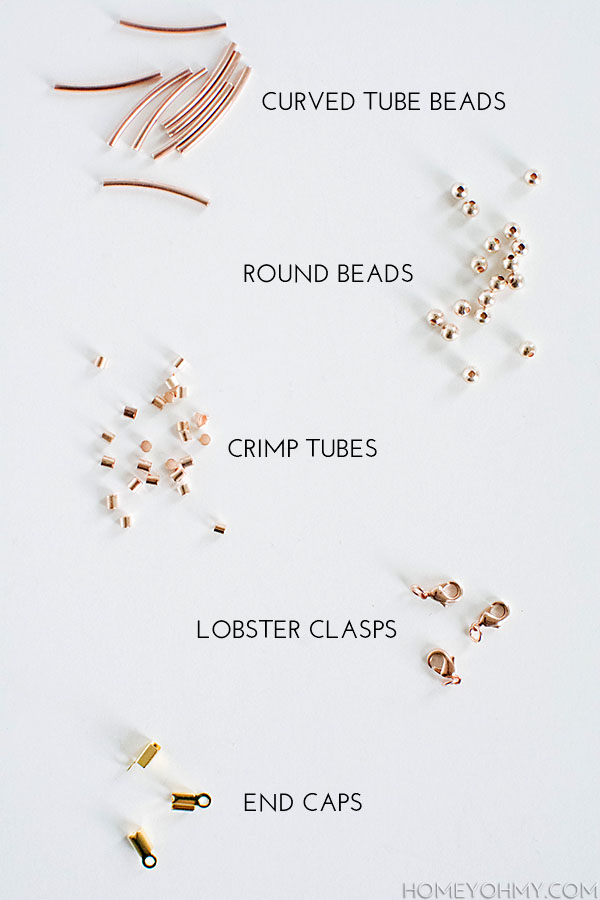 I found everything at JoAnn, and at first I was positive I’d go gold, but then I walked past the rose gold beads and immediately changed the plan. The end caps I used are yellow gold because there weren’t any in rose gold, so I rolled with it. Also, please ignore the crimp tubes. I thought I’d be using them like beads, but ended up not, so #bloggerfail.
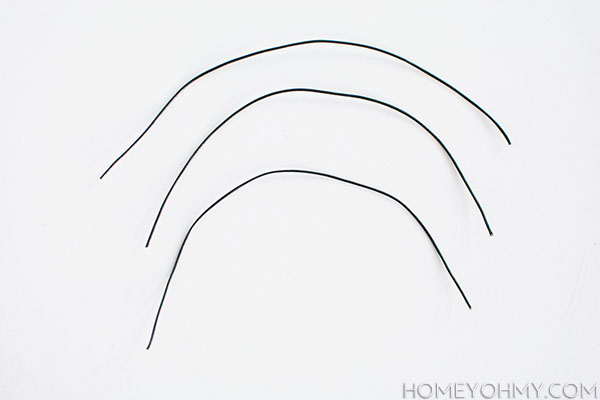 I made two bracelets with three strands each, but we’ll just talk about one bracelet from here on out. I cut three, eight inch strands of leather cord. My wrist is six inches around, so I roughly measured eight to give some room to work with it.
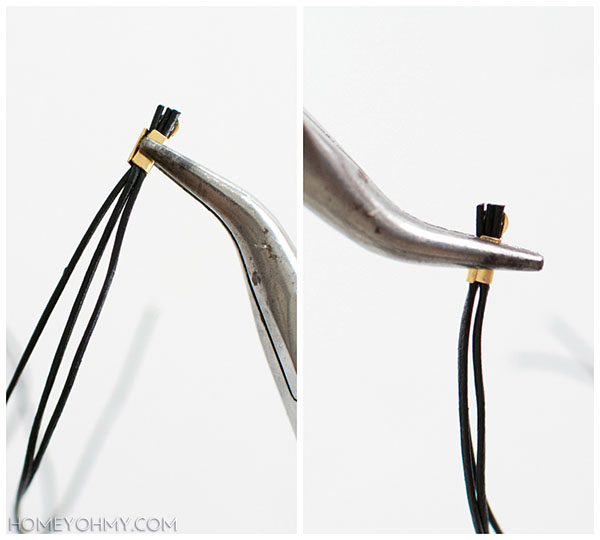 I bunched the leather cord strands together at one end and crimped on the end cap, squeezing super super super tightly with needle nose pliers. The cap had these flaps on each side that needed to be bent over one on top of the other. After doing that, I cut off any excess leather cord (as seen above, sticking out beyond the top of the cap).
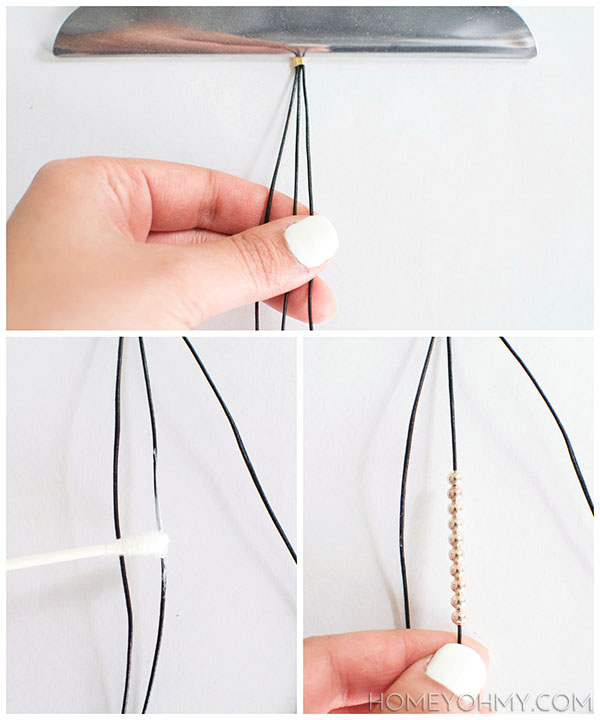 For the next part, I used the clip of a clipboard to help keep the bracelet in place. Now this next step is a little weird, but I had to do it. On the middle strand, I applied Mod Podge with a Q-tip along the center of the strand before sliding the round beads over it. A couple beads at the end needed more reinforcement so I slid them off, applied more Mod Podge, then slid them back on, wiping off any excess that oozed out.
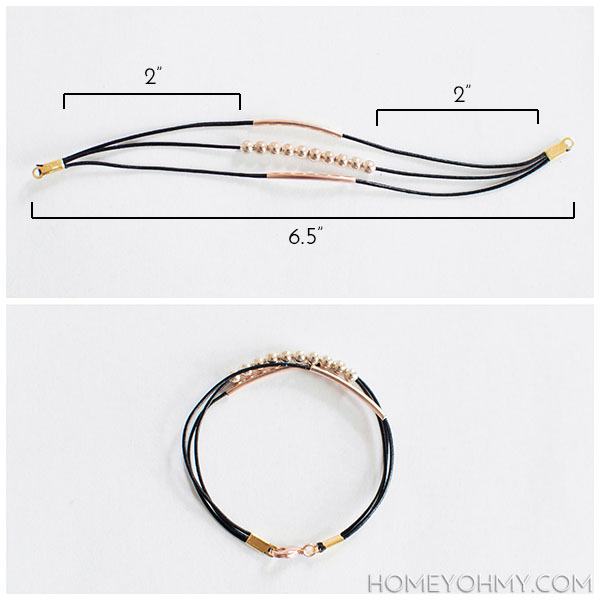 For that lobster clasp, it’s very simple.
 This is where the second pair of needle nose pliers comes in handy. I didn’t show it in the photo, but I clamped each plier at opposite sides of the jump ring opening and bent it open. Once upon a time I thought it was a pulling apart motion, but no, it’s a sideways bend. Once hooked through the loop of an end cap, I bent the ring back shut in the same way. Then all was good in the world.
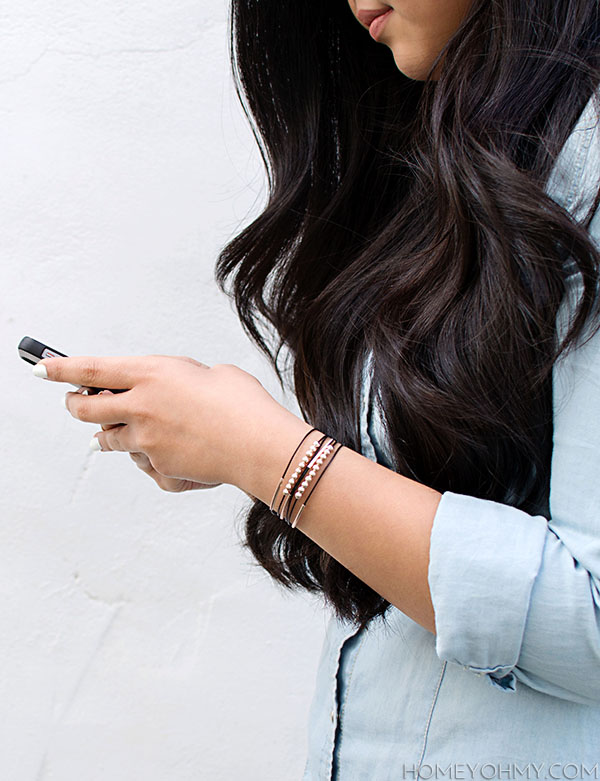
 At any given moment these days, you’ll find me wearing this combo. I love the way the bracelets look with my favorite watch ever and how they keep to the simple and minimal feel. With everything lately, I find myself gravitating towards simpler things, “less is more”, all that jazz.
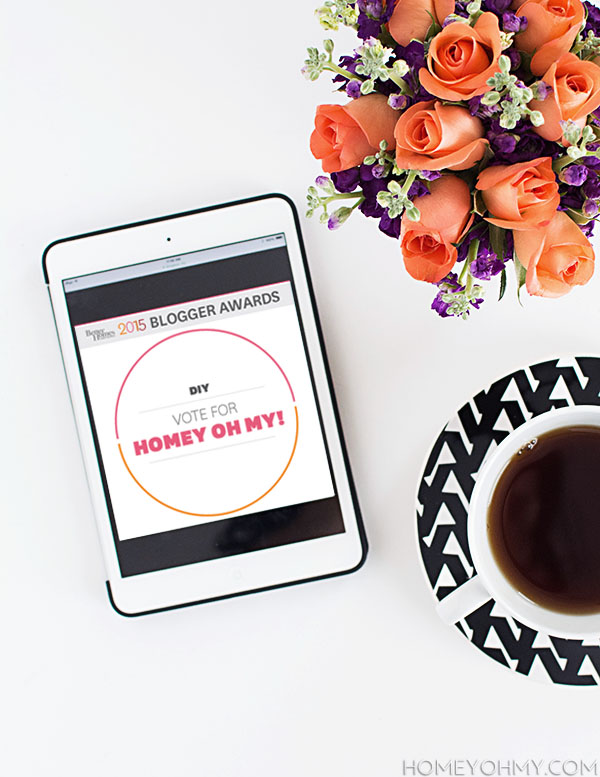 Well! I’m still in shock. I never thought I’d get nominated for an award like this, then after seeing all the other amazingly talented nominees in the final ten, it seriously, honestly, truly, no joke, feels like I’ve already won. Having my blog selected by Better Homes and Gardens and being put alongside bloggers that I insanely admire is so much already. It’s just CrAzY, that’s all I’m trying to say.
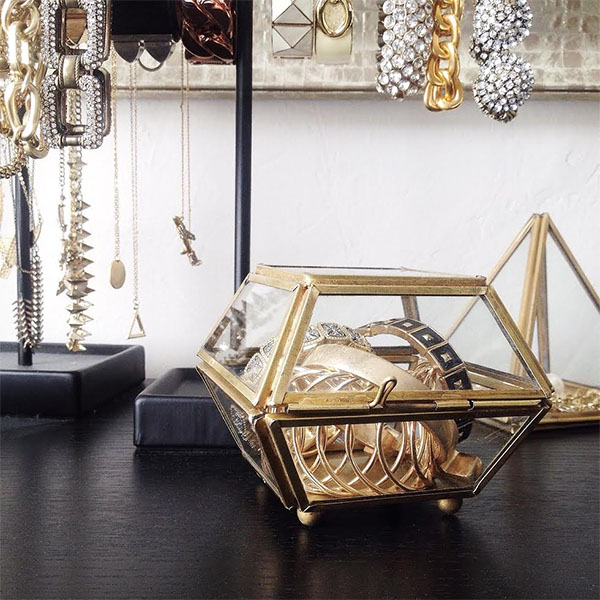 Today’s finds are all over the place, just how I like it. You, too? So much good stuff out there and maybe just enough time to check them out, which I’m hopefully helping you discover some fun and interesting stuff. I’m dying over the edible one, which sounds like a weird attempt at being vague in order to build suspense without overhyping. You’ll have to get there by scrolling through this post.
 A great
 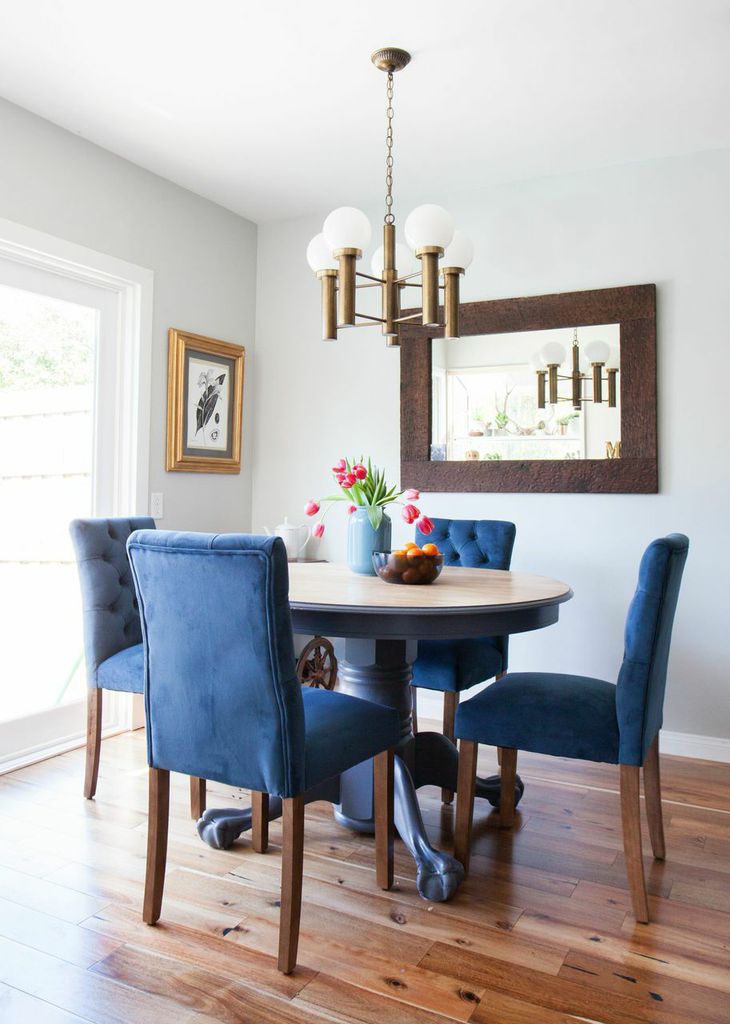 Currently on the hunt for new dining chairs and considering going with color. Really
  Once upon a time, I attempted a nail polish marbling DIY and it went horribly bad. I never shared it because it was hideous, and if I had to point my finger, I’d say it was both using some really old nail polishes and trying to do a million colors at once. I love the way Lidy kept it simple with just black nail polish.
 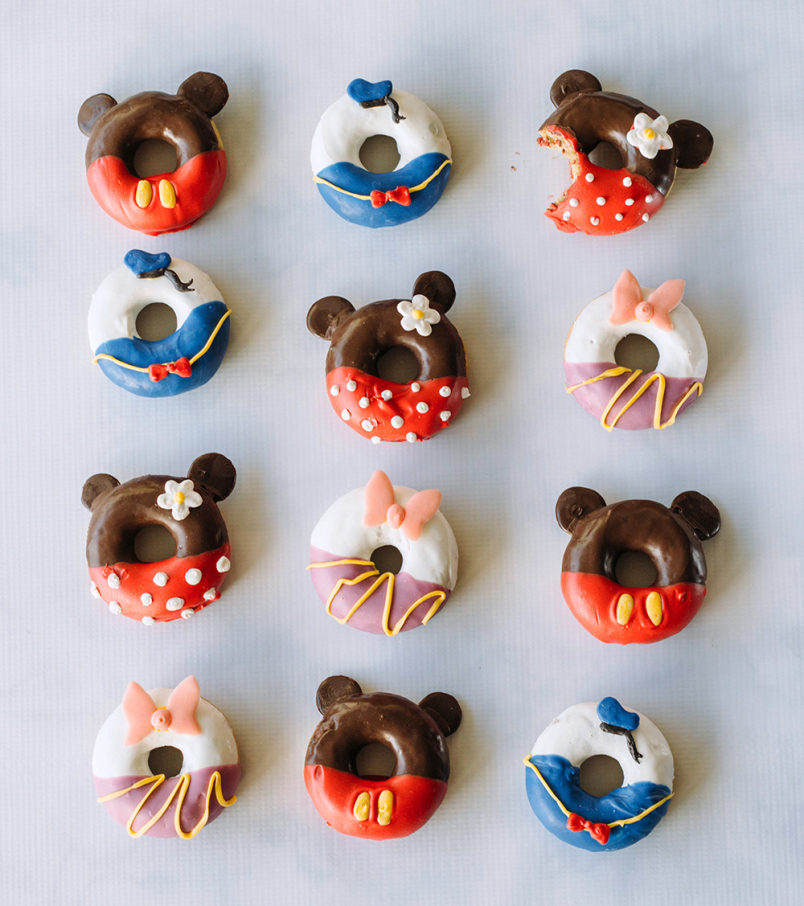 So this donut craze, right. I don’t think I’ve ever felt so strongly about them as I do with these
 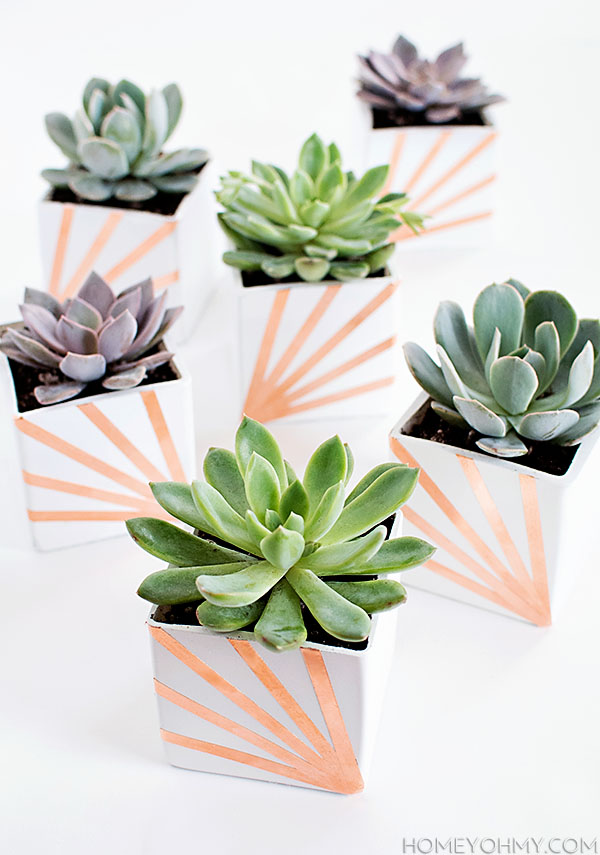 Y’all. Succulents. They’re back. I know, they never went anywhere, but it’s been a while since they’ve dominated the blog. Also thought this would be a good time to replace the ones that didn’t make it through winter (RIP) and to bring just a teeny tiny bit more color into my life. The latter wasn’t a part of the original plan, but like what happens every time I visit a local nursery, I wanted to bring everything home, and this time I was most captivated by these blue and purple ones (let me know how gorgeous they are.)
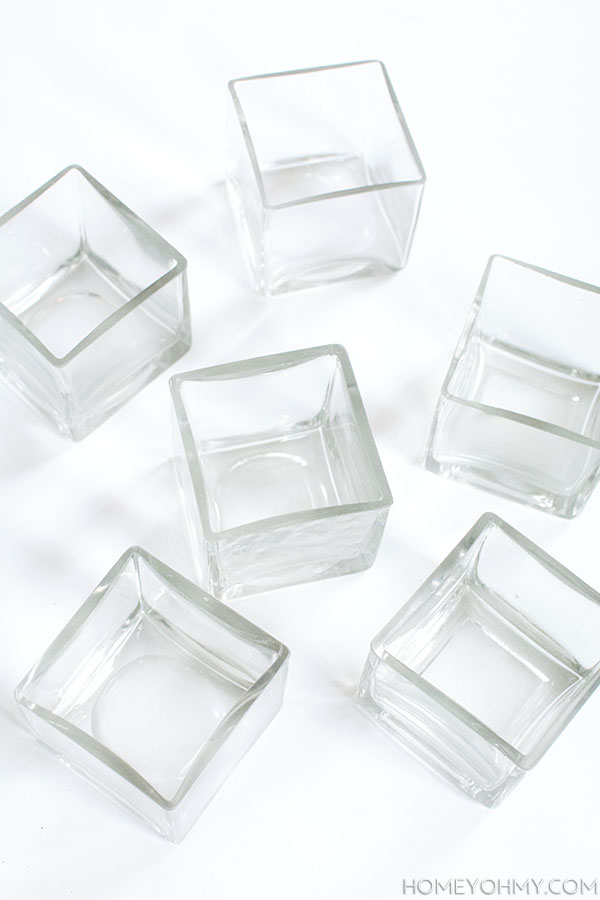 I believe these are meant to be candle holders, but they are just 3″ glass cubes that I wiped down with rubbing alcohol and spray painted white.
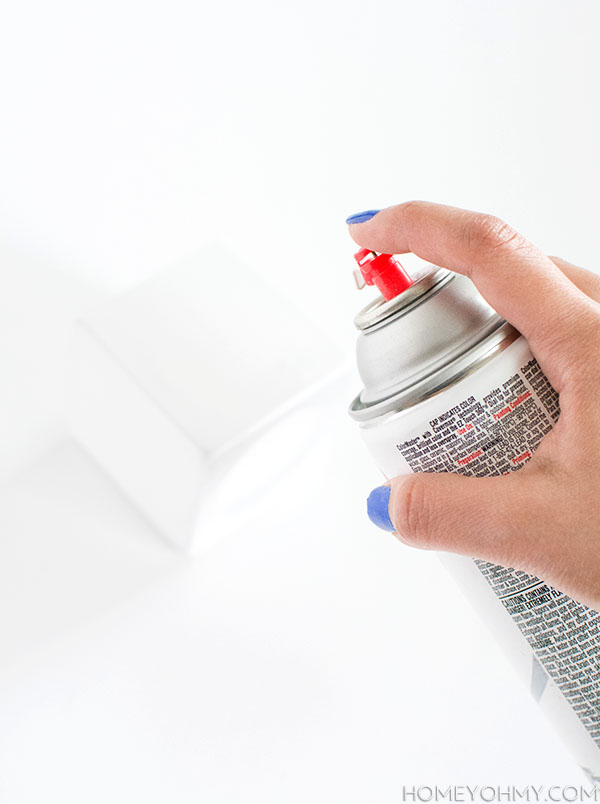 I applied three light coats of spray paint on all outside edges of each cube, waiting one minute between each coat, then finished off each surface with a few light coats of clear acrylic spray for protection. Since the surface is going to be handled in the next step, it’s best to wait 24 hours to let the paint fully dry before moving on (ugh, I know, so boring, but hang in there.)
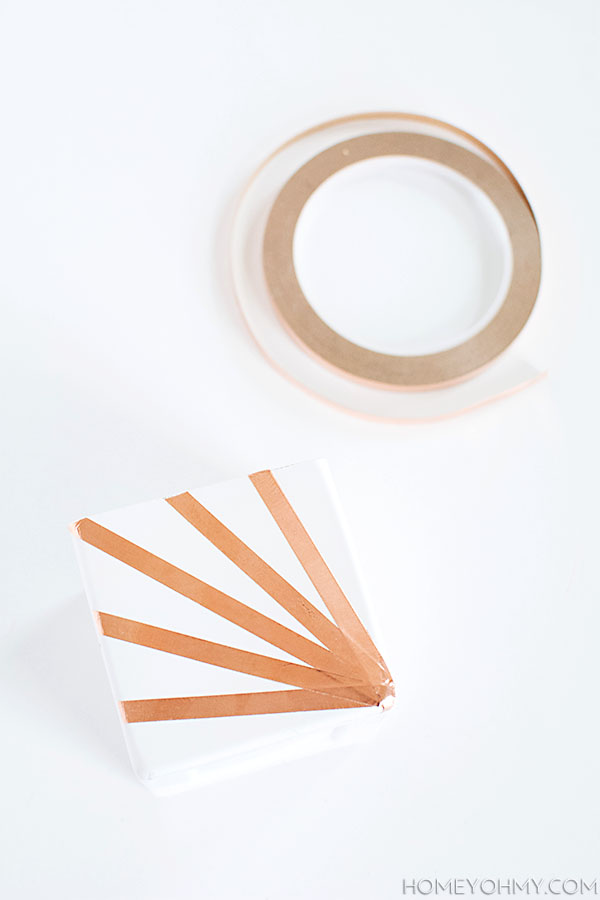 Next, I applied copper foil in this radial design, starting first with the strip in the middle, then the strips on the outside, then the strips in between, smoothing my finger over every piece. After each application, I cut off any foil extending beyond the edges.
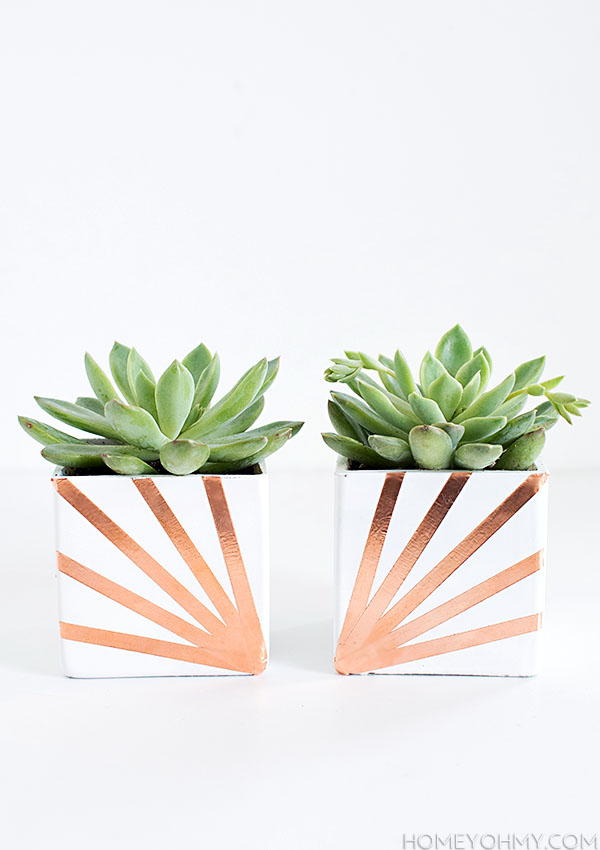 I switched the direction of the design on half the planters thinking it would be cute to pair them up like this. Wouldn’t this set make a pretty sweet gift?
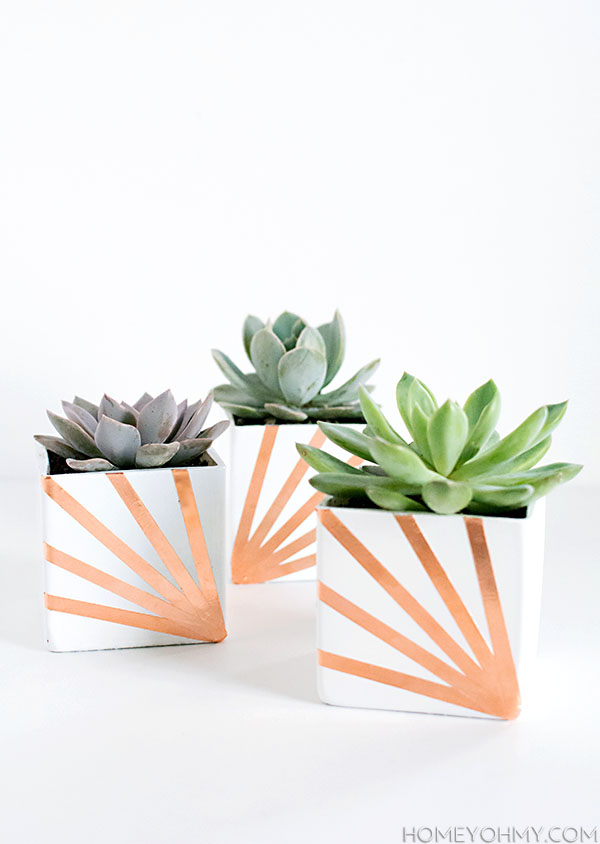
 Here’s a thought. Plants are a great way to bring in color without making drastic design commitments. Flowers are even less of a commitment. I’m thinking this is more of the way I’d want to do color as opposed to going super colorful with decor, especially if I’m experimenting. Whatever the case, Spring is hitting me early this year and has me thinking about color all of a sudden. Check out